How to convert an image to an embroidery file for free
By Julie on May 9th, 2021 This site contains affiliate links to products. We may receive a commission for purchases made through these links.
Looking for FREE embroidery designs and PDF patterns?
Subscribe to the Machine Embroidery Geek newsletter
For tips, how-tos, loads of inspiration and access to the resource library full of free machine embroidery designs and PDF patterns.
Thank you!
You have successfully joined our subscriber list.
Wouldn’t it be cool to be able to stitch out a picture of a loved one using an embroidery machine? Guess what?? You actually can. Using inexpensive and even free software, it is indeed possible to convert an image to an embroidery file. So – get out your iPhones and snap some pics, because I’m going to show you exactly how to do it. But fair warning: converting an image (like to JPG) is not exactly like pressing an easy button. There is a little bit to it and some images will be easier to convert into an embroidery file than others.
Therefore, before I can explain why the whole process of converting an image (like a JPG) into an embroidery file (like a PES, DST, JEF, etc….) is a bit more complex than simply hitting a “convert” button, I need to clarify how images are different from embroidery files. Then I will go into the details of how exactly you can do this type of conversion using some pretty inexpensive (and even free) embroidery digitizing software.
Yes – I know – we all know what an image is. It’s a picture of something. But until the 1980s, most of us probably only considered pictures to be something that we held in our hands after getting developed at the local photo store.
But now we are more accustomed to seeing images on the screen, whether it is on a computer or a tablets, phone, etc… And that image information must be stored on our devices in order for the device to know how to display it. Computers store images (like JPGs) as pixels. A pixel is short for “picture element.” Zoom in on any picture and you will start to see the individual pixels that make up that picture.
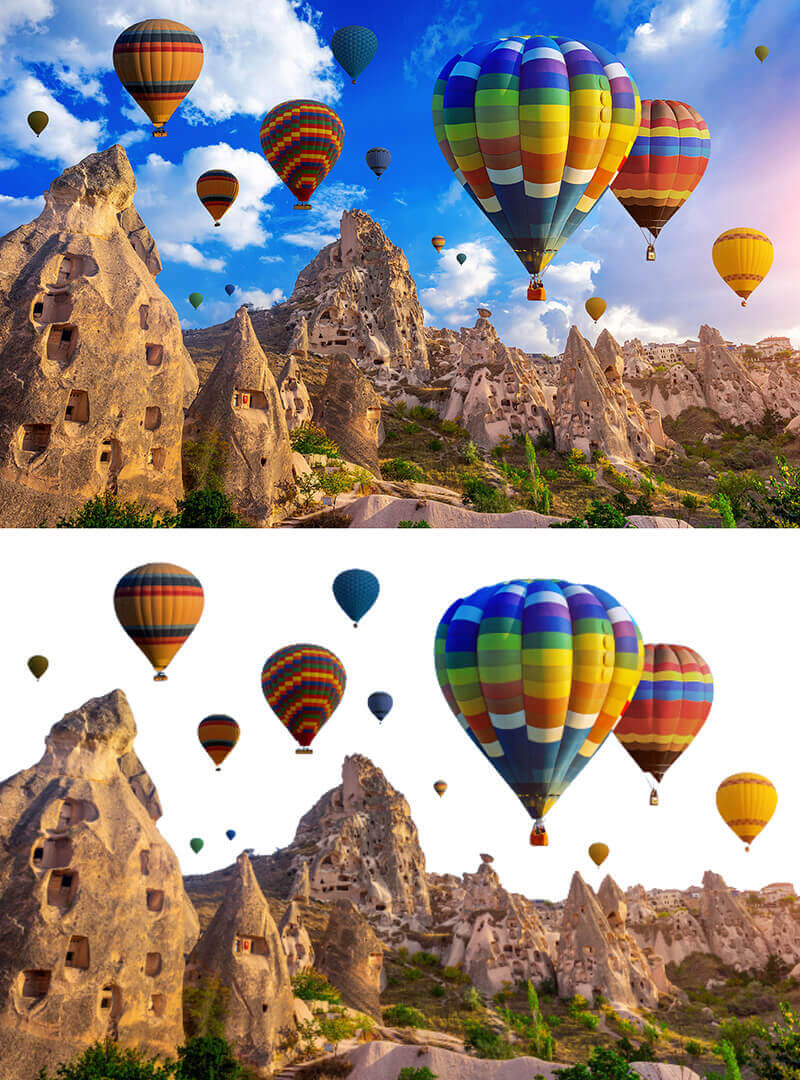
On the left, you can see the picture of a balloon. On the right a small section of balooon blown up where you can see the individual pixels.
One image can be comprised of millions of different colored pixels. Most monitors will support over 24 million different colors so these pixels can be comprised of A LOT of different possible colors! Because pixels can be so many different possible colors, and there are so many of them in an image, pixel-based images do a great job of capturing photo realism.
JPGs
JPGs (or JPEGs) are the most common pixel-based image file format. If you transfer an image from your phone to your computer, it will more than likely be in JPG format. One of the reason why JPGs are so common is because they incorporate compression. So, the quality of them is quite high for the file size compared to their uncompressed counterparts. Another reason why they are so common is because they can be seen within a web browser.
GIFS and PNGS
Other common pixel-based images include GIFs and PNGs. These, too, can be converted into to embroidery files. However, they have some differing properties from JPGs. GIFS and PNG files can both have transparent backgrounds. JPGs do not support transparent backgrounds. Therefore, if you want to remove the background of an image prior to converting it to an embroidery file, you will ultimately need to save it as either a GIF or a PNG file. (More details re: removing the background of an image below).
GIFs differ from PNG files in that GIFs only support 256 colors. Saving an image as a GIF may be a smart first step in reducing an image to fewer colors. Why would you want fewer colors? Fewer thread color changes once you convert the image into an embroidery file.
Vector-based images
Vector-based images differ completely from pixel-based images. A pixel-based image is stored on the computer pixel by pixel – which is A LOT of information. The nature of pixel-based images allow them to produce photo realistic graphics. Vector-based images, on the other hand, are stored on the computer as points and direction lines (vectors). The computer generates the images based on the data. This is why you can scale up a vector-based image and it looks crisp and clean at any size.
On the left is a pixel-based image. You can see that when you zoom in, the edges look pixelated and blurry. On the right is a vector-based image. No matter the scale, the edges look crisp and clear.
The downside of vector-based images is that they are comprised of flat shapes of color. Therefore, vector-based graphics tend to be cartoonish looking instead of photo realistic.
But, when you import pixel-based images into embroidery digitizing software, all the software sees are pixels. Therefore vector-based images are easier to convert into an embroidery file. But if your goal is to turn a picture into an embroidery file then you will need to take some steps to reduce the number of colors to get them to behave more like a vector-based graphic so that you can define different stitch areas.
Vector based images come in a variety of formats such as AI, EPS and SVG, with SVG being the most “importable” one into most digitizing programs.
What is an embroidery file?
An embroidery file differs from both pixel-based graphics and vector-based graphics in several ways. An embroidery file must contain the following information in order for the embroidery machine to stitch it out:
So you can now see why you can’t just convert a picture to an embroidery file with the click of one button. Embroidery files contain different types of information than either pixel-based or vector-based graphics.
Like pixel-based and vector-based graphics, though, embroidery files come in a variety of file formats. Every type of embroidery machine has a format that it reads. For example, Brother machines read PES files. So when you convert a picture into an embroidery file, you will want to save it into a format that your machine will read.
Pixel-based graphics vs. vector-based graphics vs. embroidery files
Pixel-based graphics
Vector-based image
Embroidery file
Contains millions of colors of pixels
Comprised of solid areas of color
Areas and paths of stitches of different types in different order.
Where to find images suitable for converting into embroidery files
There are a lot of different ways to obtain images to convert into an embroidery file. If your goal is to turn a picture of a friend / child / pet into an embroidery design, your photo can come from your phone. Or, you can scan in a photo that you already have printed out.
You can also take any image off of a web page to convert it into an embroidery file. For personal use – this is fine -but probably not a good idea if you are creating an embroidery design to sell.
Before you import any image into your digitizing program, you might want to lower it’s resolution. Sometimes the software doesn’t like working with such a high resolution image. There are many free tools online that will allow you to change the size of a pixel-based images such as: https://www.reduceimages.com/.
What is embroidery digitizing?
Digitizing is the process of creating an embroidery design using software designed for the task. Frequently digitizers start a design by importing an image into the background. In the software, the digitizer defines shapes, lines, etc… and applies different stitch types to these lines and shapes.
A digitizer can choose to digitize a design manually or take advantage of the auto-digitizing features of the software to automatically convert an image into to an embroidery design.
What types of JPGs are easiest to convert to embroidery files?
Keep in mind that the more colors that are in your image, the more difficult it will be to convert it into a suitable embroidery design. Every color will need to be stitched with a colored thread, therefore images that are very dependent on being a variety of different colors will not translate well to an embroidery design.
Some pixel-based images (like JPGs) are easier to convert to embroidery files than others. JPG images comprised of fewer colors that are not intended to be photorealistic are going to be the simplest to convert into embroidery files. This is because they have large areas of solid colors, and the embroidery software can better recognize these as solid fills.
If the image is photorealistic, and image with less detail will be more suitable for conversion to embroidery than one with a lot of detail. Ask yourself, will this image still be recognizable when you significantly reduce the number of colors in the image?
Embroidery Digitizing Books
Removing the background of an image before converting it into an embroidery design
One step you may want to take before you convert an image to an embroidery files is to remove the image’s background. This can be done by painstakingly clicking around the image subject and deleting the background using a program like Photoshop.
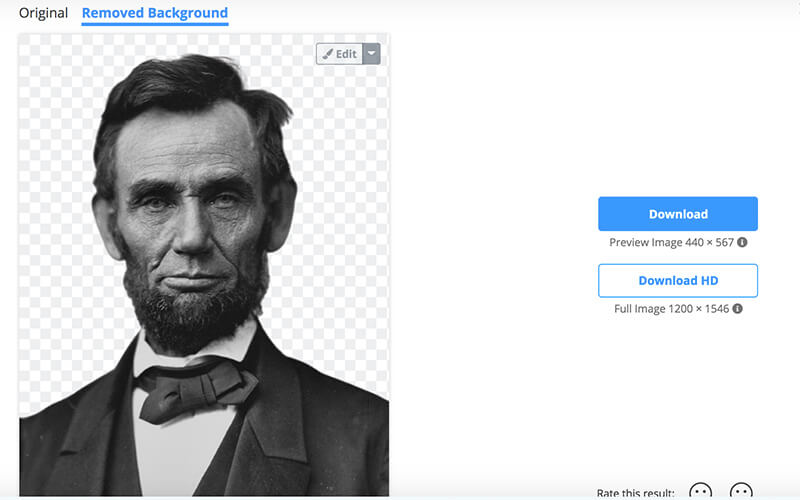
Or, you can use this (incredibly awesome) free tool to do the job for you: https://www.remove.bg/
I am pretty impressed at how well this web-based application can remove image backgrounds – even if the background is not a solid color. This is a great first step for converting your image into an embroidery design.
You can see how I could easily remove the background of this image.
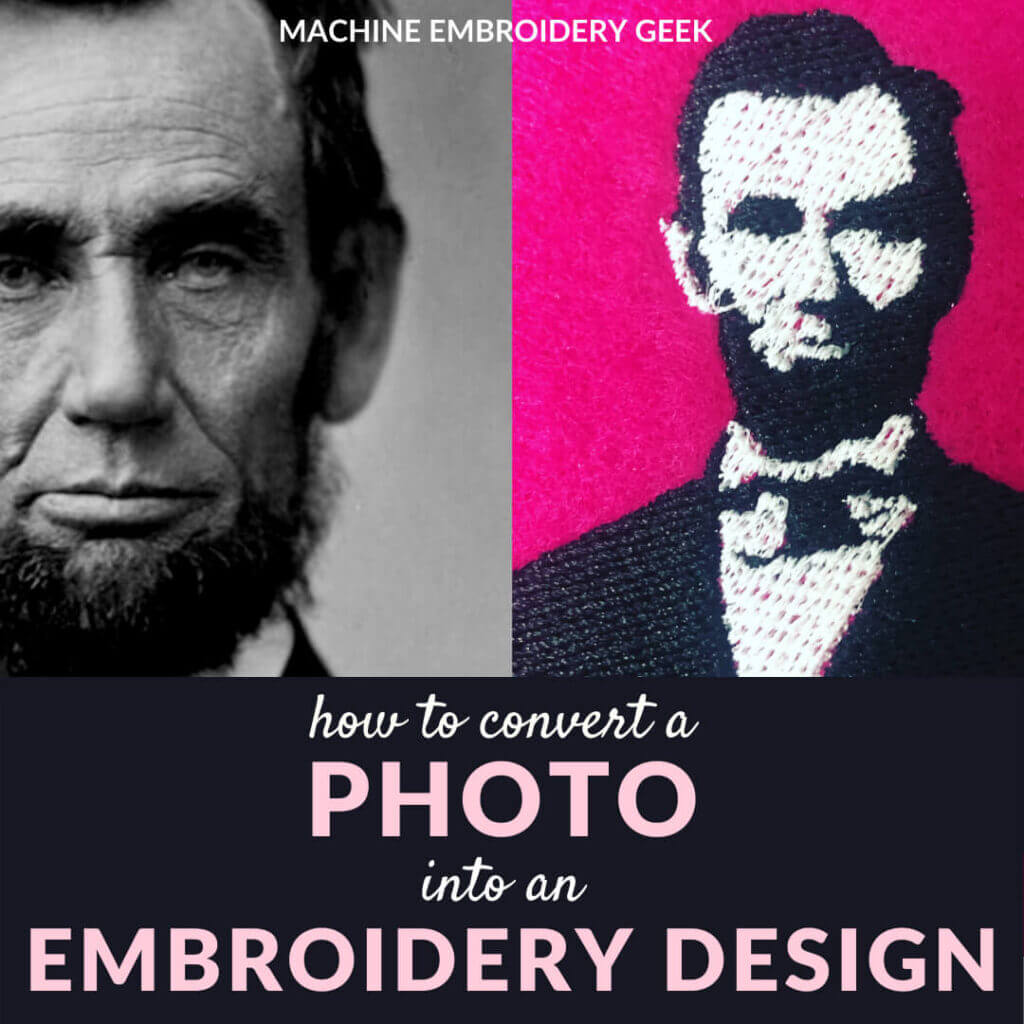
Removing the background was the first step I took prior to turning my Abraham Lincoln image into an embroidery design.
When you use this free tool to remove the background, the program will save it as a PNG file. As I mentioned earlier, this is one of two pixel-based image types that supports transparent backgrounds.
How to convert an image to an embroidery file (using different types of embroidery software)
Almost every embroidery digitizing software has some capability for converting an image into an embroidery design, but SewArt and Inkstitch are the least expensive and free options.
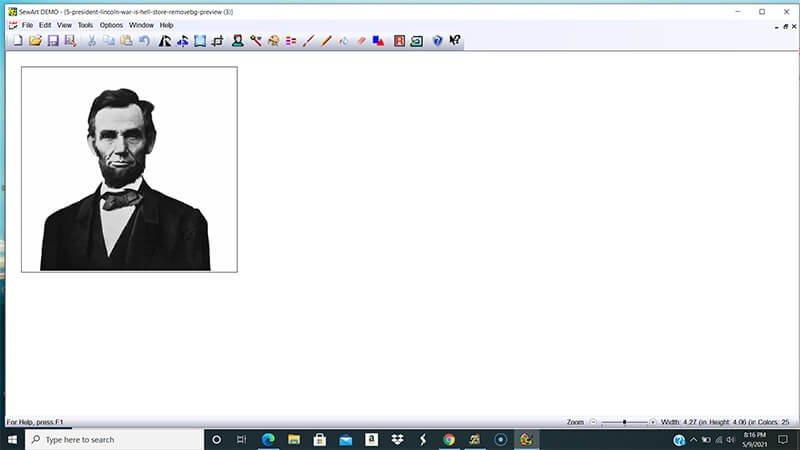
Method 1: Using SewArt to convert a JPG to a PES
SewArt is an inexpensive program that allows you to create embroidery designs from both pixel-based and vector-based graphics.
Open the image
Before you get too far with this process, you may want to duplicate the image you plan to work with. This is because SewArt saves an image as well as an embroidery design. So, any changes you make to the image to reduce it’s number of colors can be written over the original image. It’s always best to create a copy before getting started.
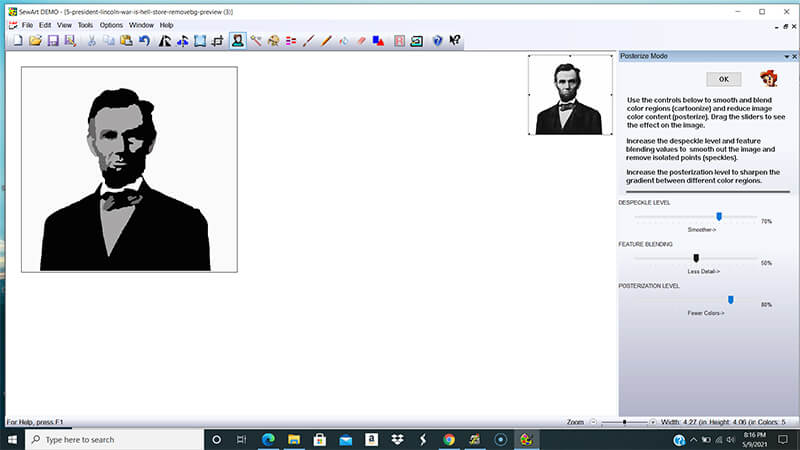
Reduce the colors
Sewart offers a number of tools that allow you to reduce the number of colors in your image. I would suggest starting with Posterize to really eliminate the speckles and get your image to be comprised of flat areas of color.
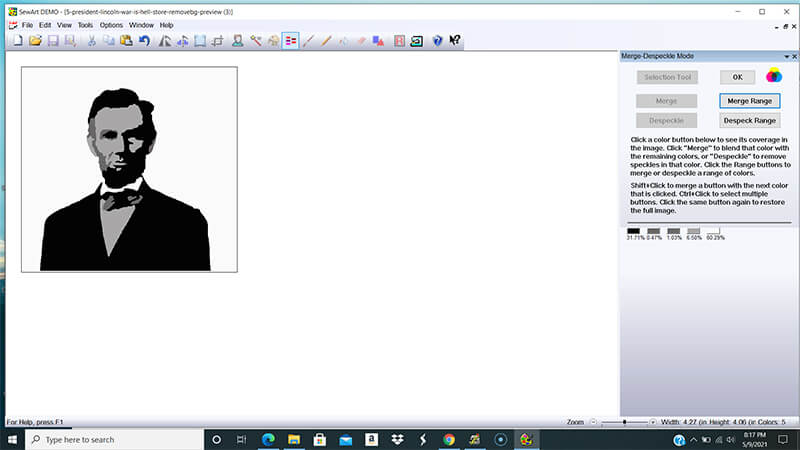
After you have reduced the number of colors in your image, you may need to reduce the number of colors further. Use the Merge colors feature to combine areas of color
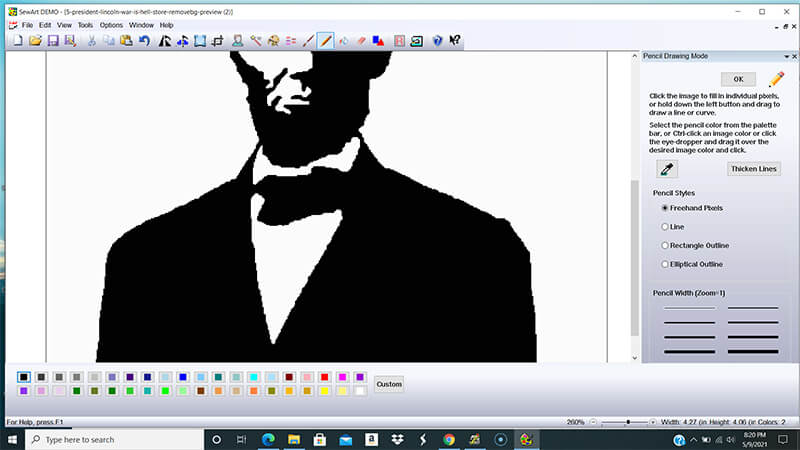
Make your shapes contiguous using the pencil tool. In my image, the white of the color was connected to the background so I colored in a bit more of the jacket up to the beard in black.
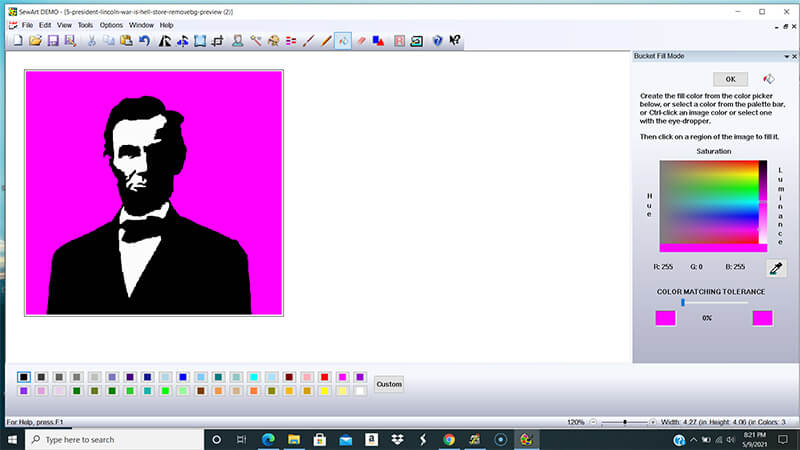
I then used the paint bucket tool to color in the background a contrasting solid color. Making the background a bright pink allowed me to clearly differentiate the background from the rest of the image.
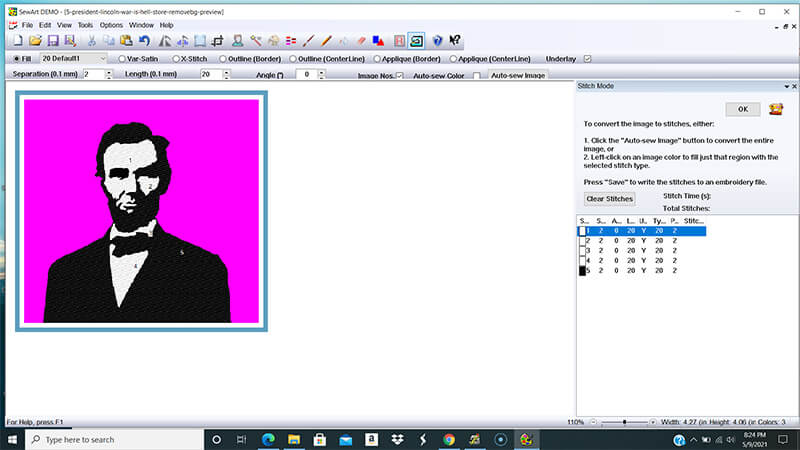
I moved over to the stitch mode and starting defining the different stitch areas based on the colors I defined.
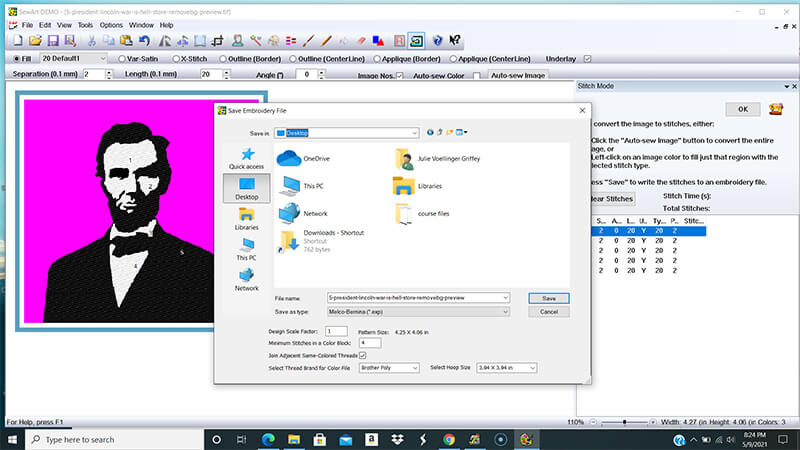
Finally, I saved my design as an embroidery file.
Method 2: Using Ink/Stitch to convert a JPG to a PES
Ink/Stitch is a plug-in for a free vector-based drawing program called Inkscape that converts a vector-based file into an embroidery design. Learn more about Inkscape. I’ve played with Ink/Stitch for quite a while and found it to be a bit finicky. But, after a bit of trial and error, I was able to successfully convert my image into an embroidery design. I did not have nearly the control that I had in Sewart, but I was able to convert my image to an embroidery file using this software with the help of a couple other free resources online.
Step 1 – Convert JPG to PNG
Use remove.bg to remove the background of the JPG and save it as a PNG file.
Step 2 – Convert PNG to SVG
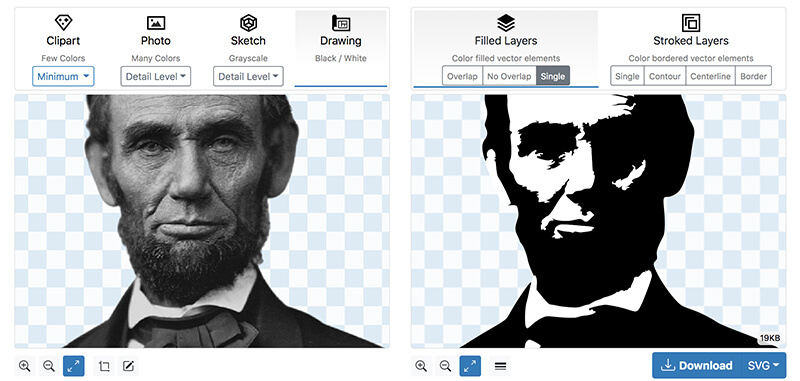
Since Inkstitch is a vector-based program, the first step you will need to take is to convert the pixel-based image into a vector-based image. I did this by importing my PNG file (with the background removed) into a free web-based utility called Vectorizer.
By selecting the “Drawing” setting on the original image, I was able to reduce the number of colors to two. I then selected “Single” under filled layers. And finally, I downloaded the converted SVG file.
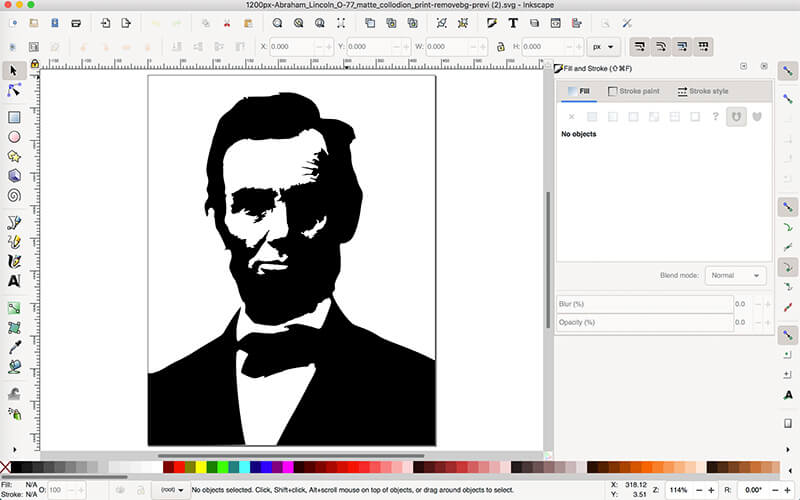
Step 3 – Import SVG into Inkscape, preview and save as embroidery file
I opened the resulting SVG file in Inkscape.
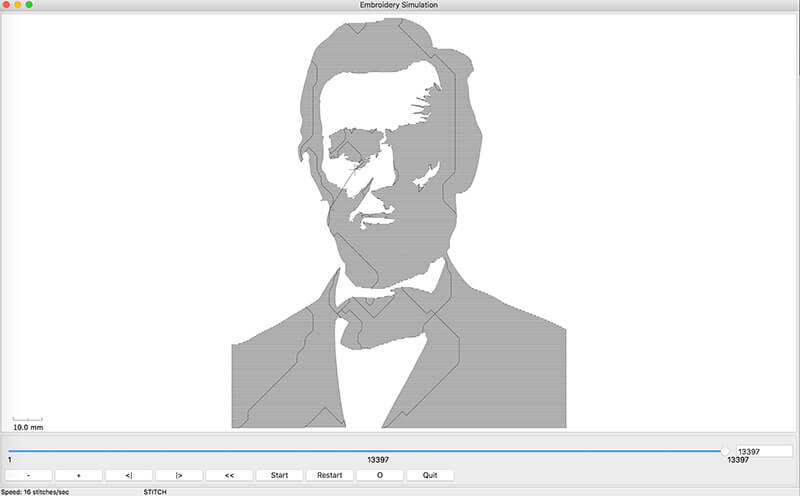
If you want to see a preview of how Inkstitch will convert your image into an embroidery file, go to Extensions -> Inkstitch -> Simulate.
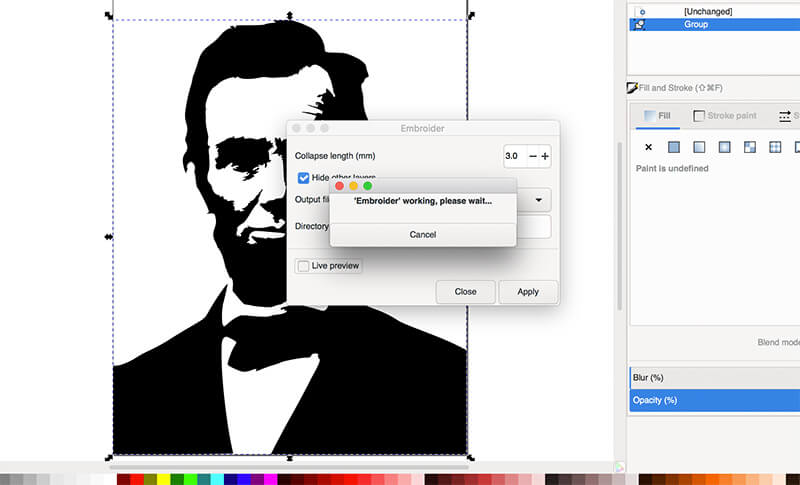
To save the embroidery file, go to Extensions -> Inkstitch -> Embroider. Then you just choose the embroidery file format that you want. I was able to create a PES file so that I can stitch out my resulting design on my Brother embroidery machine.
Additional questions (and answers) about converting an image into an embroidery design
Can you convert a JPG image to an embroidery file for free?
Yes. Ink/Stitch is 100% free. And SewArt offers a free trial, with limitations. Using the trial version, SewArt will only allow you to an export an embroidery file with up to 6 colors.
Can you hire someone to convert your JPG to an embroidery file?
Of course, anyone offering digitizing services, should be able to convert your image into an embroidery design. And any professional digitizer will be able to create a more realistic looking version of your photo as an embroidery design.
Do other embroidery digitizing programs allow you to convert an image into an embroidery design?
Yes! Most digitizing programs offer this functionality. I am just demonstrating the cheapest and easiest way to go.
Good luck! And happy stitching!
XO
Julie
Love free machine embroidery designs and PDF patterns?
my friend is requesting a sepia tone image to be combined with text to make an embroidery for use on jackets (they probably want to make a dozen or more). I can design and position and scale everything as necessary, except my friend is going to use a commercial company to do the embroidery… am I running into trouble by using ink/stitch to provide a finished embroidery file without knowing the commercial company’s process and equipment?
I don’t think that the equipment of the commercial company is an issue. The embroidery file format that their machine reads is most likely on that you can create. Or – you can convert the embroidery design into the format you need if you can’t get it from your software. The question is if the software is sophisticated enough to make a descent looking embroidery design. It might be worth it to just have someone digitize it for you.
I am just starting to adventure on to machine embroidery as a new hobby. I have tried many You Tube videos, but the one that I found most helpful was the course “Master the Machine: Embroider Like A Boss” found on the Machine Embroidery Geek website. The information is comprehensive and so easy to understand. The instructor uses videos, demonstrations, and handouts that you can print off your computer.
And as a bonus, you will get free embroidery designs and fonts, plus step-by-step instructions on completing a few projects. She starts the course with information on buying the best machine that fits your needs and ends with info on how to start your own business. It is worth every penny that you spend on this course, as you will learn the basics that you need to know to master the embroidery machine!!


Can you use WINZIP to convert an embroidery format into an another format?
No – but you can use many other free programs to convert an embroidery file from one format to another.
Can you convert an image from an iPhone to an Exp file to my Bernina 590 machine?
Thank you
You would need to have digitizing software in order to do this. You see – it’s not really a conversion. You can see how I converted a photo to an embroidery design in SewArt.
my friend is requesting a sepia tone image to be combined with text to make an embroidery for use on jackets (they probably want to make a dozen or more). I can design and position and scale everything as necessary, except my friend is going to use a commercial company to do the embroidery… am I running into trouble by using ink/stitch to provide a finished embroidery file without knowing the commercial company’s process and equipment?
I don’t think that the equipment of the commercial company is an issue. The embroidery file format that their machine reads is most likely on that you can create. Or – you can convert the embroidery design into the format you need if you can’t get it from your software. The question is if the software is sophisticated enough to make a descent looking embroidery design. It might be worth it to just have someone digitize it for you.