Disclosure: Some of the links on this site are affiliate links. This means that if you click on them and make a purchase, I may earn a small commission at no extra cost to you. Please know that I only recommend products and services I trust and use myself.
Are you an embroidery enthusiast wondering how to photograph your embroidery projects? I don’t blame you! Photography can have a huge impact on how your products are received. This is especially important if you are selling online where the customer must rely on photographs to be able to learn all they can about your embroidered products, and a good product photo can make or break a sale.
Fortunately, you don’t need a lot of fancy equipment and software to get good photos of your embroidered projects. In this article, I’ll cover tips for capturing perfect shots of your machine embroidered projects. I’ll discuss camera settings such as shutter speed and aperture, lighting techniques, shot angles and composition strategies for the most flattering results. Finally, I’ll show you how to edit your images for maximum impact.
So are you ready to up your photography game? Let’s do it.
Products mentioned in this post
Why photograph your embroidery?
There are several reasons why you might want to photograph your embroidery whether you are a hobbyist or trying to launch your embroidery business. Here are a few benefits:
Showcase your embroidery within online embroidery communities
There are many Facebook groups dedicated to machine embroidery. Often group members share their finished projects and offer encouragement and constructive criticism. Posting your images helps you improve your skills as well as inspire others.
To recall what you have done
It’s easy to forget what you have stitched. Photographing your work can serve as a visual record of all the projects you’ve completed. You may want to refer back to a previous project to recreate a past project.
To build an online portfolio
If you are considering selling your embroidery as a service, an online portfolio is essential for showcasing your work and attracting potential customers. Your portfolio may be a standalone website, a Pinterest board, or simply a folder full of images that you share with potential customers.
To market your products or services
Good product photos can be used for marketing purposes on image-first social media platforms like Instagram, Pinterest and Facebook . People who follow you (or a hash tag that you use when posting your image) will see your photos and potentially want to learn more about you and your products or services.
To increase sales
If you are selling embroidered products, high-quality, well-lit images of your embroidery can greatly impact sales. They give potential customers a clear idea of the quality and design of your product, helping them make an informed purchasing decision.
For personal satisfaction
Sometimes we just want to share our creations with others for the joy of it. Good product photos can help make our projects stand out and be appreciated by a wider audience.
So, no matter what your purpose is for photographing your embroidery projects, it’s important to know how to do it effectively. In the following sections, we’ll discuss some tips and techniques that will help you capture stunning images of your embroidered creations.
How to photograph your embroidery with a DSLR camera vs an iPhone
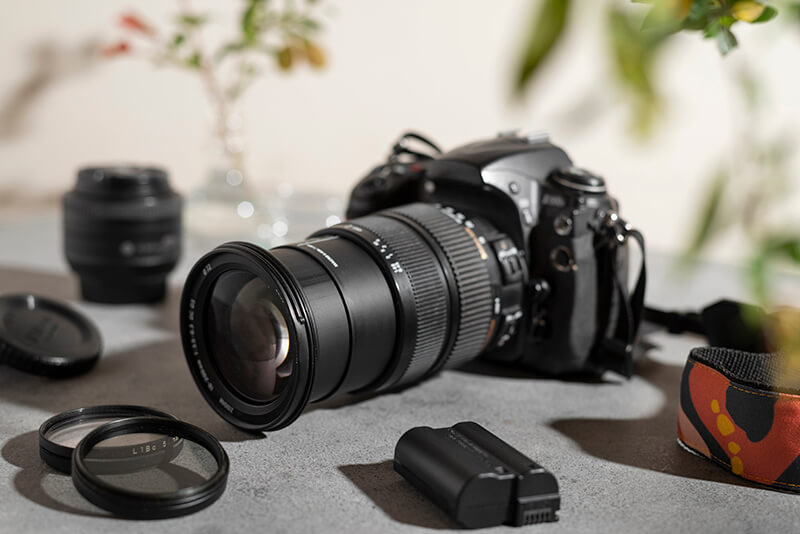
DSLR cameras are considered the gold standard for product photography. They offer many advantages over the cameras built into your smart phone. DSLRs allow you to manipulate shutter speed, ISO and aperture which give you more control over the look of your photography. They also can accommodate interchangeable lenses further expanding your photographic repertoire.
iPhone cameras have evolved significantly over the years, and they, too, can also be used for both print and online product photography. They still don’t have all the manual options offered by a DSLR, but with the right techniques and taking advantage of some of the new, built-in features, you can still achieve high-quality photos when you set out to photograph your embroidery.
Basic DSLR settings and their impact on product photography
While photography can be as complicated or as simple as you want to make it, understanding the basics of DSLR photography will help get your photos looking professional. Here are a few key settings that you should understand if you venture out of automatic mode on your DSLR. Keep in mind that you must change the setting on your camera to work in manual mode in order to adjust these settings.
Shutter Speed
Shutter speed controls how long the camera takes to capture an image. It is measured in fractions of a second. A fast shutter speed can be used to capture action shots, while slower shutter speeds are better for photography in low-light situations.
Typically, you don’t have a lot of motion in product photography (unless you are shooting on a model in motion). Product photography captured with a camera mounted on a tripod in still light can utilize slower shutter speeds such as 1/13 of one second. A slower shutter speed will allow more light to enter the camera and your pictures will be lighter and brighter.
Aperture
Aperture controls how much light is allowed into the camera’s lens and is measured in f-stop. A larger opening is designated with a lower f-stop number. A larger opening will allow more light to enter the lens, which can be helpful when shooting in darker environments.
However, in addition to having an impact on lighting, aperture also affects the depth of field which refers to the relationship of the object you are shooting to the background.
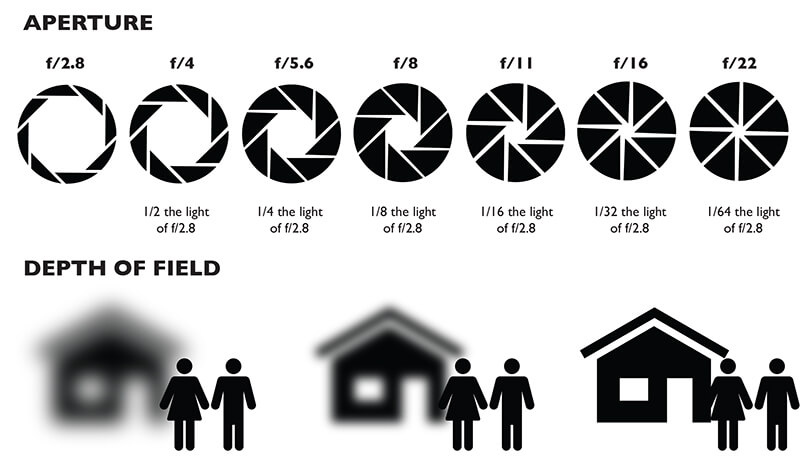
Typically when shooting products, you want a shallower depth of field (lower aperture number), which means that the product itself will be most in focus and the background will be blurred.
ISO
ISO controls how sensitive your camera’s sensor is to light. Higher ISO settings will make the camera more sensitive, which can be useful in low-light photography but can also create grainier shots.
ISO may not be a setting you need to change as you can usually control your lighting when shooting products.
iPhone camera settings and their impact on product photography
Although an iPhone doesn’t have the same settings as a DSLR, there are still some key features that you can use to improve your product photography. Here are a few settings to consider.
Adjusting depth of field
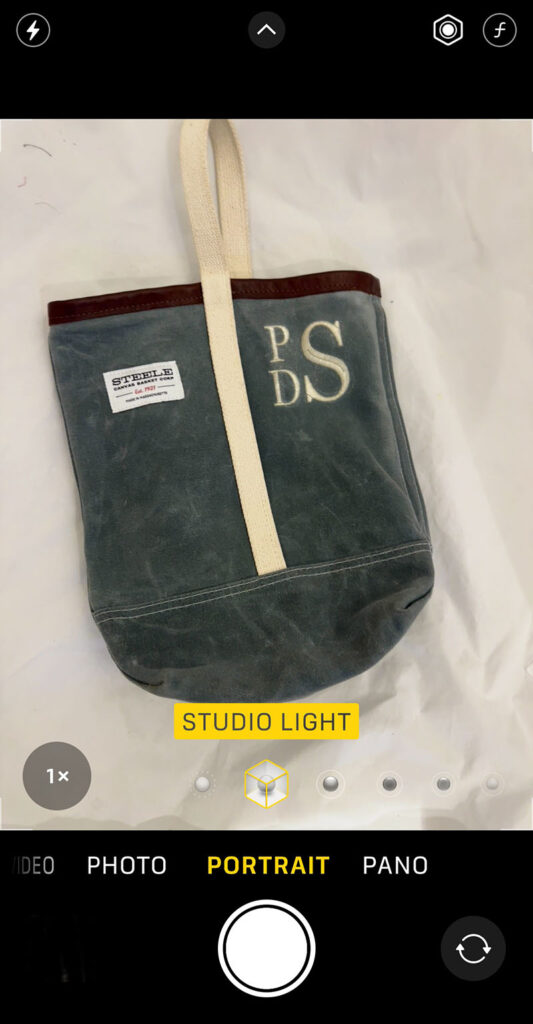
Portrait mode on an iPhone makes the depth of field more shallow. This is helpful when shooting products as you want to make the product itself most in focus with a blurred background. On newer iPhone models, you can even adjust the depth of field even further.
Adjusting focus
It’s pretty easy to specify what part of your image you want to be in focus when shooting on your iPhone. You simply need to tap your finger on the area you want in focus and it will adjust automatically. For more advanced focusing options, you will need a 3rd party app.
Adjusting brightness
On an iPhone, you can adjust brightness with the slider on your camera app that appears after you click to focus. This is a helpful tool for when shooting products in darker environments as you don’t want too much light coming into your lens.
Arranging, positioning, and setup strategies when photographing your embroidery
Stabilize your camera
Whenever you are shooting your embroidered products, it is important to make sure that your camera is steady. A tripod or a stand will help you achieve this. There are varieties made for both DSLR cameras a well as smartphones. While you may think that you are being completely still when taking your pictures, even slight movements can add unwanted blur to an image.
Photograph your embroidery at eye level as well other angles
When shooting your embroidered products, you want to make sure that your camera is at the same level as your product. This will give a more realistic view of what it looks like in real life. However, don’t forget to capture other angles such as overhead, straight on, or at an angle; customers will want a comprehensive view of what they’re purchasing! You may be surprised to see how your embroidery looks when photographed from a different point of view.
Shoot on a white background
Keeping the emphasis on your product has never been easier than with a photo that incorporates a white background. To ensure you get this perfect shot every time, consider utilizing a photography tent for optimal success. Plus, it’s even more convenient to edit afterwards! If you shoot on a contrasting background, your editing software may be able to automatically remove the background.
Experiment shooting on a non-white background
While photography on a white background is great for keeping the emphasis and focus on your product, sometimes it can be fun to experiment with other backgrounds. Try out different backgrounds, or even shooting in a natural setting like outdoors! For example, if you want to emphasize the rustic vibe of an embroidered item, consider shooting it on wood slats.
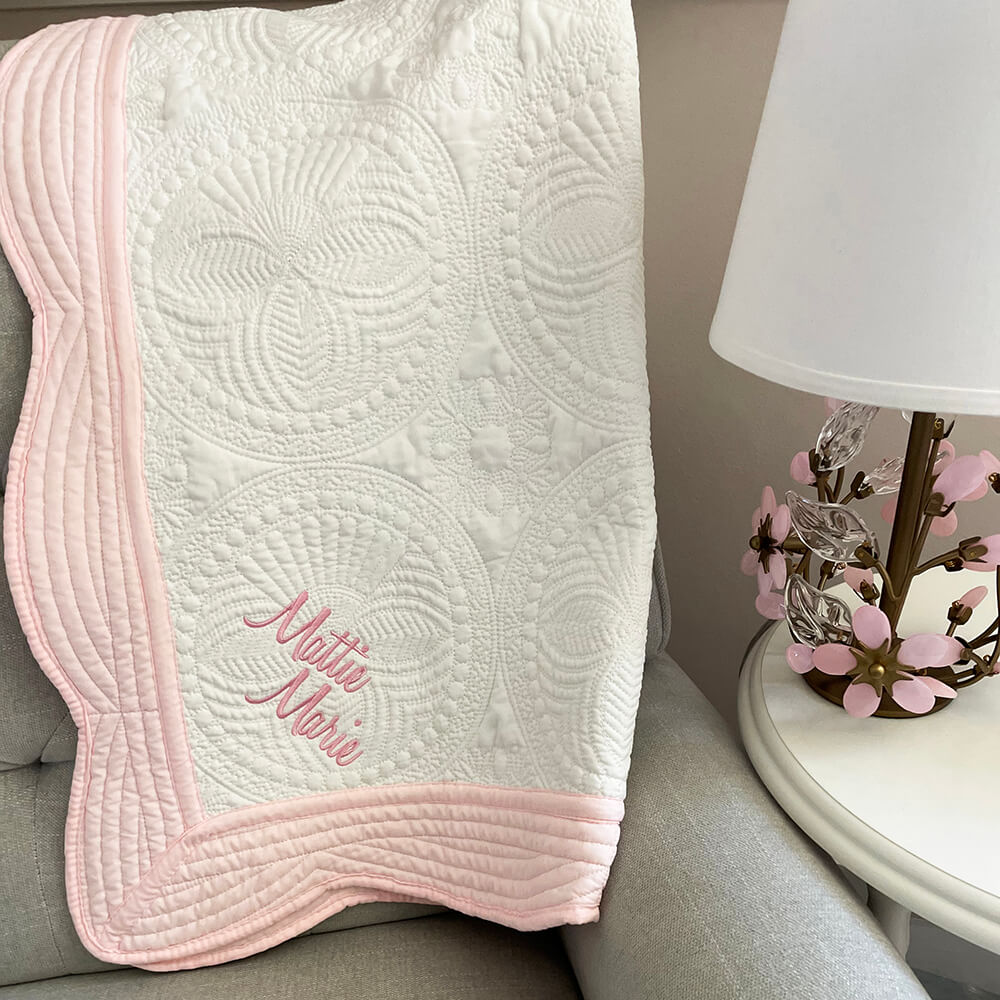
Photograph embroidered products in context (staging)
Rather than just shooting your embroidered items in isolation, think of ways to make it part of a larger picture. For example, you could shoot your an embroidered pillow in a room as part of décor. This will show potential customers how the item can be used in everyday life!
Use models to showcase your embroidery.
Models can be invaluable in helping shoppers to determine size and fit. Seeing embroidered clothing or accessories on a model can help a consumer envision themselves in those items. Models can also be used to clarify the scale of a product.
Before selecting a model, think about your target audience. A shopper who is purchasing the embroidered product should be able to identify with the model.
Lighting techniques for photographing your embroidery
Use natural light
When shooting your embroidered projects, lighting is key for maximum impact. Natural light is ideal when possible as it tends to be the most flattering for photography. Try shooting near a window or outdoors for best results. If the light feels too harsh, hang a sheet over the window to diffuse the light.
Use a light box
When photographing your products indoors, you may want to invest in a light box. A . Light boxes are useful as they diffuse the light and can help you achieve more balanced photography results. Light boxes also provide an easy way to get a clean, crisp, white background.
Use supplemental lights
An inexpensive light kit can do wonders for your embroidery photographs. Position lights on either sides of your light box to brighten the background of your images. This will help remove any shadows and create a softer effect. You can purchase
Bounce your light with reflectors to avoid shadows
Bouncing light off of reflectors can help reduce harsh shadows and create an even exposure. There are photography reflector kits available online that are very inexpensive.
Use a remote or your Apple Watch to prevent shadows
When taking photos of your embroidery, your own body can be the source of shadows in your images. But, you can avoid casting shadows by moving out to the way! If you are using an iPhone and have an Apple Watch – you can control your camera from your watch which allows you to take a picture from a distance. For standard DSLR cameras, you can use a remote shutter release.
Editing your photographs
Once you’ve taken and cropped your photography, now it’s time to edit. Editing allows you to make adjustments such as brightness, contrast, color temperature, and more. Fortunately – you can accomplish professional level photo editing with free and inexpensive tools. You may be familiar with Adobe Photoshop, which is the leading photo image editor on the market, but you can do quite a bit of editing in Canva, GIMP and Photopea.com. Canva is free for some functionality and GIME and Photopea.com are 100% free.
The most common image editing tasks you will likely want to tackle are background removal, color correction, adding filters and effects, and cropping to an appropriate proportion and size.
Removing the background
In some cases, you may want to remove the background of your product photos to create a clean and professional look. Fortunately new features in common editing software programs have one-click “remove background” features. The results are not always perfect but they can be a bit of a shortcut and you can do the rest of the work manually by selecting the background and deleting it.
Color correction
Color correction is an important step in making your product photos appear true to life. You may need to adjust the brightness, contrast and saturation levels to achieve the desired effect. Any image program will offer a basic brightness/contrast slider. However, you can achieve more precise image editing using tools like Levels and Curves.
Adding filters and effects
Adding filters and effects can also help enhance your product photos and create a unique look for your brand. Just be sure to use them in moderation so that the product itself remains the focus of the photo. Experiment with different styles to find what works best for your products.
When editing your embroidery product photos, be sure to keep in mind the style of your brand and the mood you want to convey. Additionally, it’s important to maintain consistency in editing across all of your product photos for a cohesive look on your website or marketplace.
Crop images to the right resolution and proportion.
Every image is comprised of pixels. And your camera (even an iPhone camera) captures more pixels than what you need for e-commerce platforms. If you include too many, the file size will be large and take a long time to download. Therefore, you will want to crop your images before integrating them into your website.
Using the crop tool in an image editing program, you can also control the proportion of the finished image. Some platforms require you to submit images that are 4:5, some 1:1, and there are many other possibilities. To ensure that your images are displayed correctly, be sure to review the image size guidelines of your platform. For example, Etsy encourages sellers to use images with a 2000 x 2000 pixels resolution and 72 dpi.
Compressing your images
Once you have cropped your images to the correct resolution and proportion, it is important to also compress them for faster loading times if you plan to display them on the web. This can be done using the image compression functionality within your image editing program. The goal of compression is to reduce the file size of your images without sacrificing quality.
There are also third party applications that help you compress your images such as tinyjpg.com. It’s free and easy to use.
Ready to photograph your embroidery?
Hopefully now you have learned a few tips for upping your photo game and how this can make a difference in how your embroidery work is perceived. A few tactics like setting up an inexpensive photo studio and trying out some creative staging can make a big difference. You should also now see how photo editing can significantly enhance the visual appeal of your product photos, especially for embroidery products. By utilizing the right tools and techniques, such as background removal, color correction, adding filters and effects, cropping, and compressing images, you can create professional-looking photos that capture the essence of your products and brand.
Want to remember this? Save “How to photograph your embroidery” on your favorite Pinterest board