Disclosure: Some of the links on this site are affiliate links. This means that if you click on them and make a purchase, I may earn a small commission at no extra cost to you. Please know that I only recommend products and services I trust and use myself.
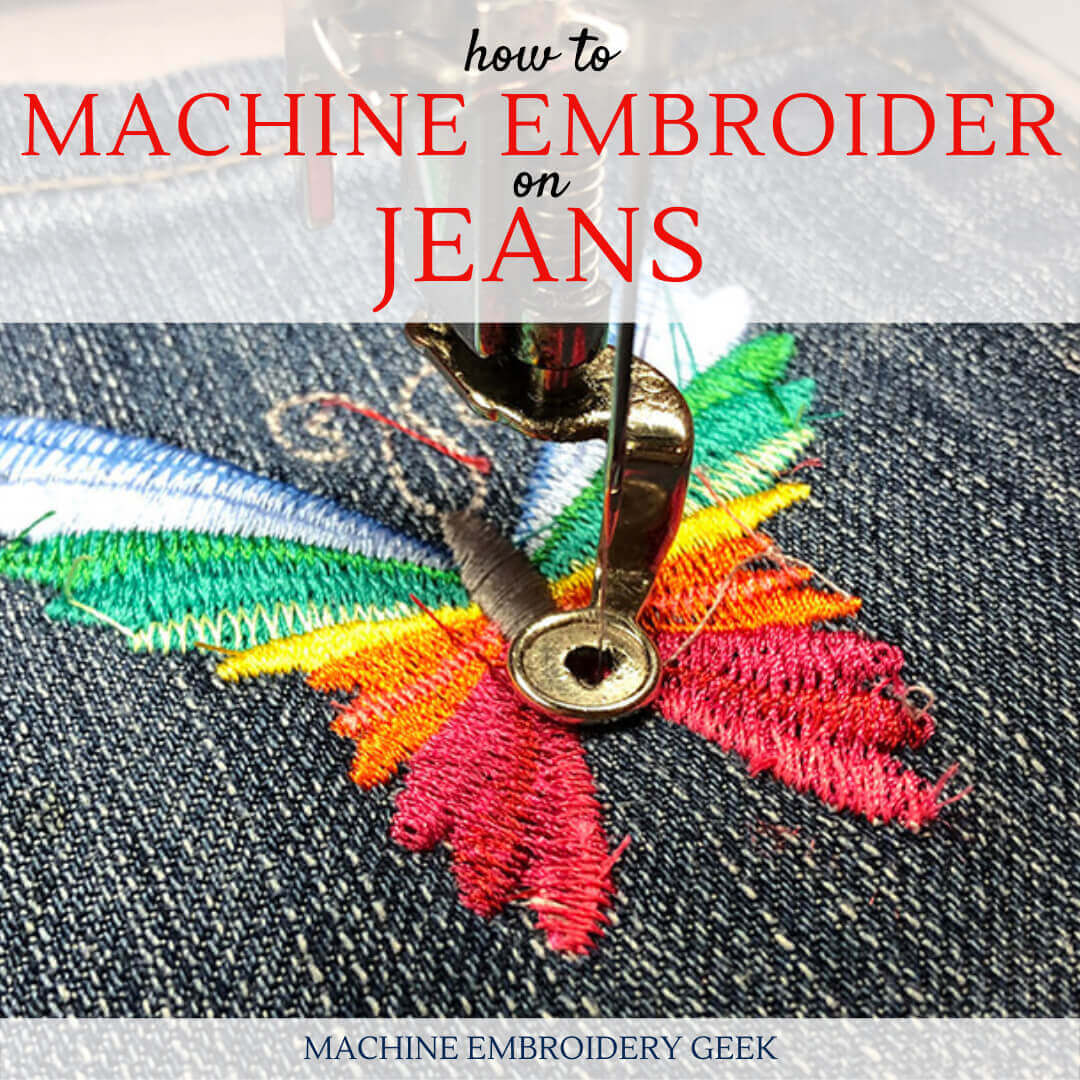
If you love embroidered denim, you may wonder if you can actually use your embroidery machine to stitch out embroidery designs down the leg of a pair of jeans. Machine embroidery on denim is actually not difficult at all. But to machine embroider jeans, you will have a couple of challenges. But – I promise – it’s nothing you can’t handle. And… wait ’til you see how they turn out!
A few years ago I purchased a pair of jeans from Old Navy strictly due to the fact that they had a big and Broadway design stitched out on the upper thigh. Did I love the design? It was OK. Did the jeans fit perfectly? Not really. But, I bought them anyway because I am such a huge sucker for embroidered denim.
Wouldn’t it be great if I could add whatever the heck embroidery I wanted on a pair of jeans then to settle for what was offered off-the-rack?
I decided to give it a try.
Products mentioned in this post
The challenge of machine embroidery on jeans
Here’s the good news. Jeans fabric (denim) is one of the easiest materials to work with on an embroidery machine. I’ve had great success embroidering on several denim skirts. But, skirts are easy because the embroidery area is easy to access. With jeans – not so much.
Where to buy jeans for machine embroidery
Well – you can get a pair of jeans just about anywhere. But if you’re a little bit gun shy regarding how this creative project may turn out, you probably want to spend as little as possible on the pair of jeans. Of course you don’t want to settle for Ill-fitting or ugly denim. The key is to find jeans you actually like without breaking the bank.
At the end of a winter season, stores like Old Navy are practically giving away jeans. I actually – no lie – purchased a pair for $.99 last year! Even during non-sale times you can often strike a great deal on denim every now and then at Old Navy.
[do_widget id=custom_html-58]
Don’t discount Amazon for as a source for inexpensive jeans. Order a few cheap pairs, see what you like, and return the ones you don’t.
If you want to go to super budge on this project, you can do what I did, and pick up a pair of jeans at… drum roll please… yes, Goodwill. The jeans I purchased for this project cost a total of $3.50.
I wasn’t about to use the Goodwill dressing rooms, so I did my best to size up a pair that look like they would fit that also had a basic and very worn look. Fortunately, I totally nailed it: I tried the jeans on after I thoroughly washed and dried them and they fit like a glove!
Where to purchase machine embroidery designs that work well on jeans
There are so many places you could buy your embroidery designs. But, since I wanted to have several designs stitched out on my jeans, I needed to find a collection of designs that were visually related, but weren’t exactly alike. I would have digitized them myself but it seemed like a lot of work
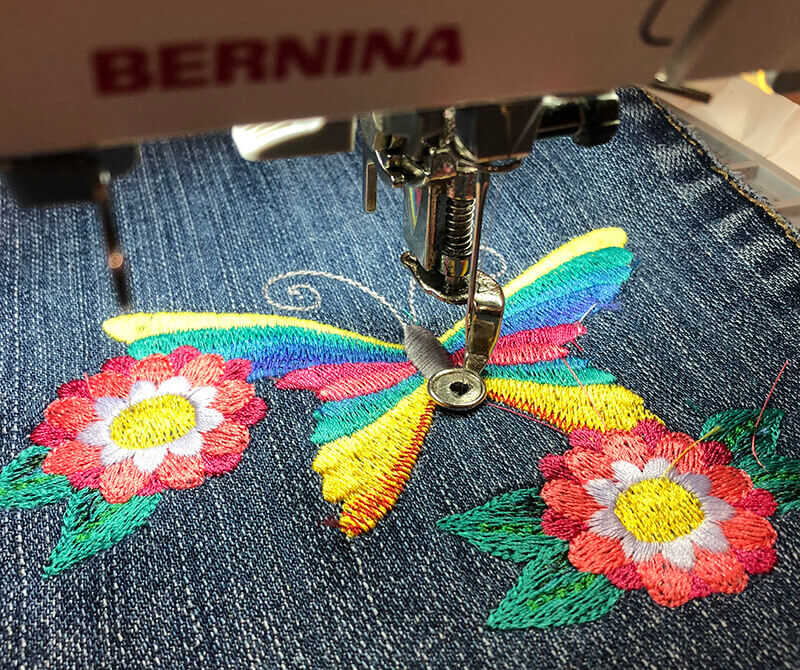
So, I downloaded five or six different similar butterfly and flower designs from the Embroidery Legacy website. Embroidery Legacy has a reputation for producing high-quality embroidery designs. They offer memberships on their site which allow you to download certain ends of designs every month.
Before I found the butterfly designs that I ended up using from the embroidery legacy site, I had considered stitching out several appliqué designs down the leg of my jeans. The beauty of appliqué – especially when you are trying to cover a large area – is that it doesn’t take as long to stitch out. The appliqué fabric covers quite a bit of space so you don’t have to wait so long for all the stitching to be done. Low stitch count + high visual impact.
Planning the placement of the embroidery designs
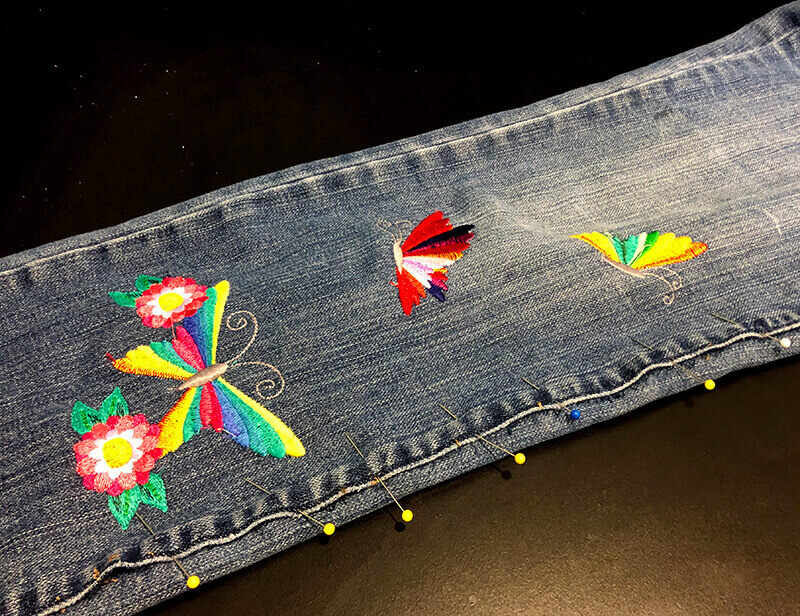
I decided that I would stitch a large design on the left hip front and then stitch several smaller designs on the opposite lower leg. I felt like this arrangement would create a balanced look.
However, in order to access the front of the lower leg I needed to open up the seam of the jeans. Jeans are stitched together pretty securely, so it took a little bit of effort (using a seam ripper) to do so. But, once I had the leg opened up, it gave me a nice large flat area on which I could start my embroidery.

Preparing the denim for machine embroidery.
Once I have decided the location of each of the designs, I ironed a piece of fusible poly mesh stabilizer on the wrong side of the design location.
But, instead of hooping the denim, I floated it. In case you are not familiar with floating, I’ll explain how I did it.
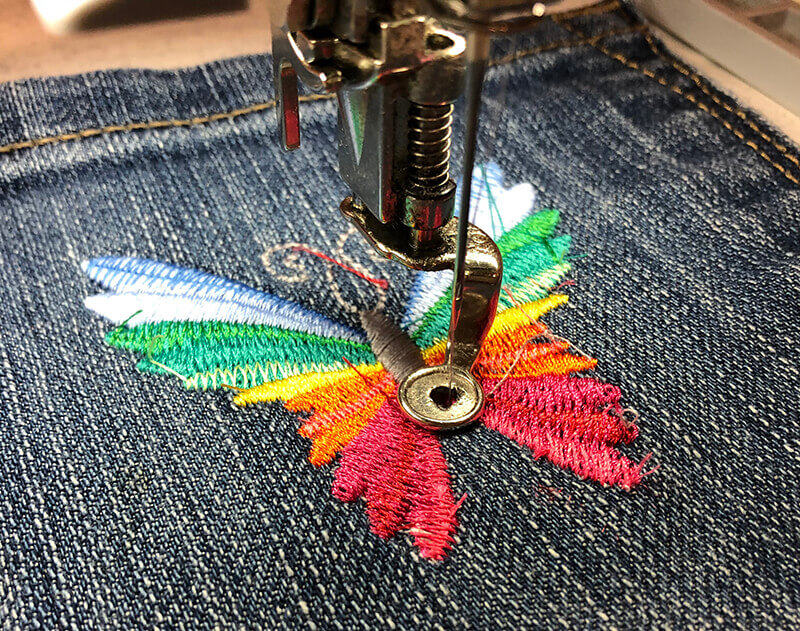
I hooped a piece of sticky back tear away stabilizer with the shiny side up. Then, I use a pin to score the top layer of the stabilizer around the inside edge of the embroidery hoop, creating a tear in the paper. The tear allowed me to peel away the shiny paper and expose the sticky surface. Finally, I stuck my denim onto the hooped stabilizer making a sandwich of (from top to bottom): denim, fusible poly mesh and then sticky back tear away.
Once I had the denim in place, I let the machine do it’s thing. I don’t often stitch out such elaborate embroidery designs, but in doing so, I realized that you really need to pay attention to the suggested colors that are provided with the design. If you’re trying to create the illusion of depth, it will only work if you layer the appropriate colors together. I was a bit too cavalier with my color choices on the first design I stitched out, and I feel like I lost some of that effect.
When choosing colors for each part of the designs, I didn’t try to follow the suggested thread color list perfectly, but I did make an effort to repeat thread colors throughout the different designs to make the overall look cohesive.
After completing each design, I tore my denim away from the hooped stabilizer, patched it and set up the next spot to be embroidered.

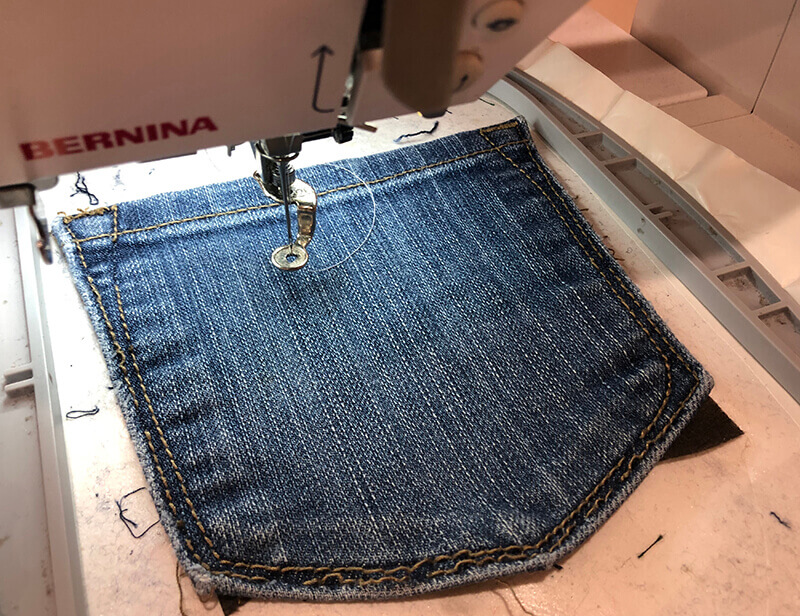
After I completed stitching out the designs on the front of the pants, I felt like the back looked awfully plain. So, what’s a girl to do? I needed to remove the pocket and add a little finishing touch.
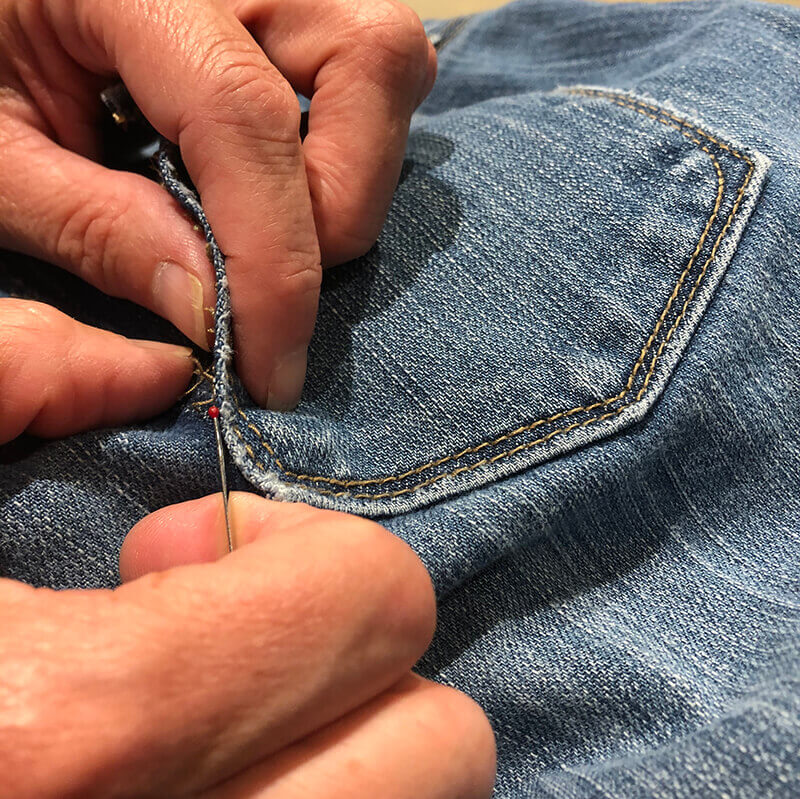
I stitched out one more about a butterfly on the back pocket.
Putting the jeans back together
After you take apart a pair of jeans for machine embroidery, eventually you need to them back together. Unless, of course, you want to start a really weird fashion trend. Fortunately, you can buy thicker gold thread that matches the hue that you typically see in top stitching on denim clothing.
I carefully pinned the legs of my jeans back together and stitched them together. This is not an easy task. It is very easy for other parts of the jeans to get sucked in to your stitching as you go. So, I suggest using a lot of pins and going very, very slowly, making sure you’re keeping only the parts you don’t want to stitch together out of your path.
The pockets were easier to reattach. Again, I just used a lot of pins, went slowly, and tried to follow the path of where the top stitching had been.
To make my jeans look slightly hipper and a bit bohemian, I decided to leave the hem frayed at the bottom. I cut off about an inch along the bottom of the jeans and threw them in the wash to get them to start fraying. It may take a few more cycles to get the full fray effect, but I think it will look great.
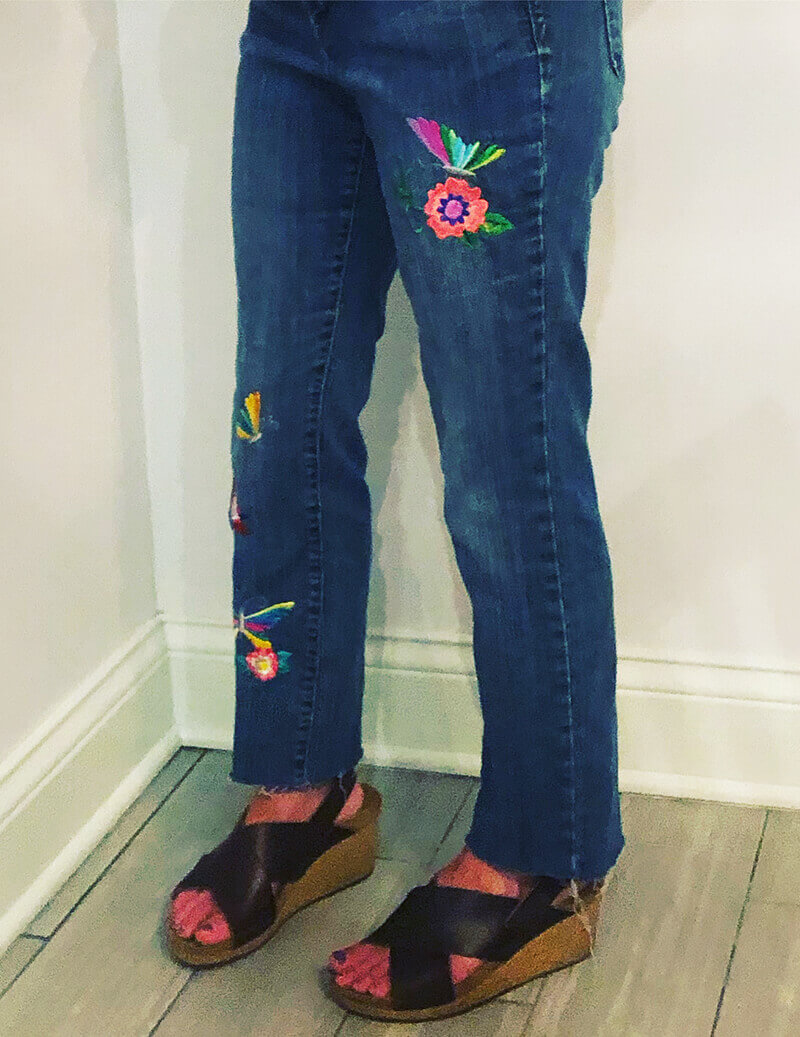
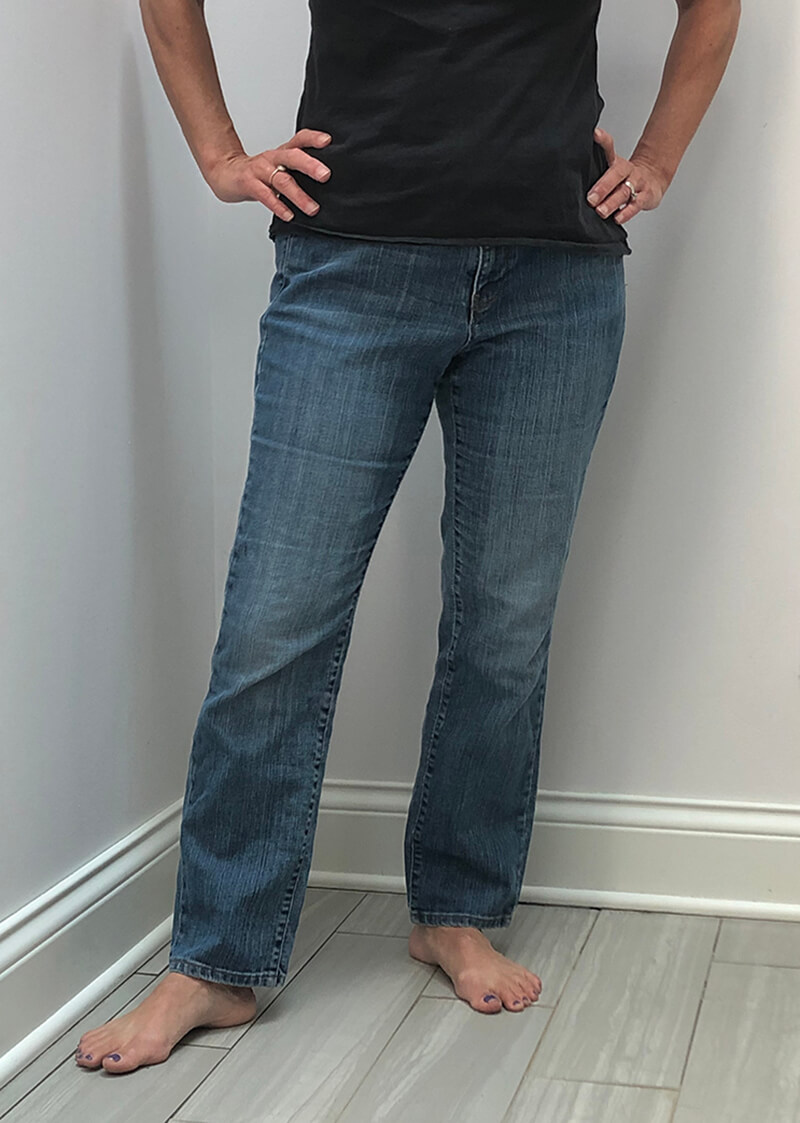
So, what do you think? No more boring jeans, right? These crazy pants are ready to go out and have some fun.
xo
Julie
[do_widget id=custom_html-55]
[do_widget id=custom_html-10]
 Want to remember this? Save “How to machine embroider on jeans” on your favorite Pinterest board.