Disclosure: Some of the links on this site are affiliate links. This means that if you click on them and make a purchase, I may earn a small commission at no extra cost to you. Please know that I only recommend products and services I trust and use myself.
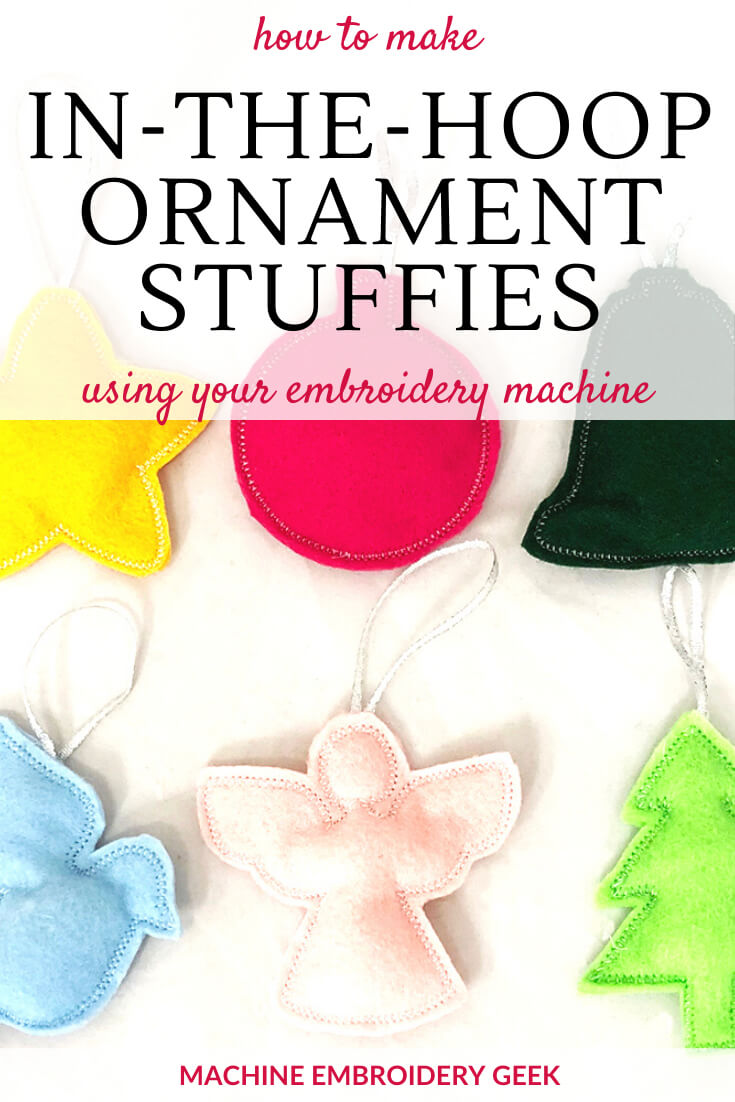
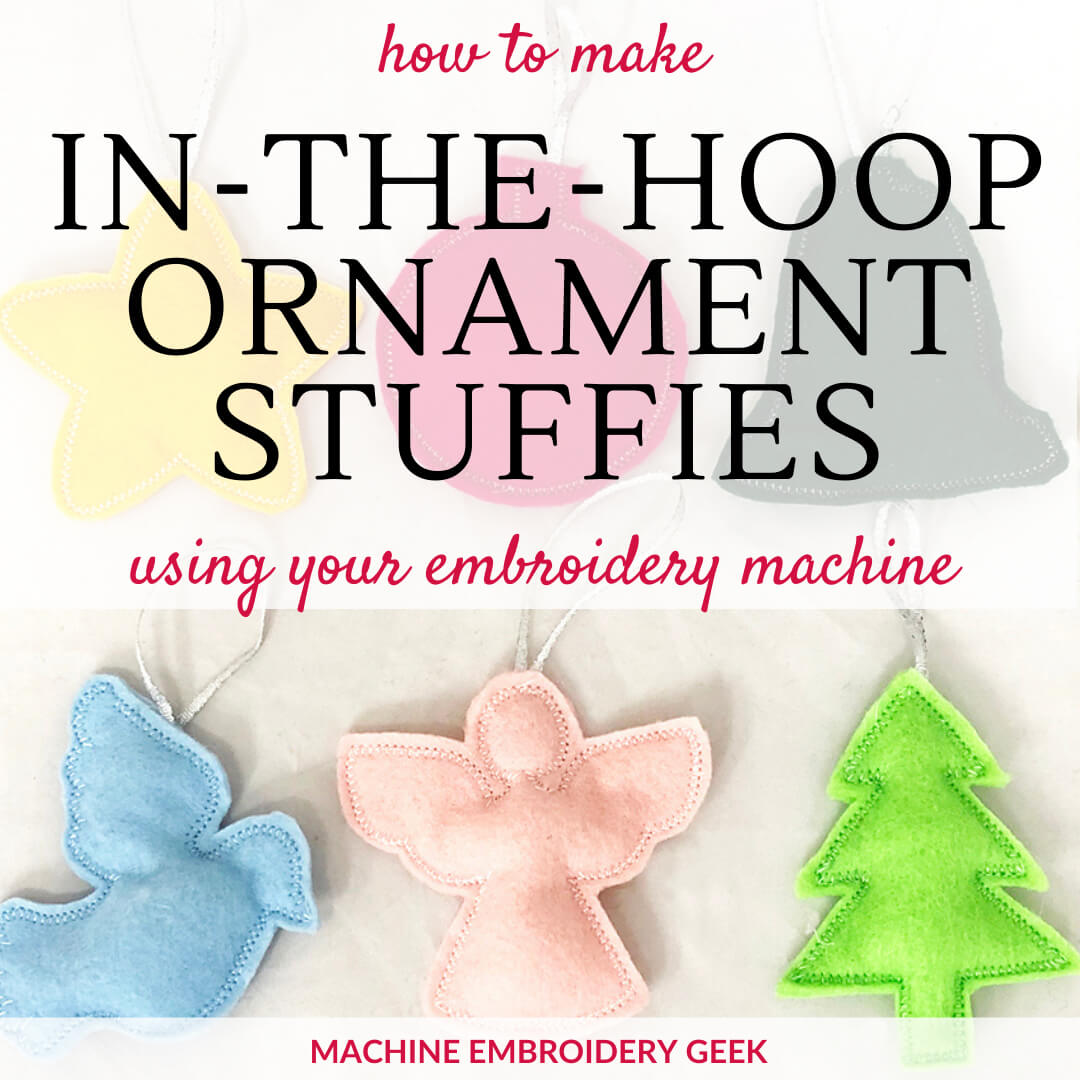
If you need to make a large quantity of ornaments quickly and inexpensively, I have the solution for you. These super basic ornament stuffies inspired by classic Christmas silhouettes come together in a snap. In this post I’ll show you how to make in-the-hoop stuffies using my own ornament design. And, I’ll also point out some additional in-the-hoop stuffie projects to make for the holidays. Hey – I figure – once you learn – you may just want to make more.
Products mentioned in this post
- Felt
- Water soluble stabilizer
- 1/8″ shiny ribbon
- Poly-fil
- Chopstick
- White machine embroidery thread
- In-the-hoop stuffie ornament design classic Christmas silhouettes set
- Tooth stuffie – in-the-hoop design
- Cat stuffie – in-the-hoop design
- Decorated Christmas tree stuffies – in-the-hoop design
- Sweet little bee in-the-hoop baby toy
- Play food stuffies – in-the-hoop designs
What are in-the-hoop stuffies?
An in the hoop stuffie is a project that you can make entirely in your embroidery hoop using your embroidery machine. It’s a lot like a very basic in-the-hoop item called a “feltie,” however, instead of remaining a flat two-dimensional object, it has a three-dimensional shape. And it gets that 3D shape from the Poly-fil material you stuff inside while you are in the process of stitching it out.
You might wonder how you stuff a stuffie while it is on your embroidery machine. Stuffie in-the-hoop designs are made with an opening so that while the project is stitching out you can put the filling inside. Then the final round of stitching closes up that hole. And, you are left with a soft, pillowy item.
There are a wide variety of stuffie in-the-hoop patterns available. You can make anything from little stuffed animals, play food to dog toys. The size of the stuffie you can make is only limited by the size of your embroidery hoop. The in-the-hoop stuffie ornaments that I designed and am using in the demonstration, below, are sized to fit within a 4” x 4” embroidery hoop.
How to make in-the-hoop stuffies
Supplies
Scrap fabric
If you have some scrap felt laying around, you may have just about all you need to make this project. While you don’t necessarily need to use felt for these ornament stuffies, or this particular in-the-hoop pattern, the outside edges of the stuffie will remain raw. So, you probably don’t want to choose a fabric that will ravel quite a bit. While felt fabric does not ravel, I still pinked the outside edges of the stuffie just to give it a more decorative feel. But that can also help prevent fraying if you choose a different type of fabric
Water soluble stabilizer
For this project, water soluble stabilizer is absolutely essential. The stabilizer will span the entire back of the ornament, so you will definitely want it to go away when you’re all done. And that is the beauty of water soluble stabilizer, you can simply wash it away.
Thin ribbon or cording
In the following project we will integrate a little loop of very 1/8″ shiny ribbon at the top, so that we can hang up the ornaments when we are done. Alternatively, you can use some decorative coding or even scrap fabric if you want to cut it into strips and like that look.
Poly-fil
Honestly, you need very little Poly-fil for this particular project. Fortunately, I had a half open bag that I pilfered a few pieces from in order to make these ornaments. But, if you don’t have any lying around, you could also use cotton balls for stuffing if you pulled them apart a little bit.
Chopstick
A chopstick is the perfect tool to push stuffing into your ornament. However, you could also probably use a pencil as it doesn’t matter if you get a few markings on the stuffing as you’re pushing it into your ornament. I would just use a dull pencil as you just don’t want to poke a hole into your fabric.
Machine embroidery thread
I used white machine embroidery thread for this entire project which is one of the reasons why the project went so fast – no changing thread colors!
In-the-hoop stuffie ornament design
In order to make the ornament (shown below), you will need the in-the-hoop stuffie ornament design classic Christmas silhouettes set sold on this site.
Steps
Change your bobbin thread
The first and probably one of the most important steps you do is to change your bobbin thread to match your top thread. Since ornaments are visible from both the front and back, you want your ornament back to look just as good as your front.
In my example, below, I did all of the stitching with white embroidery thread, so I simply changed my bobbin to be a white thread that was the same as my top thread. I suppose I could’ve used white embroidery bobbin thread, however since it’s a bit thinner than regular embroidery thread, I thought it might look different on the back than the front.
Prepare your embroidery hoop
Hoop a piece of water soluble stabilizer making sure that it is quite tight.
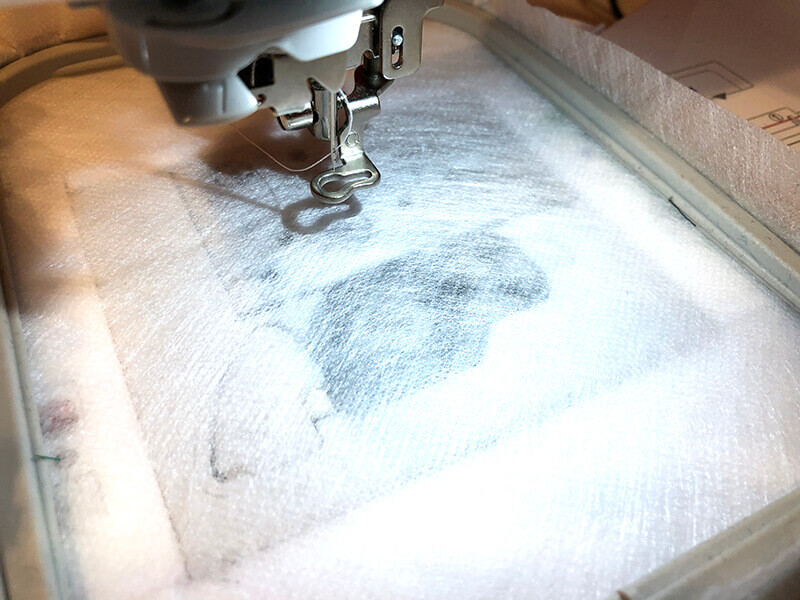
Load in your embroidery design
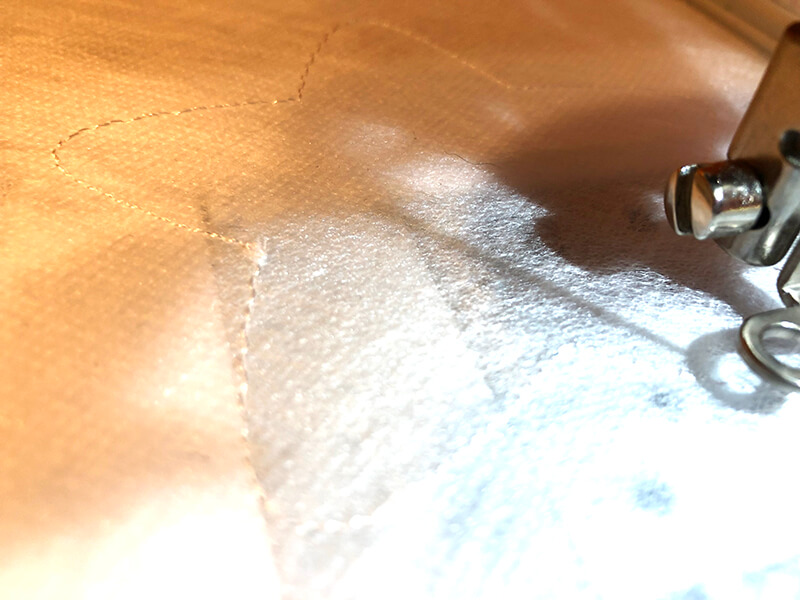
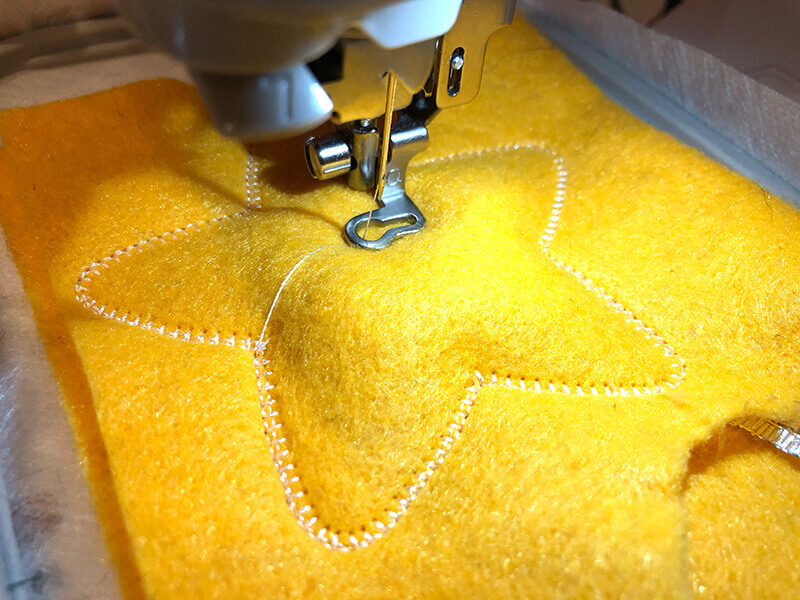
Start stitching out your first thread color. This first round of stitching is simply a placement line to show you where to lay down your fabric.
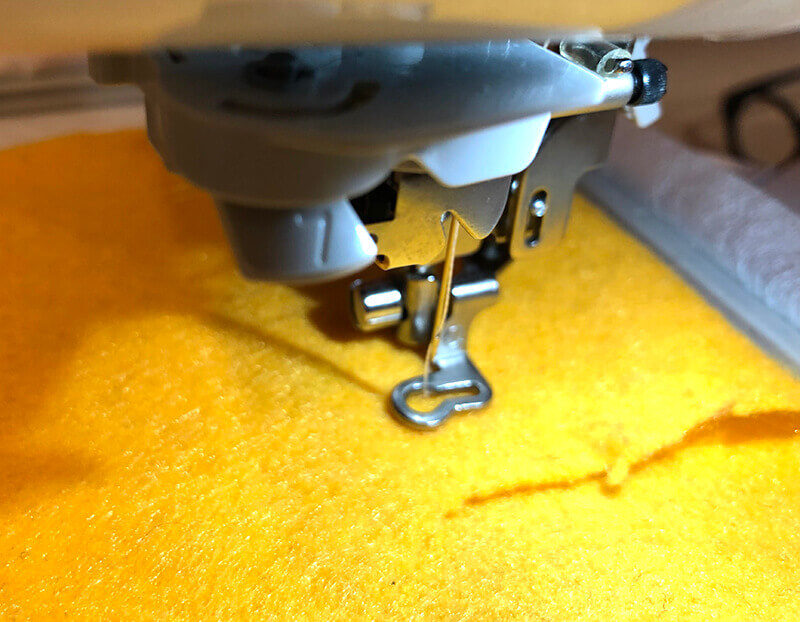
Float both pieces of your fabric on your stabilizer and insert your ribbon loop
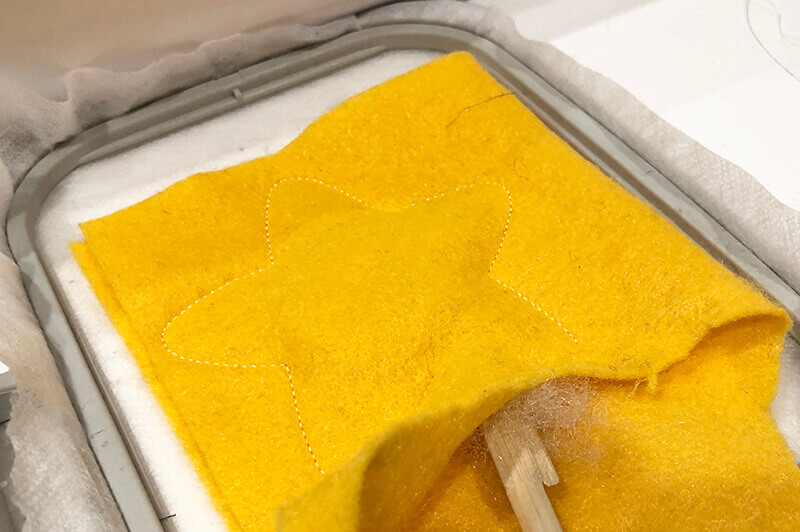
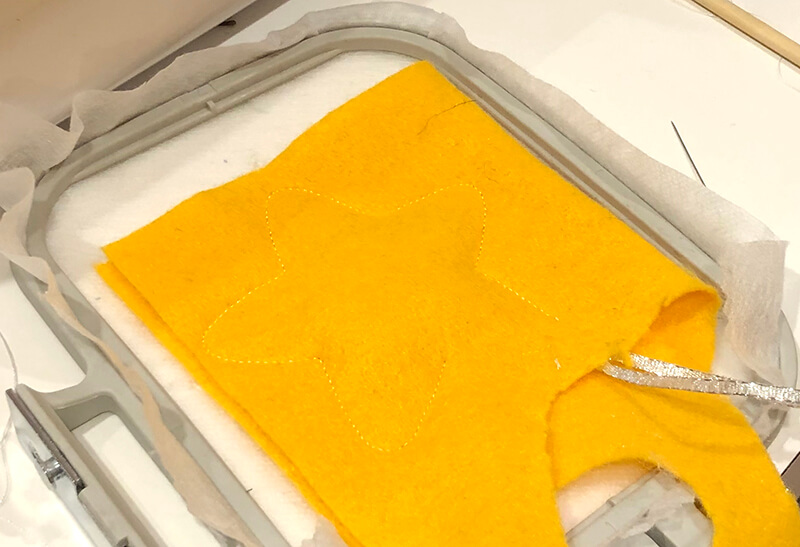
Now lay down two pieces of felt (or whatever fabric you are using) on the hooped stabilizer, completely covering the placement stitching. If you are using fabric that has a distinct front and back, make sure that the pieces have their wrong sides together. So, for the bottom piece, the right side of the fabric should face the stabilizer. And for the top piece, the right side of the fabric should face out.
Secure your ribbon loop between the two layers of fabric making sure the loop extends out about 2″ from the placement stitching. Tape it down inside the shape.
Start your next round of stitching.
This next round of stitching will be similar to the placement line. The difference is that the stitching will not encompass the entire silhouette. There is a gap left in the stitching.
Stuff your stuffie
You are now ready to stuff your stuffie. For this step, you can either remove your embroidery hoop from your embroidery machine or you can stuff while the hoop is in place. Either way – do this part very carefully so that you do not inadvertently pop your stabilizer out of your hoop. Very gently push a bit of stuffing into your hooped project through the opening between the two layers of fabric. Use a chopstick to help you push the stuffing into all areas of the ornament.
Tape a small ribbon loop between the two layers of the fabric so that the ends are encased inside the two layers of fabric and the loop extends about 2 inches beyond the top of the ornament.
Stitch your final round of stitching
If you have removed the embroidery hoop from the machine, gently place it back on the machine. Then start your final round of stitching.
Cut out your stuffie
When all the stitching is done, you are ready to cut the ornament away from the stabilizer. You can trim the fabric away cutting two layers at once until you get to the top where the loop comes out. In this area, you will want to trim the front and the back separately so that you don’t cut off the loop.
All done!
Hang your new stuffie ornament on your Christmas tree.
Want to personalize this stuffie?
You can easily add a name or monogram to these ornaments. Here’s what you need to do. When the placement stitching is done – just lay down the top layer of the ornament. Stitch out your name or monogram. Then tape the back of the ornament to the BACK of the hooped stabilizer with the right side of the fabric facing out. Start the next thread color which will connect the front and the back, leaving a hole for stuffing. Using this method will mean that the stabilizer is encased inside your ornament, but it will still be stuffable.
Other in-the-hoop stuffie projects
As I mentioned, there are a lot of other in-the-hoop stuffie patterns available. Many of these projects are ideal for holiday decorations and even gifts. Here are some of my favorites.
In-the-hoop tooth stuffie
Talk about a multi-purpose little stuffie. This in-the-hoop tooth stuffie is a cute little cuddly character with a pocket for lost teeth. If you aren’t up for making a full fledged tooth fairy pillow, this one will be much quicker to make.
In-the-hoop cat stuffie
Here’s an in-the-hoop cat stuffie that is comprised of multiple parts. Once you put all the components – you have a floppy cat with an attitude.
In-the-hoop decorated Christmas tree stuffie
You can make these in-the-hoop decorated Christmas tree stuffies in a few different sizes. You can use them as Christmas decor or add a loop and hang them on your Christmas tree.
In-the-hoop bee baby toy stuffie
This sweet little bee in-the-hoop baby toy reminds my of one of my daughter’s favorites when she was little. The great thing about making these little baby toys is that you can easily embroider a name on the back which might help it from getting lost.
In-the-hoop play food stuffies
Why buy cheap, plastic play food when you can make it yourself from felt? These in-the-hoop play food stuffies look like the real deal and are soft and cozy to play with
Feeling inspired?
In-the-hoop stuffies are fun and easy to make. Whether you need some Christmas decor or a full-fledged gift, an in-the-hoop stuffie might just be exactly the project to make.
xo
Julie
Want to remember this? Save “How to make in-the-hoop stuffies” on your favorite Pinterest board