Disclosure: Some of the links on this site are affiliate links. This means that if you click on them and make a purchase, I may earn a small commission at no extra cost to you. Please know that I only recommend products and services I trust and use myself.
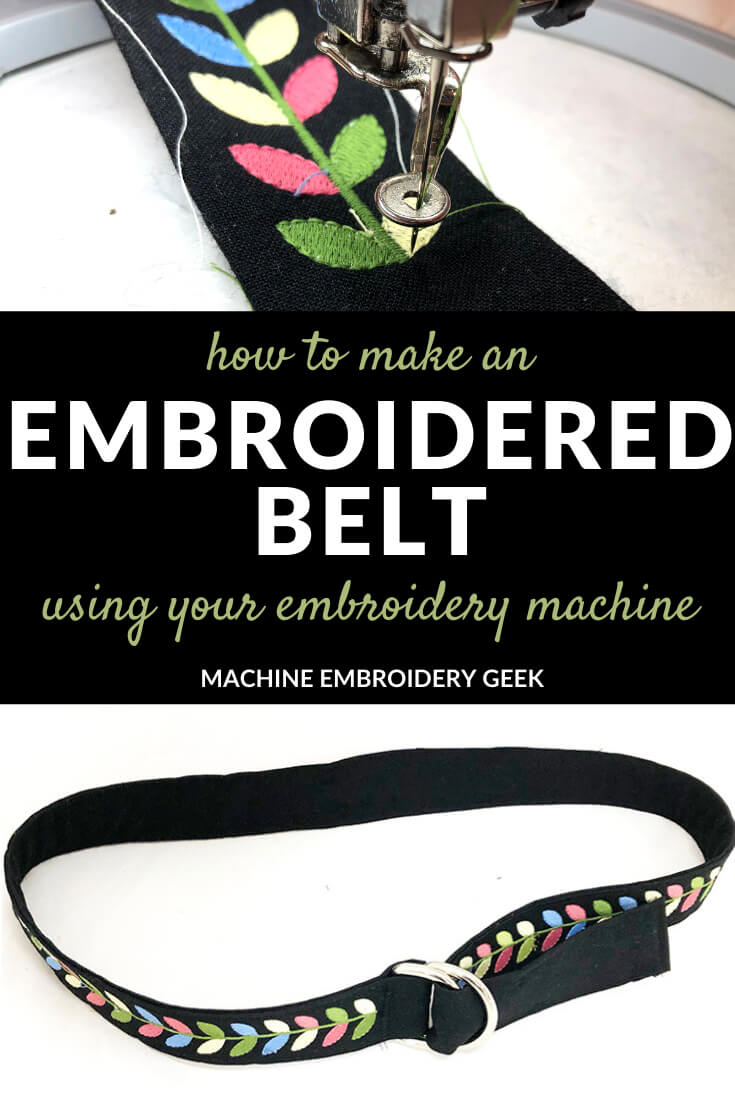
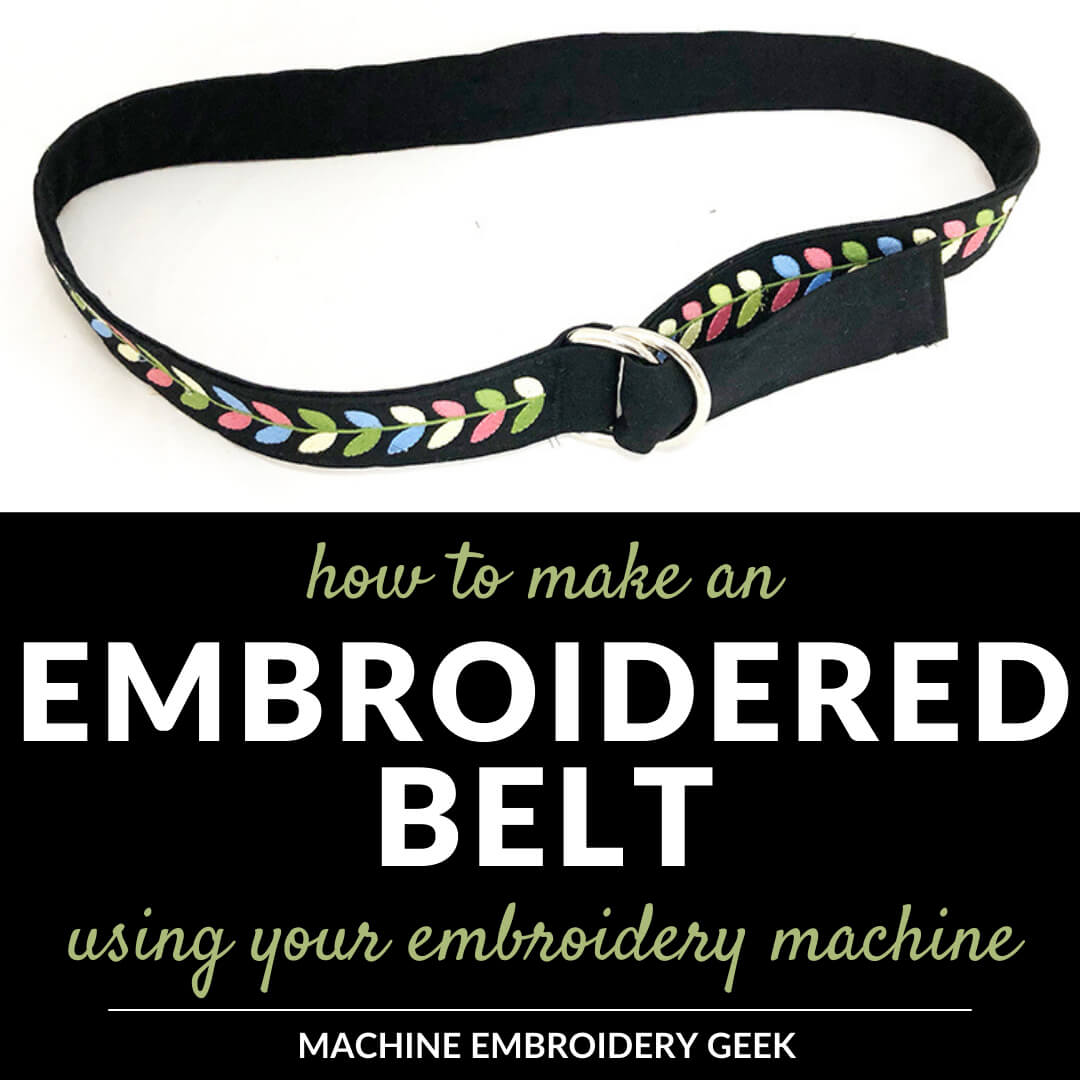
I have always wanted to make an embroidered belt. But, I have to admit, I was pretty nervous about the prospect of embroidering a repeated pattern again and again. I have never tried such a thing. My fear was that the patterns would not line up properly, and I would not be able to create the effect of one long, continuous embroidery design. But you know, as they say, you never know until you try. So I decided to give it a go. And, I made an embroidered belt using an embroidery design intended to be stitched out as a repeating pattern.
Products mentioned in this post
- duck cloth
- heavier weight interfacing
- embroidery thread
- regular sewing thread
- 1.5″ D rings
- sticky back tear away stabilizer
- modern leaf border design
- variety of border embroidery designs
- Celtic border embroidery design
- delicate rose border embroidery design
- repeatable diamond embroidery design.
- large set of repeatable borders that are fairly abstract and modern
- daisy border embroidery design
What is a repeatable, continuous embroidery design?
As you probably know, embroidery hoops are limited in size. And even the largest embroidery hoop would not be long enough to accommodate a continuous embroidery design that would span the entire length of a belt. So, if you want to make a long, continuous embroidered pattern, you will need to find a design that is intended to be repeated again and again giving it a seamless look.
There are many such repeatable embroidery designs available specifically for this purpose. However, for my first attempt at making an embroidered belt, I decided to design one of my own.
Why make an embroidered belt?
You know, belts are not for everyone. In fact, I have a couple friends who never wear them. But for me, belts are pretty indispensable and I tend to favor ones that have an interesting patterns or designs with D ring closures. And these are precisely the types that are easy to make.
A belt with a D ring closure is pretty forgiving. One length can accommodate a variety of waist sizes. There might just be a shorter or longer tail at the end dictated by the waist size. Therefore, because a belt like this does not need to be precisely sized, you can usually estimate the length and make the belt work for a variety of recipients
My point here is that an embroidered belt could make a great gift without knowing the precise waist measurement of your intended recipient.
However – in the case of the embroidered belt I made…. after I put in all the work, I was reluctant to give it away. So I kept it for myself and have actually worn it quite a bit.
Want to see how I made it? Here we go.
How to make an embroidered belt
Supplies
Belt fabric
You probably want to choose fabric for your belt that has a bit of weight. I would suggest a duck cloth or thicker canvas type material. If you would like to use lighter weight fabric, you can add some weight to it by fusing heavier weight interfacing to the wrong side of the belt fabric.
In the case of my belt, I used a medium weight, black cotton fabric, and I reinforced both the front and the back with a layer of heavy duty interfacing.
Since the width of most fabric is between 44 and 60 inches, which is longer than the length of most belts, you will not need much length for this project. Assuming that the width of your fabric is long enough for a belt, you will only need 6 inches of fabric total.
You can use the same fabric for the inside and outside of your belt (like I did) or use contrasting fabric for the inside of your belt.
Interfacing
The weight of the interfacing you use should be dictated by the weight of the fabric that you’ve chosen for your belt. Since my fabric was on the lighter side, I fused it to a heavier weight interfacing. But if you’re using a thicker material you can get away with a lighter fusible interfacing.
Embroidery thread
You will, of course, need embroidery thread to stitch out your design in whatever colors you would like.
Regular sewing thread
After the embroidering is done, you’ll be top stitching the front and the back of the belt together with regular sewing thread. I wanted my top stitching to be subtle and not compete with the embroidery, so I chose a regular black sewing thread with a matching black bobbin for my top stitching.
D rings
You will need a set of two 1.5″ D rings that can accommodate a 1.5 inch with belt
Tear away stabilizer
My preference is to almost always use sticky back tear away stabilizer but you can also get away with using regular tear away and some temporary spray adhesive.
Repeatable embroidery design
You can recreate my project by using my modern leaf border design, or any border. I’ll recommend other designs at the end of this post.
Steps
Prepare the front and back pieces of your belt
Cut your fabric into two strips each 3 inches wide by the total length you need for your belt. You will use one for the front and another for the back of the belt. Since I have about a 30 inch waist I kept the length of my strip about 40 inches.
Cut 2 pieces of interfacing the same size as the belt front and back.
Fuse the interfacing to the wrong side of both strips of fabric.
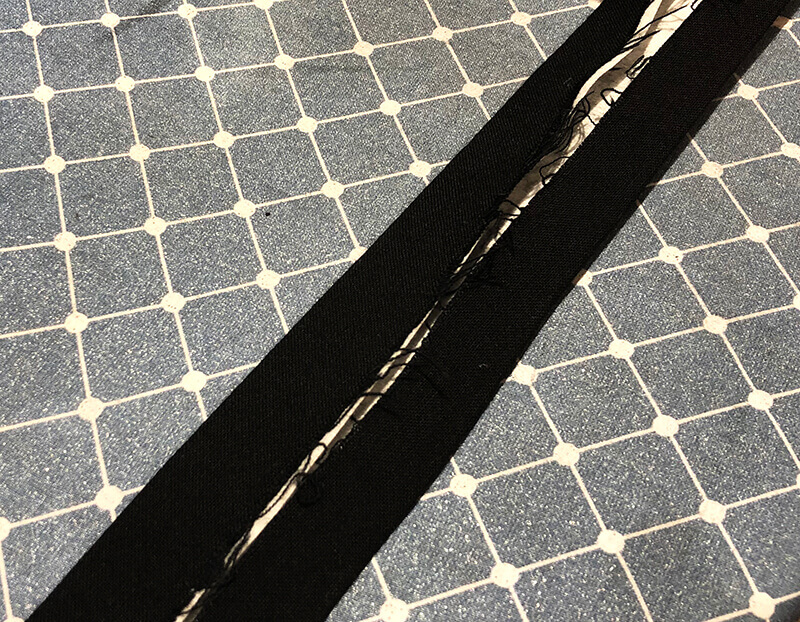
Fold over 3/4″ of fabric to the wrong side of the belt and press so that the total width of your strip is now 1.5″. I did this in small sections using a ruler to ensure that my belt remained 1.5 inches in width throughout the entire length. You will want to do this for both the front and back belt pieces.
Prepare your embroidery hoop
Hoop a piece of sticky back sticky back tear away stabilizer with the shiny side up. Then, use a pin to score the top layer of paper around the inside edge of the embroidery hoop. Peel away the paper to expose the sticky surface. Use a disappearing ink pen to draw a horizontal and vertical line through the center of the hoop. To help you position your belt on the stabilizer draw two lines 3/4 of an inch away from the vertical line through the center point you drew on the stabilizer.
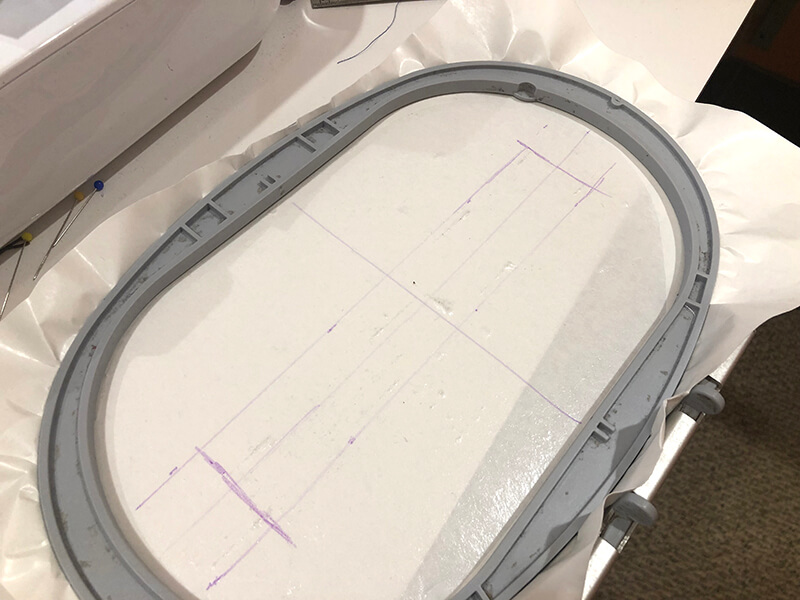
Stick your belt down on the stabilizer between these two lines that are 3/4″ offset from the center line so that the belt is stuck within the center of the hoop. The horizontal line you drew on the stabilizer should correspond to your intended center of your design, the exact location of which will depend on the version of the embroidery design you use. If you’re using the longer embroidery design, which is about 5 inches long, your belt should be positioned so that the center point is about 4 inches from the end of your belt. This will allow for ample room to stitch out the design leaving about an inch or so at the end of the belt that will be left blank.
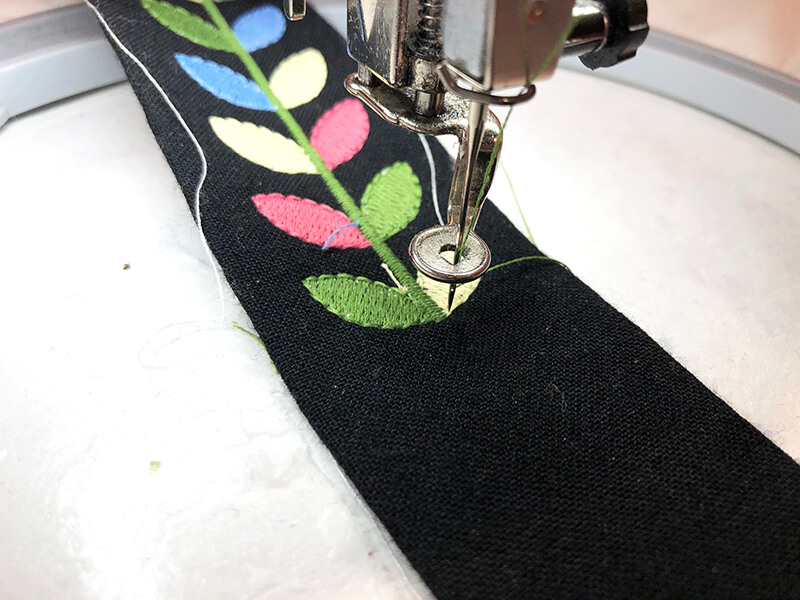
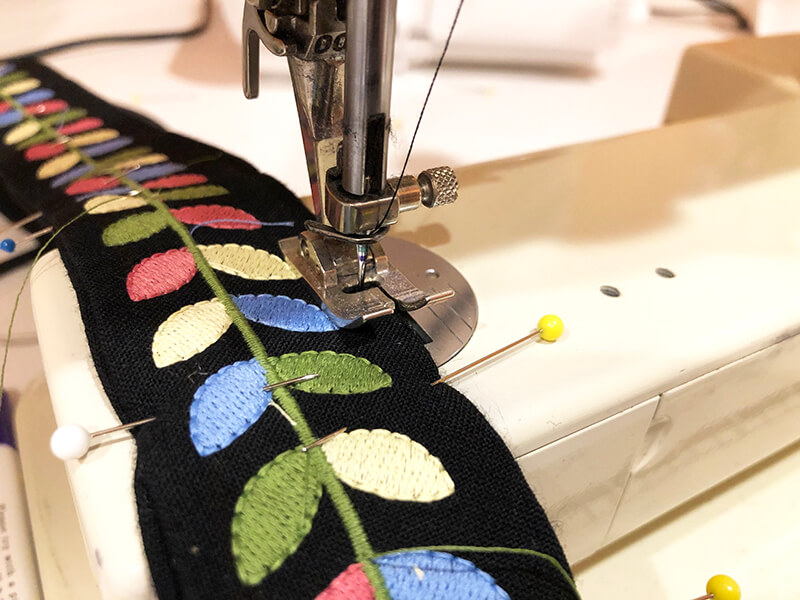
Start stitching out your embroidery design.
Load in your embroidery design and use the tools on your machine to forward the design to the point where you needle is at the very top center of the design. Make sure that this is exactly where you want the machine to start stitching.
In the repeating leaf design I made, I integrated a simple vertical line through the entire design which stitches out first. My intention was to give me a preview of where the design would be. If the line was really off, then I could take it out, reposition the belt and start again.
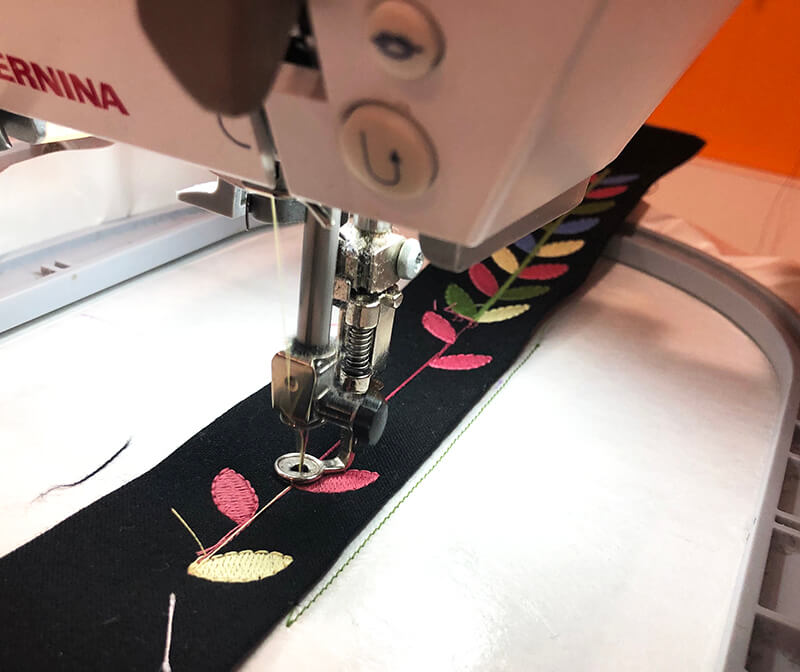
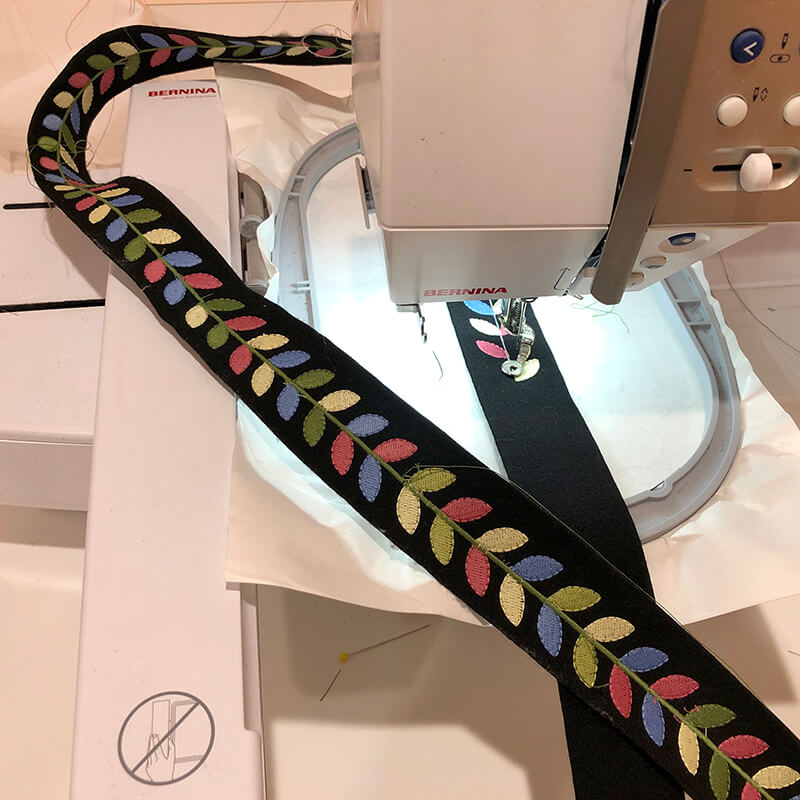
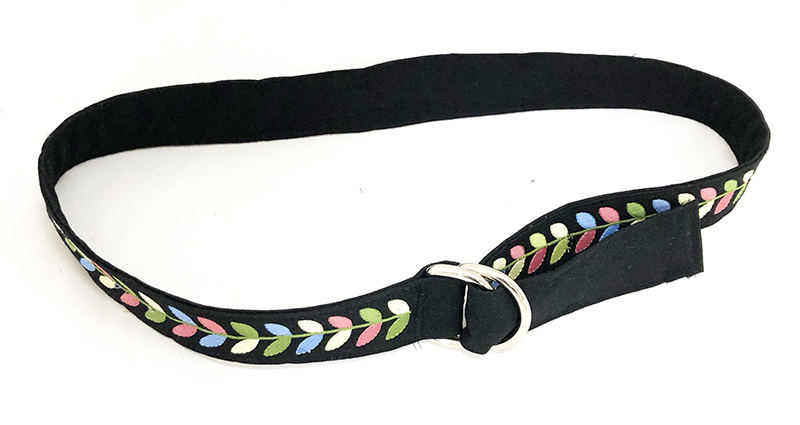
Once you feel confident about the positioning of your belt on the stabilizer, you can start stitching on the design. The design I used was comprised of four different leaf colors and a stem. It took about 10 minutes to stitch out each instance of the design. When it was done I removed the belt from the hoop patched up my tear away stabilizer, repositioned my belt, and stitched another instance of the design. I repeated the step again and again until I was near the end of my belt.
Finishing the belt
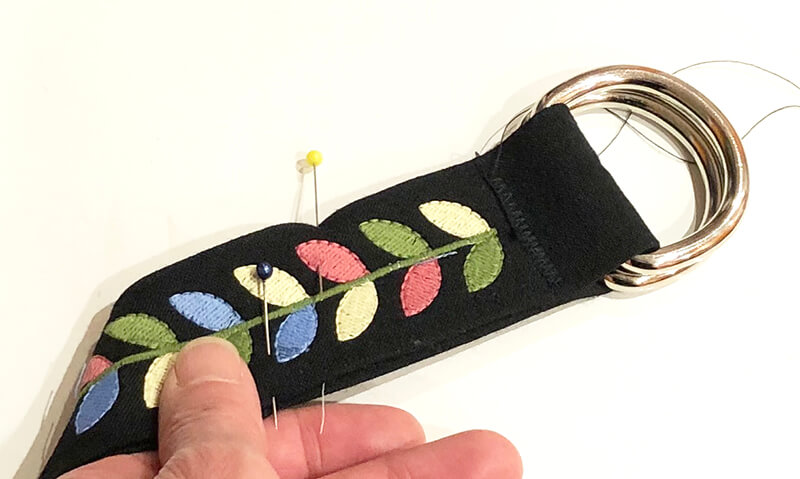
When you’re finished embroidering the belt, it’s time to put the belt together. The first thing you need to do is to open up the folded down sides of the belt and stitch the front and back together. Press down the seam allowance and then insert the 2D rings at the seam, using pins to hold the D rings in place.
Using a zigzag stitch with a long stitch width and a short stitch length, topstitch a column of stitching parallel to the straight part D ring to hold them in place.

Pin the front and back belt pieces together. When you get about 8″ from the end, stop pinning. Stitch the two belt ends together the same way you did the other side. Press it. Then complete pinning the rest of your belt together.
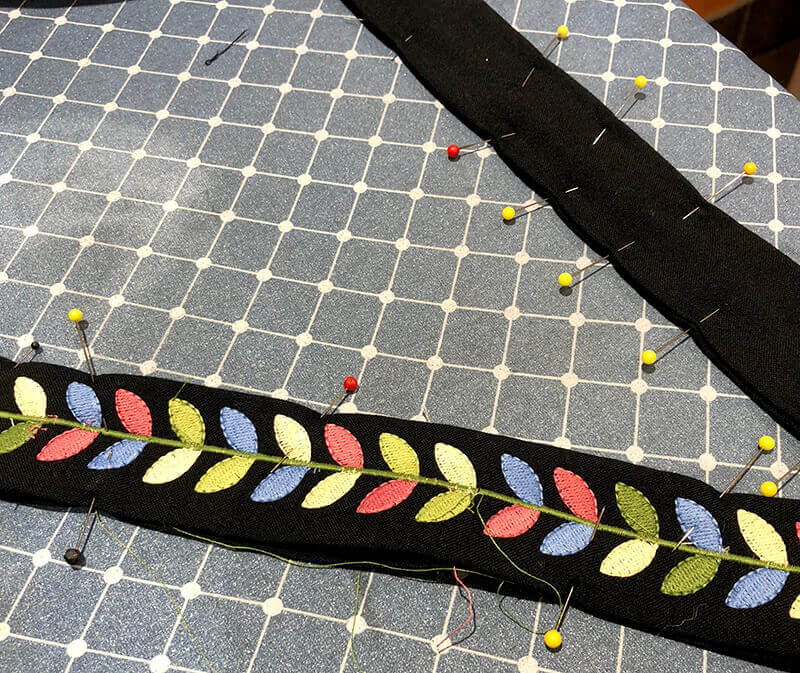
Even with the pins in your belt you can press your belt together. Flattening your belt with an iron and pinning it with a lot of pins will make your top stitching easier and will likely result in less puckering.
Top stitch your belt approximately 1/8″ from the edge being careful not to stitch over your embroidery design.
And that’s it!
Your belt is all done! Trim your threads, put on your favorite jeans and rock your new embroidered belt.
Other repeatable embroidery designs suitable for making an embroidered belt
Don’t fret! If you are not crazy about my modern leaf repeatable pattern, there are many others that will work for such a project. Here are some of my favorites.
Floral repeat border embroidery design set
Here’s a huge variety of border embroidery designs that include a lot of flowers and leaves which work well stitched out as a repeat pattern on belt.
Repeatable Celtic border embroidery design
This repeatable Celtic border embroidery design would look amazing stitched out on a belt for a more grown-up look.
Delicate rose border embroidery design
This delicate rose border embroidery design would make a sweet springtime embroidered belt.
Modern diamond repeat border embroidery design
If you are looking for a more contemporary embroidered belt, check out this repeatable diamond embroidery design.
Dots and swirls repeatable embroidery design set
Here’s a large set of repeatable borders that are fairly abstract and modern. You could actually build a totally custom border by combining some of the thinner borders included in this set.
Daisy border embroidery design
While this is not continuous, this daisy border embroidery design could certainly be stitched out as a repeat pattern. Just space each instance out equally and you will create a lovely repeatable design.
Ready to make an embroidered belt?
While an embroidered belt takes a bit of time and patience, the result is quite stunning. So, just sit back, relax and start stitching!
Enjoy and happy stitching!
xo
Julie
[do_widget id=custom_html-70]
[do_widget id=custom_html-10]
Want to remember this? Save “How to make an embroidered belt” on your favorite Pinterest board