Disclosure: Some of the links on this site are affiliate links. This means that if you click on them and make a purchase, I may earn a small commission at no extra cost to you. Please know that I only recommend products and services I trust and use myself.
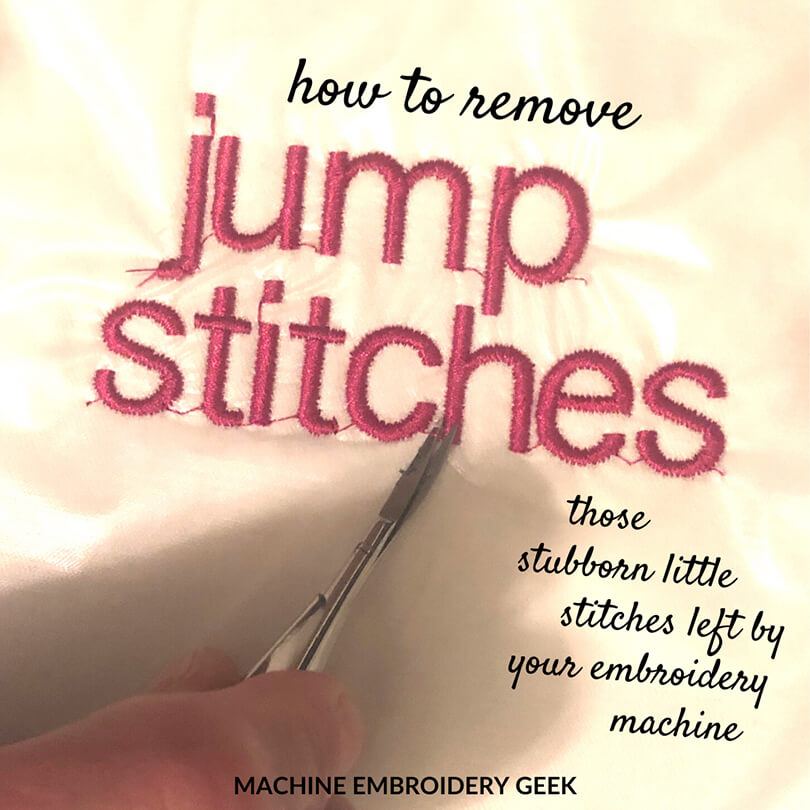
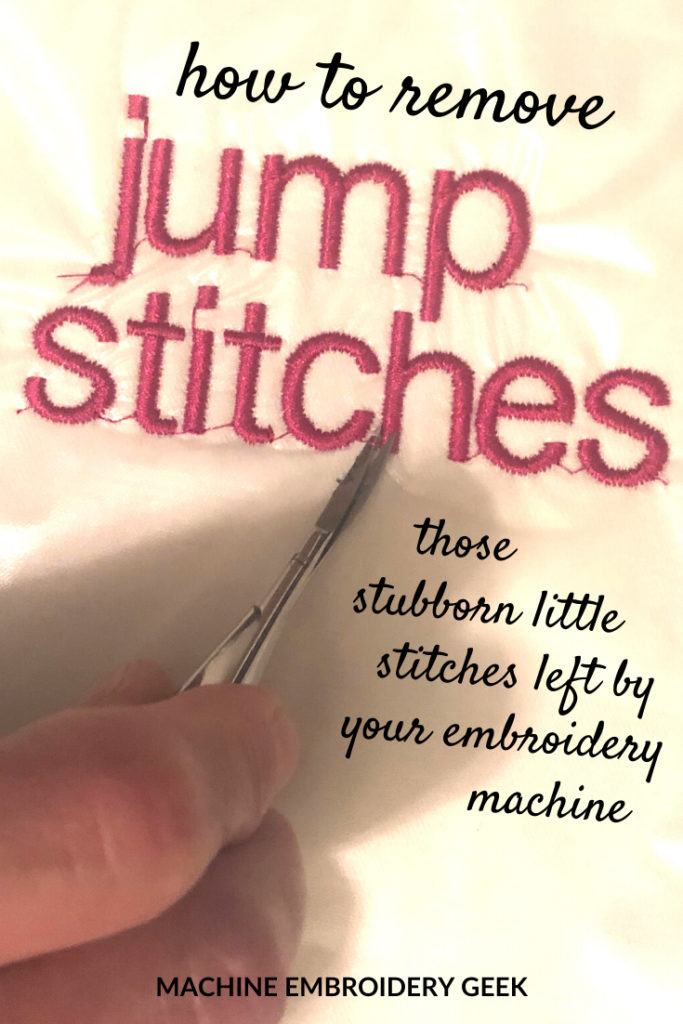
Never heard of jump stitches? Well, I’m sure you’ve noticed them. Jump stitches are the stitches that an embroidery machine makes when it finishes stitching one object out and needs to move over to another object to start stitching. They are not intended to be part of the design. Most often you want them to disappear, and you can do this in a number of different ways. So what are the best methods to remove jump stitches?
Products mentioned in this post
Why are there jump stitches in machine embroidery?
Jump stitches are often a necessary evil. When two objects in a design are not connected in any way, the embroidery machine will need to travel from one to the other. It’s wonderful when these traveling stitches can be obscured by another part of the design, but this is not always possible.
For example, consider an embroidered name. There will naturally be spaces between the letters and there is often no other way to get from one to the next without making a jump stitch.
The downside of jump stitches
When the machine makes these small jump stitches between letters, they tend to be quite small which makes it quite tricky to remove them. Therefore, when you remove your project from the hoop, it requires a bit of clean up work to make the project look presentable.
Jump stitches are kind of a pain because they can tend to pull on the fabric in an inconvenient way when you’re trying to embroider, which can lead to puckering. I’ve also experienced my embroidery machine getting hung up on existing jump stitches as it gets further along in stitching out the design. It’s always a good idea to trim your jump stitches in between stitching out thread colors to avoid puckering and snags.

How to remove jump stitches
The best way to remove jump stitches is to trim them very closely to the project. But trimming them closely can be tricky unless you have the appropriate tools.
How to cut jump stitches
The best way to cut jump stitches is with a good pair of tiny nippers or scissors. These specialized tools allow you to trim very close to the fabric so that the jump stitches essentially disappear.
I remember when I asked this question to the ladies at my local sewing/embroidery store and they directed me to my first pair of embroidery nippers. Wow- what a game changer. Since then I’ve learned that a lot of different speciality nippers and scissors can be quite effective at removing jump stitches. Here are some of the best.
Tools to remove jump stitches


Ways to hide jump stitches
Some jump stitches – especially ones that result from stitching out teeny tiny letters are simply too difficult to remove. When this is the case, it’s often easier to disguise them. A clever technique is to invest in a pack of fine-tipped Sharpie markers in a variety of colors. You can simply touch the jump stitch with a Sharpie that matches with the background fabric. The thread will absorb the Sharpie ink and the jump stitch will blend in nicely with the background.


Another alternative to cutting the jump stitches is to pull them to the back side of the garment. A very useful tool that is designed specifically for pulling thread through a fabric is the Snag Nab-It. One of my embroidery Facebook friends swears by this little device stating that this little doo dad has made all her embroidery work look much more polished.


How to avoid stitching out designs with a lot of jump stitches
If you are not digitizing the embroidery design yourself, you are really at the mercy of the digitizer from whom you are buying the embroidery design. A good digitizer plans out her design ahead of time to minimize the length and quantity of the jump stitches within the design.
Once you start buying embroidery designs from a variety of digitizers, you may notice that some designs from certain designers have fewer jump stitches than others. This factor may inform your opinion as to whom to buy embroidery designs from in the future.
Or, you can take a different approach. If you are stitching out a design that has an extraordinary number of jump stitches, contact the digitizer to let him or her know. It can be helpful for a digitizer to know that the design is problematic. It may not be the fault of the digitizer but a bug in the software when saving a design in different file formats. Once the digitizer is alerted to the problem, he or she may revise the file, reduce the number of jump stitches and send you the new versions.
How to reduce jump stitches in the designs that you digitize
If you are a digitizer who wants to make embroidery designs with the minimal number of jump stitches, you really have to think! While there are tools in most digitizing programs that automatically reduce the number of jump stitches in a design, sometimes you have to do some clever tricks to really hide them.
For example, sometimes I will digitize some plain stitching (perhaps along a strange route) to get the machine to travel to point A to point B. The route I would digitize would be one that would be covered by the next round of stitching. So instead of a long jump stitch I just get a few extra stitches that will be hidden anyway.
As a digitizer, however, I find it to be a bit of a trade off. When I digitize a design, I often like for the embroidery machine to stitch down the underlay stitching in the entire area of the design to kind of hold it in place. Nevertheless, I do try to minimize jump stitches whenever possible.
If you can’t eliminate jump stitches altogether, sometimes it helps to deliberately make them a little longer. Tiny ones are hard to trim. It’s a little bit easier to get your nippers inside of a longer jump stitch.
Can you remove jump stitches in editing software like Embrilliance or SewWhat-Pro?
Yes and no. If you have two different shapes in your design the machine will need to travel between the shape and you will get a jump stitch. If this really bothers you, you could take the design into software like SewWhat-Pro or Embrilliance Essentials and assign different thread colors to these shapes. That way you will have an opportunity to trim the thread before the machine starts stitching the next shape.
Can you remove jump stitches in digitizing programs like Embird or Hatch?
Digitizing programs like Embird or Hatch allow you to create embroidery designs from scratch, so you can certainly do just about anything you want with the design using these programs. Keep in mind that there is a bit of a learning curve to mastering any of these programs. So, if your sole purpose is to remove jump stitches, you would be better off finding a different design or using a more basic program to remove the jump stitches.
How much does it cost to cut jump stitches?
I’m not talking about hiring someone to trim your jump stitches for you. Did you know that some embroidery machines will actually trim your jump stitches as it is stitching out the embroidery design.
Are you thinking – Wait, WHAAAAAAATTTTTT? That’s exactly how I responded when I heard about these magical embroidery machines. To me, it sounded just too good to be true. But, yes, there are many new models of embroidery machines (typically ones that are $1000+) that actually trim jump stitches.
Does the Brother PE800 cut jump stitches?
Unfortunately, the popular entry level Brother embroidery machines like the PE800, the PE535 and the SE600 DO NOT cut jump stitches. Many embroidery machines designed for beginners do not trim jump stitches.
Which embroidery machines cut jump stitches
You will need to spend at least $1000 on an embroidery machine to get one that cuts jump stitches. For example, Brother’s Innovís NQ1600E Embroidery Machine will cut jump stitches. But it is much more as expensive than the entry level Brother embroidery machines.
Is it worth the additional cost to buy an embroidery machine that trims jump stitches?
Many of people say that once you start embroidering on a machine that trims jump stitches, you’ll never want to go back. Yet, these machines aren’t perfect. Sometimes they are unable to trim the tiny jump stitches. These machines have a setting where you can specify the length of jump stitch you want the machine to trim. Nevertheless, it’s still a huge improvement over trimming all the jump stitches yourself.
Ready to take on some jump stitches?
Not ready to invest in an embroidery machine that trims it’s own jump stitches? then get the best tools available to trim them yourself. And trim away between color stops to keep your machine from getting tripped up on those taut pieces of embroidery thread as it works it’s magic.
Happy stitching (despite those annoying jump stitches)!
xo
Julie
[do_widget id=custom_html-10]
[do_widget id=custom_html-9]
Want to remember this? Save “How to remove jump stitches” on your favorite Pinterest board
I find keeping project in hoop makes removing jump stitches easier. I also clip from back first then front. Seems like I rarely miss one and clean front of project
I agree 100% with Katen about cutting jump stitches.
Here is one tip that makes it easier to clean up those extra threads; a horizontal lint roller. Here is one on Amazon for only $7.00 and it has a handy cover for storage:
https://www.amazon.com/Sunbeam-Extra-Adhesive-Roller-Black/dp/B08PL6VQ7K?source=ps-sl-shoppingads-lpcontext&ref_=fplfs&psc=1&smid=A1CQIIRCKZ2GW6
Enjoy!
Kris