Disclosure: Some of the links on this site are affiliate links. This means that if you click on them and make a purchase, I may earn a small commission at no extra cost to you. Please know that I only recommend products and services I trust and use myself.
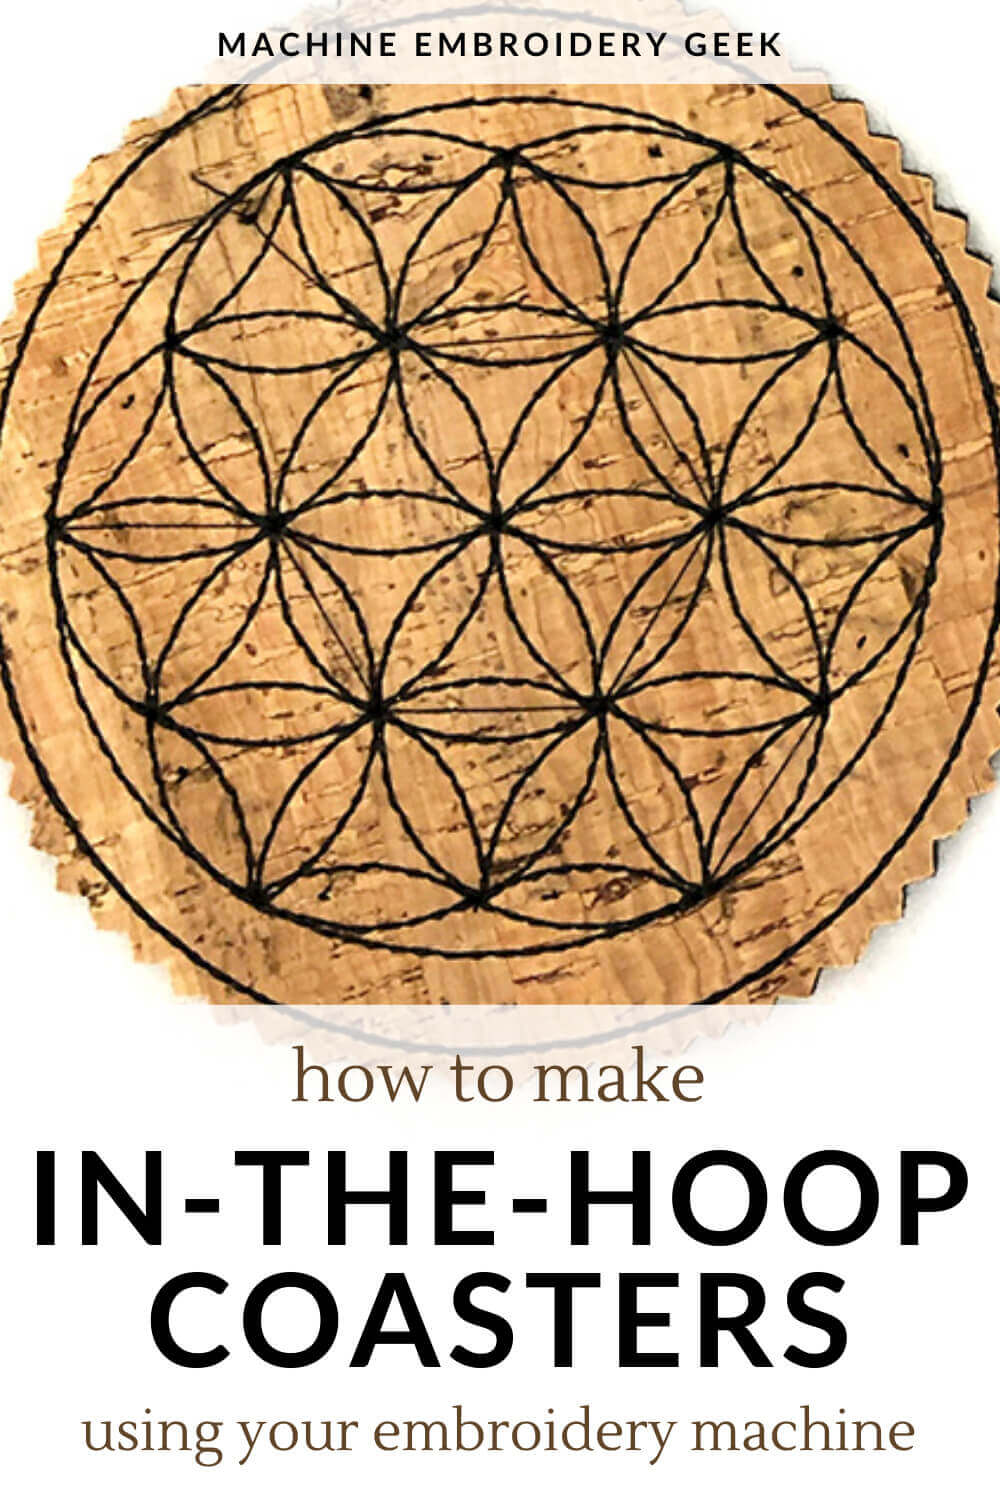
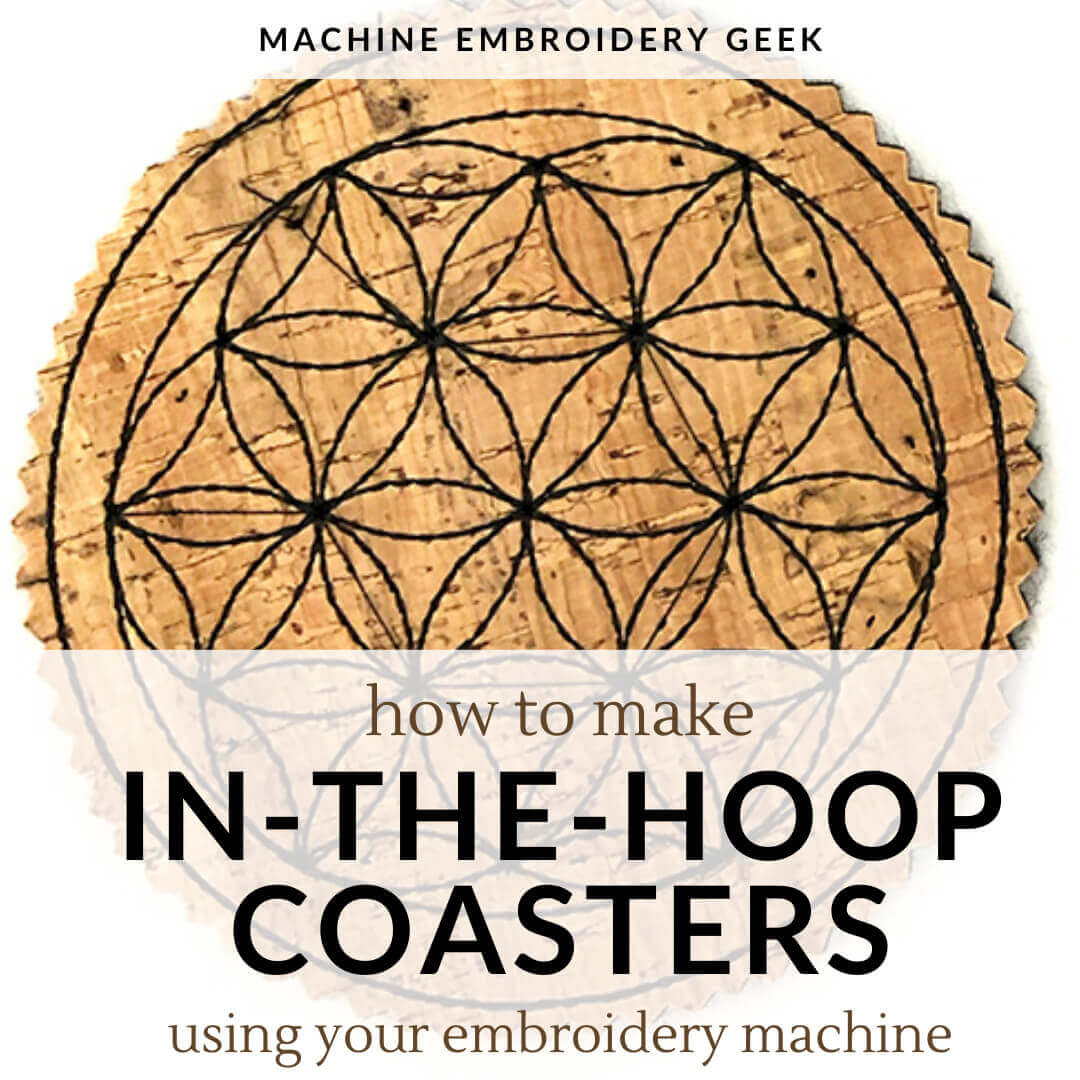
Christmas parties are just around the corner, which means you will probably want to have some host / hostess gifts on hand. Of course, you could be like everyone else and show up with a bottle of wine. But why not take advantage of your embroidery machine and make your host some in-the-hoop coasters? Sound too crafty? They’re actually not. In-the-hoop coasters made from cork and embroidered with a contemporary design can actually be quite modern.
In this post, I’ll show you how to make some unique in-the-hoop coasters using cork fabric and felt. I’ll also recommend other in-the-hoop coaster designs that defy the cutesy, crafty stereotype.
But first…
Products mentioned in this post
- cork fabric – You will need about 4″ x 4″ for each coaster.
- in-the-hoop mandala coaster patterns *
- machine embroidery thread
- water soluble stabilizer
- blue painters tape
- in-the-hoop elk coasters
- flower in-the-hoop coasters
- single initial monogram in-the-hoop coaster
- quatrefoil design.
- flower in-the-hoop coaster
- in-the-hoop square coaster pattern
* design used in this post
Why make in-the-hoop cork coasters?
If you think of coasters as an accessory you might find in your grandma’s living room, think again. Coasters have a distinct purpose protecting your delicate table surfaces from unsightly rings. Older furniture can be especially vulnerable to these types of rings as the wood finishes years ago were not quite as protective as what is currently available.
Coasters can also add a bit of flair to your home decor. They provide an opportunity to inject a small burst of color or personality into your home.
Cork fabric is an especially suitable material for coasters because it has a smooth finish which keeps your wine glass standing up straight. It also has a bit of softness which cushions your glass – again keeping it from tipping over. And finally, cork is absorbent, so it might just suck up a few drips and drabs from your glass and prevent them from staining your table.
Why embroider on cork fabric?
I admit. I had never actually machine embroidered on cork fabric until recently when I decided to write a post about it. But, through that experience, I gained a huge appreciation for this unique fabric. In addition to just looking unique, cork fabric is also a durable and sustainable material.
The cork in cork fabric comes from a cork tree. But, after the cork is harvested, the tree continues to thrive and produce more cork. How cool is that?
Anyway – inspired by my new love for this fabric, I decided to design some in-the-hoop coaster patterns intended to be stitched out on cork fabric. And they actually turned out really well.
Want to see how I did it? Here we go.
How to make in-the-hoop cork coasters
There’s not much to an in-the-hoop coaster. Essentially it’s just a circle or whatever shape you so desire and can be made with a finished edge or a raw edge. But, since cork doesn’t fray, and it’s fairly thick, it is most suited for an in-the-hoop design where the edge is left raw.
There are loads of in-the-hoop coasters designed with funny sayings and even some elegant designs. But, knowing that I would be working with cork, and wanted to make modern-looking circular shaped coasters, I decided to digitize some mandalas to be stitched on my coasters.
Supplies
- cork fabric – You will need about 4″ x 4″ for each coaster.
- in-the-hoop mandala coaster patterns
- machine embroidery thread
- water soluble stabilizer
- blue painters tape
Steps
Change your bobbin thread
Before you get started making your coasters, you should switch your bobbin thread to match your top color thread. In my example, below, you can see that I have done all my stitching in black, so I made my bobbin thread the same black as the top.
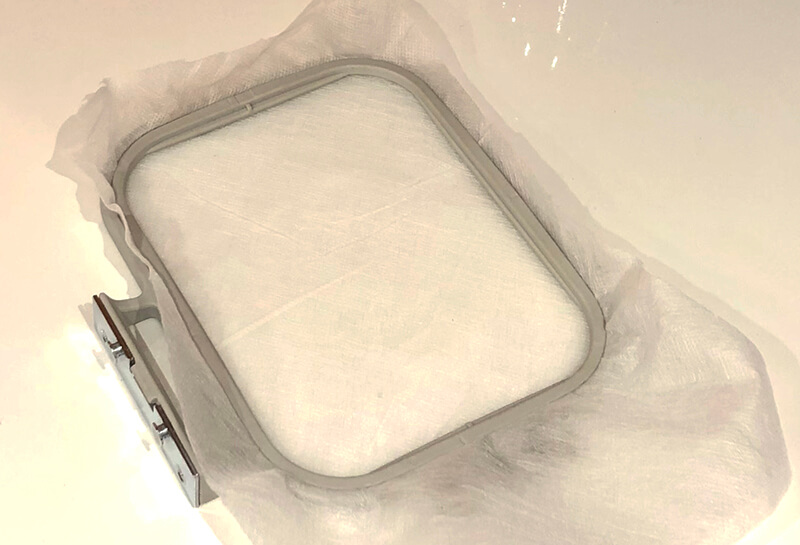
Hoop your stabilizer
Next, hoop a piece of water soluble stabilizer making sure that it is quite secure in your embroidery hoop.
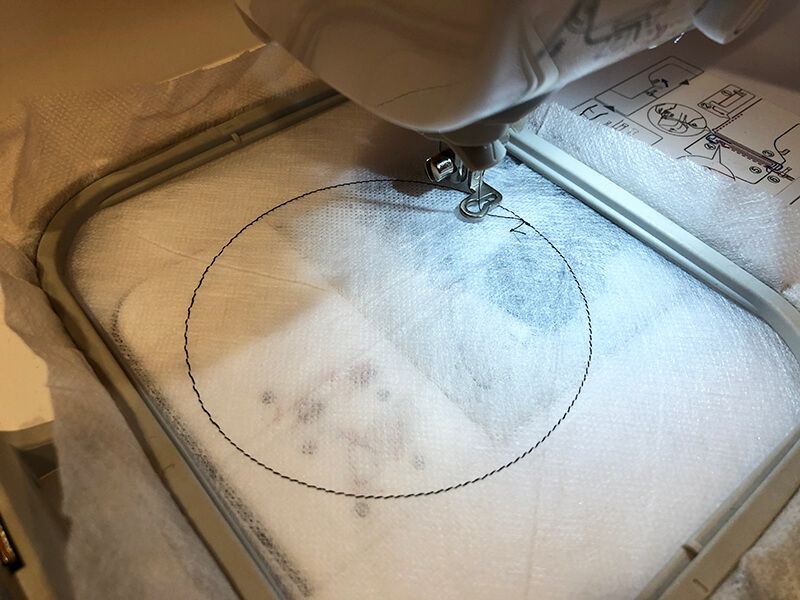
Stitch your placement stitching
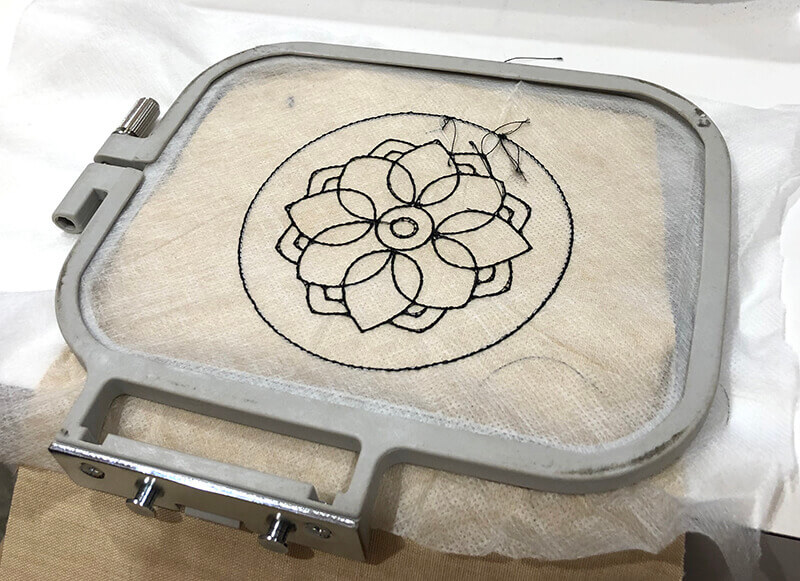
Load in your in-the-hoop coaster design onto your machine. Start stitching the first thread color which will serve as a placement line for your material.
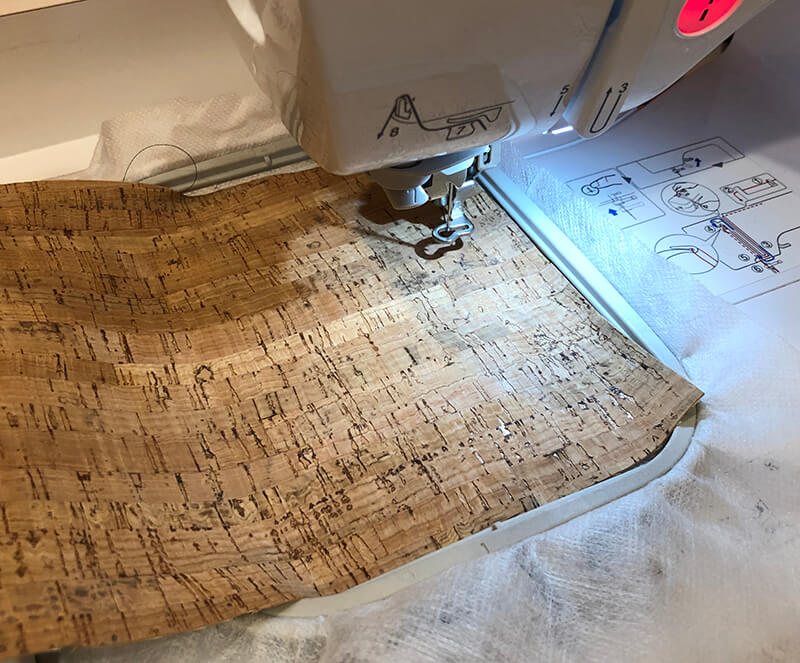
Stitch your design
Float a piece of cork fabric over the placement stitching lines. Make sure that you completely cover the placement stitching, leaving at least 1/2″ of overlap all around the outside of the placement stitching line.
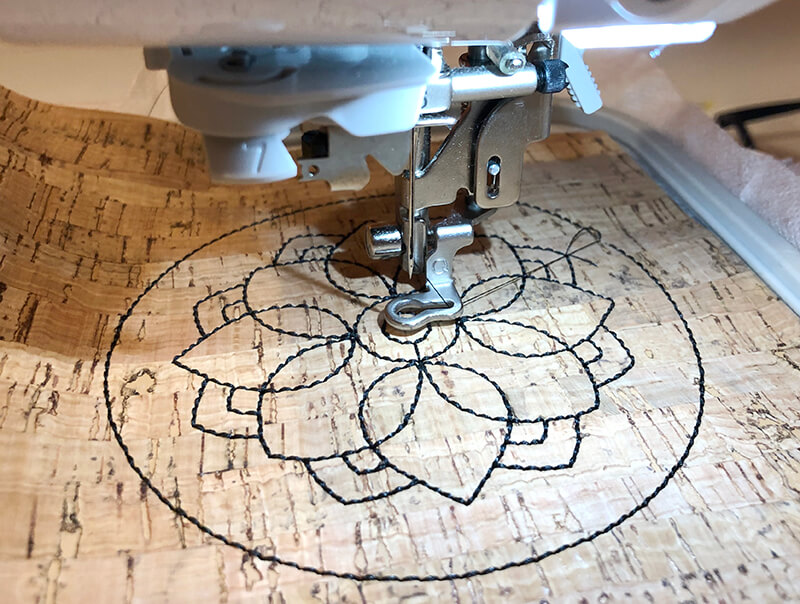
Start your next round of stitching. This will be your decorative mandala stitching.
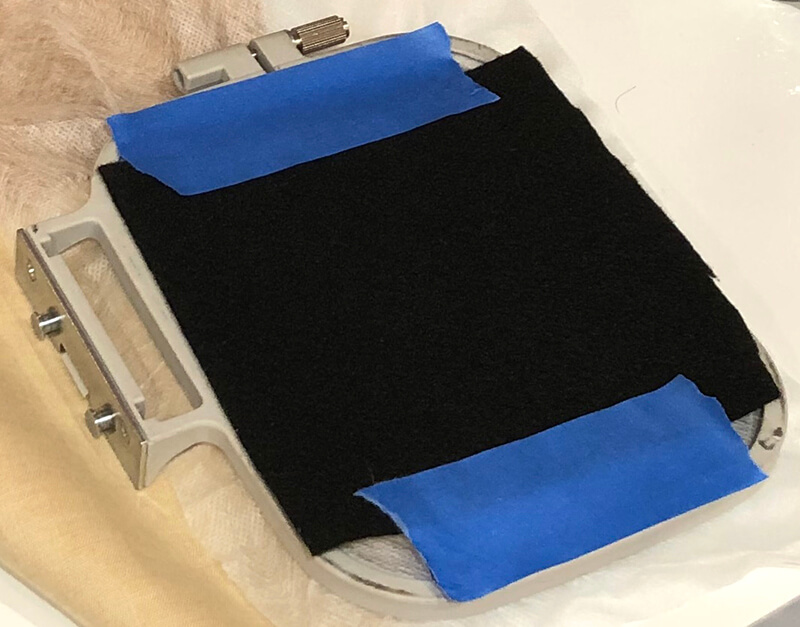
Add your coaster backing
When the stitching is done, remove your embroidery hoop from your embroidery machine and flip it over.
Tape a piece of felt onto the back of the hooped stabilizer making sure you completely cover the placement stitching line leaving at least 1/2 inch of overlap. I like to use blue painters tape to secure it in place.
Stitch the coaster together
Return your embroidery hoop to the machine, and start the last round of stitching. This will just be a circular outline which means that the only stitching you will see on the back of the coaster is this circular outline.
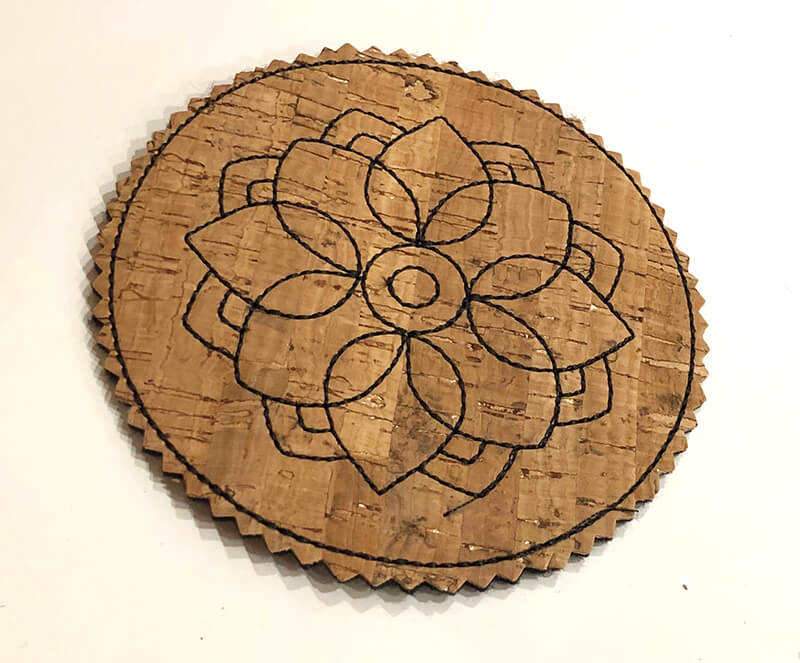
Finish the coaster
Once you are done stitching, you can remove the coaster from the hoop. Cut the three layers of materials: cork, stabilizer and felt around the outside border of the cork. I used pinking shears to give the coasters a more decorative look.
Remove the stabilizer
Spritz the outside edges to remove the water soluble stabilizer. You don’t need to soak the coaster because the stabilizer will only be visible around the edges.
All done!
Keep going! Stitch out all four mandala designs to make a complete set!
Other in-the-hoop coaster designs
Don’t love my mandala in-the-hoop coaster designs? That’s cool. There are loads of other cool in-the-hoop coaster designs. Here are some of my favorites.
Elk in-the-hoop coaster
If your host or hostess is a hunter or has an outdoorsy aesthetic, they will be sure to love these in-the-hoop elk coasters. Here they are shown on burlap, but they could also be made with cork fabric.
Flower in-the-hoop coaster
Ok – so this is not the most sophisticated looking design, but it sure is fun. These flower in-the-hoop coasters which would be lovely in a lake house, or could be used to brighten up any home decor.
Casual single initial in-the-hoop coaster
This single initial monogram in-the-hoop coaster is more sweet than formal. It’s an easy, personalized gift that almost anyone will appreciate.
Quatrefoil in-the-hoop coaster
If you want to make a more formal in-the-hoop coaster, check out this quatrefoil design. While you will need to add the initial yourself, the effect is pretty stunning.
Detailed flower in-the-hoop coaster
If you like the idea of a flower in-the-hoop coaster but are craving a more grown-up look – these may be the ticket. The flower shape is unique, and I really love all the stitching on top.
Square in-the-hoop coasters with geometric details
These may be my favorite in-the-hoop coasters I’ve found. I love how this in-the-hoop square coaster pattern with bold geometric patterns completely transforms some plain fabric into a work of art.
Feeling inspired?
Head over to your machine and start stitching! You’ll have made some in-the-hoop coasters in no time and will be armed and ready for your all those holiday parties!
xo
Julie
[do_widget id=custom_html-62]
[do_widget id=custom_html-10]