Disclosure: Some of the links on this site are affiliate links. This means that if you click on them and make a purchase, I may earn a small commission at no extra cost to you. Please know that I only recommend products and services I trust and use myself.
It’s a common request for the newbie embroiderer: how to convert a JPG into an embroidery file such as a PES, DST, SEW, etc… When I first got my embroidery machine, I figured it was as simple as changing the extension on the file name to make it “stitchable,” or you could click a button to turn a JPG into a PES. But, I learned pretty quickly, that’s not exactly how it works. Fortunately though, it’s pretty easy to use an inexpensive program called SewArt to convert a JPG to an embroidery file.
Now, if you are a professional digitizer reading this who uses $1000+ digitizing software, I think I know what you are going to say. SewArt can not do what your fancy digitizing program does. I totally get it. Nevertheless, it can still do a lot.
But before we get into the weeds of how exactly this is done, let’s just discuss the notion of “converting a JPG into an embroidery file.”
Supplies needed to convert a JPG to an embroidery file using SewArt
Converting a JPG to an embroidery file
What I am about to show you is really not a conversion process. To reproduce a JPG using an embroidery machine would actually be impossible. Think of the pictures you have on your phone. Each one of these is comprised of millions of colors. It would not be possible to replicate every color with different colors of embroidery thread. Therefore – what we are actually going to be doing here is creating an embroidery file based on a JPG image.
Preparing an image to become the basis for a machine embroidery design is exactly what SewArt is designed to do. It automatically reduces the number of colors in an image and then provides you with tools to further simplify the image to make it “stitchable.”
The problem with auto digitizing
I first heard about SewArt from a video where a guy claimed you could instantly convert a JPG to an embroidery design in SewArt. In a three minute video, he demonstrated you how to auto-digitize a (very, very simple) logo. While he made it look super easy, he neglected to discuss setting stitch angles, density, pull compensation, adding an outline… anything above and beyond what the computer did by default. Back then, even with my limited experience digitizing with my Bernina software, I knew these settings were important.
Shortly thereafter, I started hearing through my machine embroidery and digitizing forums that you never want to use the auto digitizing feature in your digitizing software. Because, (just as I had suspected), there are simply too many variables you need to consider and understand when digitizing. You will never get great results if you let the computer do the digitizing for you.
In fact, Larry Pike of You Can Digitize, explained it quite well in a previous post.) He said, “computers are smart – but not that smart!”
So, for many years, since I had always associated auto digitizing with SewArt I assumed that’s all it did.
But, guess what? I was wrong.
[do_widget id=custom_html-26]
SewArt does allows you to do more than auto digitizing
I’ve been using SewArt for a while now and come to realize that, while it is somewhat limited, it’s capabilities are beyond what I had expected. For the price ($75), it can really do a lot. It’s a great software to start with for someone who is new to digitizing. Plus, there is a 30 day free trial period where you can actually use the program to convert a JPG to a PES or any other type of an embroidery file and then stitch that embroidery design out on your embroidery machine.
The emphasis of SewArt is really all about manipulating an existing image to reduce the colors. An image can’t have thousands of colors if it is going to be stitched out on an embroidery machine.
My Bernina software is totally different. In that program, I usually start digitizing by tracing shapes and really just use the image as a reference. So needless to say, SewArt took a little bit of getting used to.
[do_widget id=custom_html-5]
How I used SewArt to convert a JPG to an embroidery file
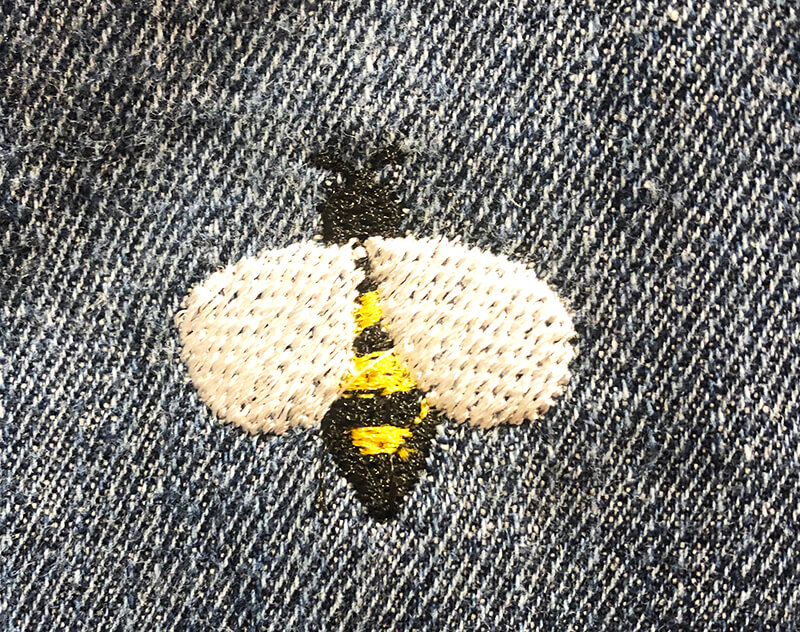
The image that I wanted to convert to an embroidery file was a simple little bee. I had this crazy notion of stitching out all these little bees on a sweater. Yes – crazy, I know. Check out the finished embroidered bee sweater. Anyway – I decided to find a JPG of the bee I liked and then use SewArt to covert the JPG to an embroidery file.
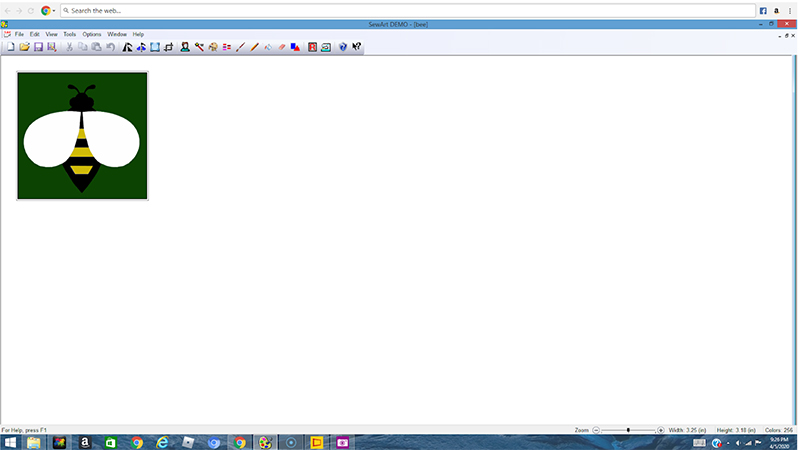
Opening the JPG
First I opened the JPG file in SewArt.
Analyzing the colors in the image
Next, I looked to see how many colors SewArt thought my JPG was. As you can see, it was a lot!
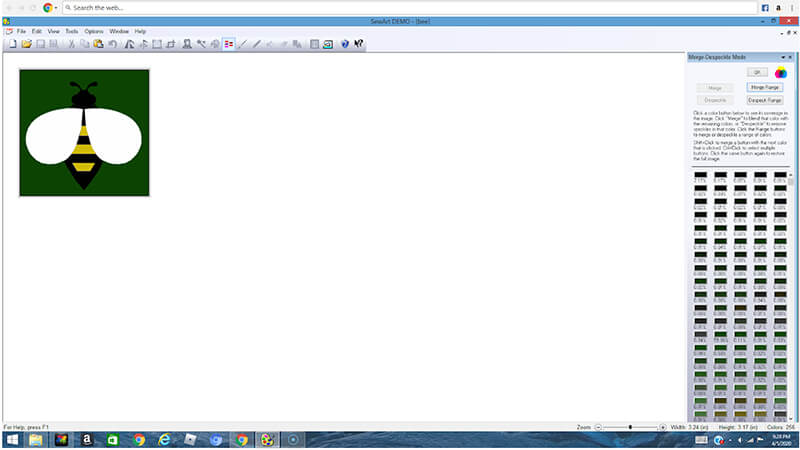
Reducing the colors in the image
I then used the posterize tools to try to reduce the number of colors in my image without losing the integrity of it. When you adjust the sliders on the right, you simplify the image. But you can’t go too far or the image will change appearance.
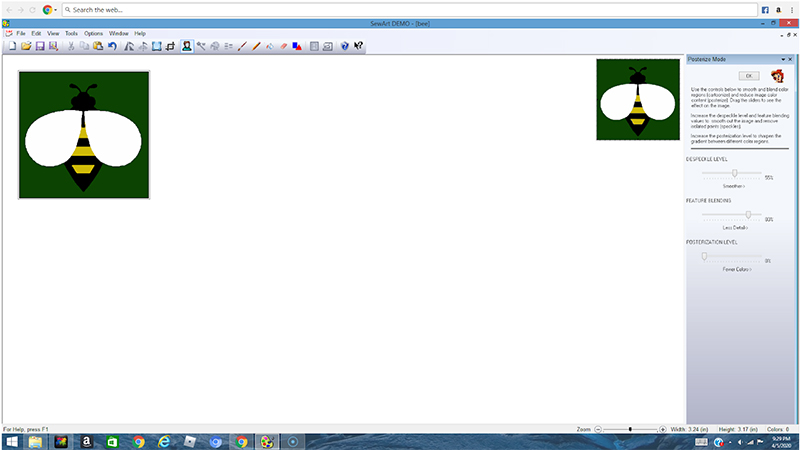
I was very successful using the Posterize tool because I reduced the number of colors in my image to four. (You can see how many colors are left in your image by choosing “Merge Colors.”) Sometimes, you don’t get this lucky; I expected that I would have to merge more colors together to get to four, but I didn’t.
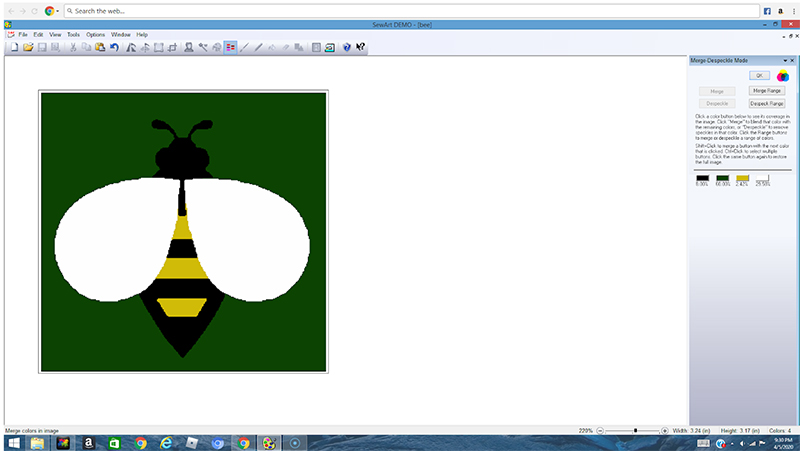
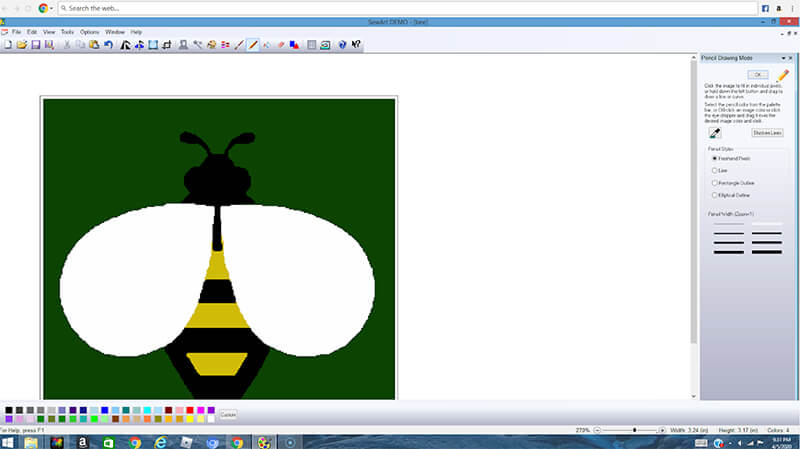
Cleaning up the image
I noticed there were spots of colored pixels where they shouldn’t be. For example, there was a little yellow around the outside of the wings so I used the paint tools to color in those spots with whites. My goal was to get large, solid areas of color. I didn’t want any outlying pixels.
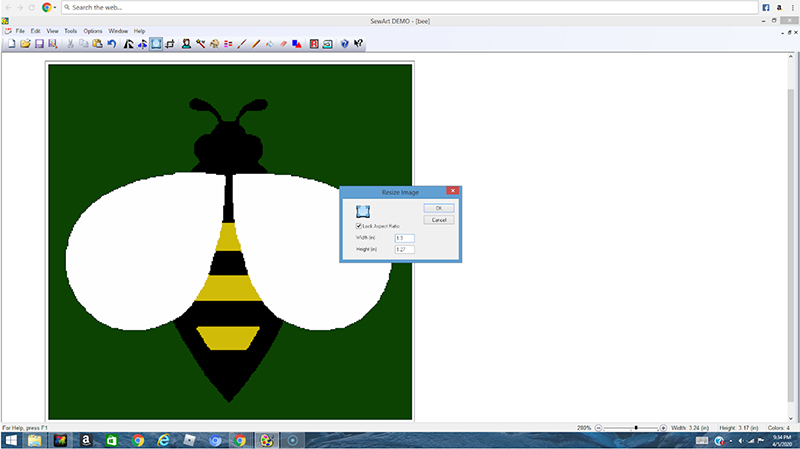
Resizing the image
Once I finished cleaning up the image, I resized it. I knew that I wanted the bee to be about 1.25 inches tall so I reduced the size of the image.
Planning the stitch out
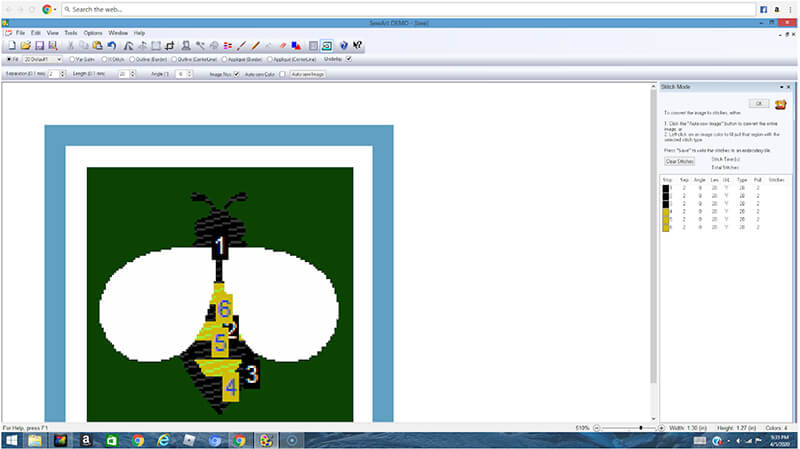
Next I started designating stitch areas. I selected all of the black shapes from top to bottom.
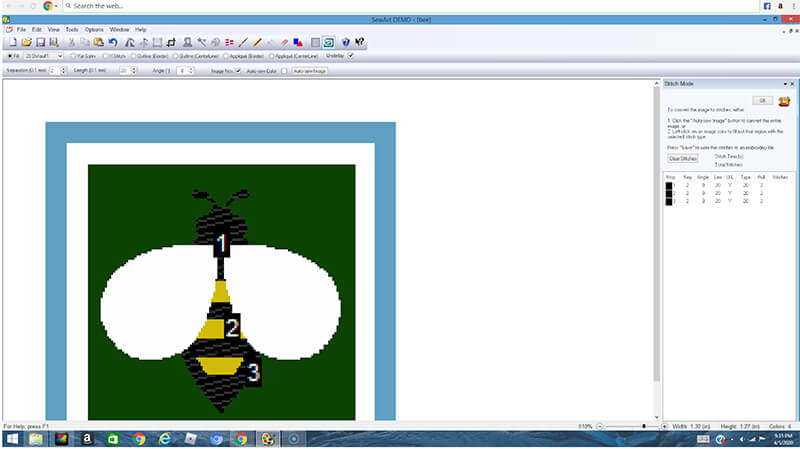
After the machine stitches the black shapes, it will be at the bottom of the bee. Therefore, I started selecting the yellow parts of the bee from bottom to top.
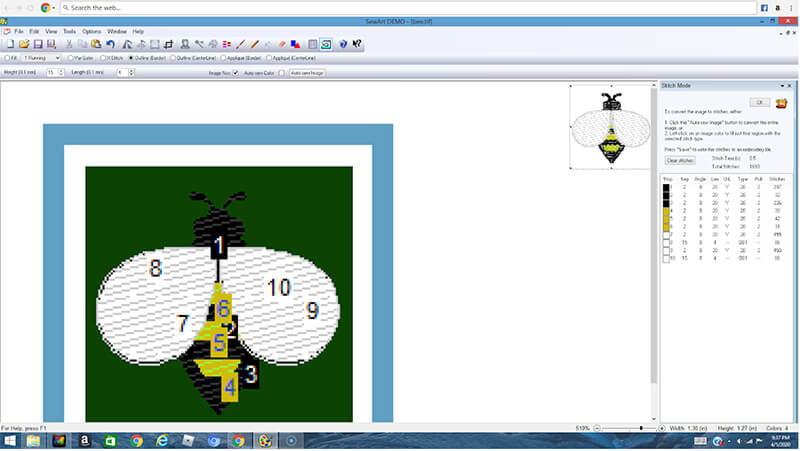
I selected the two white wings last with the fill setting selected. Then I selected the wings again with an outline, because I wanted the wings to be well defined. Then, I went over to the menu on the right and changed some of the stitch angles so that the bee body would look different from the wings. I used a 45 degree stitch angle on one wing and a 135 degree angle on the other. For all of the bee body parts, I used a 0 degree stitch angle.
Time to save out my bee as an embroidery file.
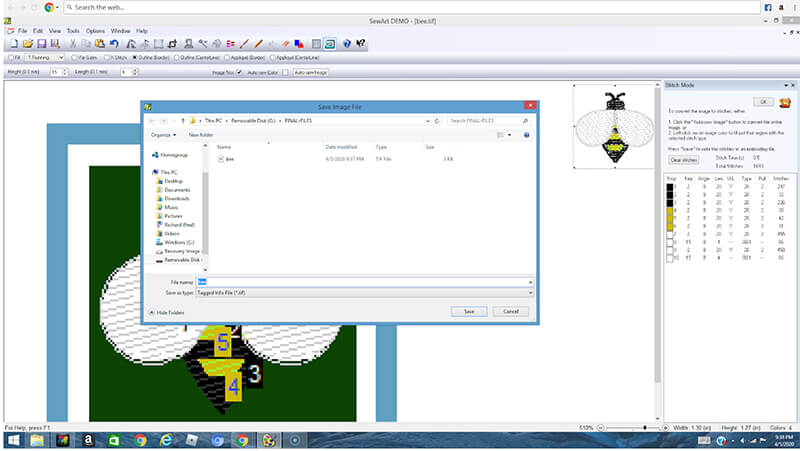
Saving the Image
Before SewArt saves the embroidery file, it also prompts you to save the manipulated image as an image file. I saved my image as a TIF file.
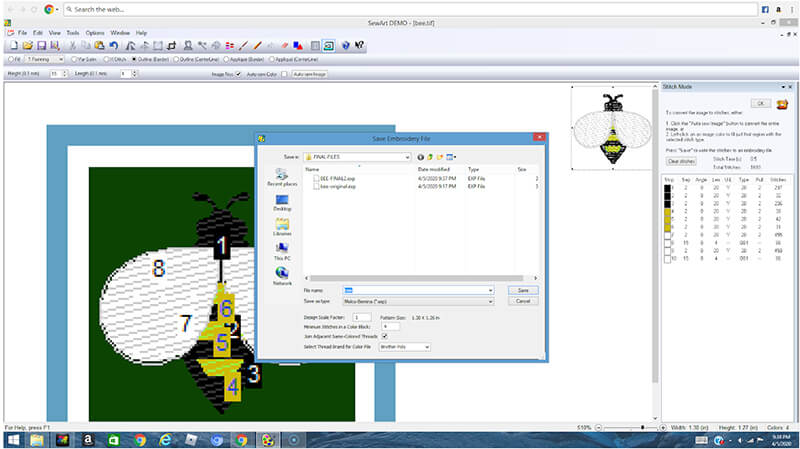
Saving the embroidery file
Finally, I saved out my design as an embroidery file. Note: that there is an option to have any sequential shapes designated as the same color merged. This means that the machine will not take breaks between shapes of a similar color. I selected this option.
So – that’s what’s involved in converting a JPG image to an embroidery file in SewArt. It’s not as easy as clicking a button but not exactly super complicated either.
And, here is my stitched out bee! Like this design? Check out how I embroidered this little bee design all over a sweater!
Interested in learning more about SewArt?
You can also download a trial of SewArt from the S&S Computing website.
Check out my complete review of SewArt.
[do_widget id=custom_html-59]
[do_widget id=custom_html-27]
[do_widget id=custom_html-10]
Want to remember this? Save “How to Convert a JPG to an Embroidery File Using SewArt” on your favorite Pinterest board.
2 clicks ?.. takes me a little more. I use Sew Art & really like the simplicity. It’s the best kept secret in ME circles . Most recent project was digitizing GD’s elementary school Mascot. The time consuming part was cleaning up the graphic. I chose to create a svg file (vector graphic) by manually tracing the jpeg first in Inkscape (freeware), but you can take the graphic straight into SewArt. Sew Art has a neat Wizard which reduces no of colors and de-speckles the graphic before taking it into digitizing phase. Editing is a breeze. I got a good solid fill design and also one in Redwork . I am continuing to learn the program and learn something new every time I use it, but it is fun! There is a 30 day free trial of the full program .. no greyed out options. It even lets you do ‘Save’ so you can do a Stitch out as the proof is in the pudding. I also use the other programs from S & S computing, Sew What Pro ( design editing) & Sew Write & SewIconz to let you see the designs. All of them have generous trial periods. The developer Steve Hirshman, is also VERY responsive (via his Yahoo Group, Facebook Group, & email) to any issues that pop up ..find that with other programs. Try it you’ll like it. No affiliation, just a happy user for many years.. Oh, another neat thing, life long Registration on all products.
I have been using Sew Art since it was introduced to the SewWhat Embroidery Software Yahoo Group in beta testing. It is pretty easy to use and there are some helpful tutorials on the website (sandscomputing.com). I have had great success with some designs, mediocre results with others. I can’t do lettering at all, but have been able to do quite a few applique designs and fill designs. I would love to have more flexibility with it, but for the money, it can’t be beat. Pair it with SewWhatPro and you’re set! Also, factor in the unbelievable support you get. Be sure to join the Yahoo Group.
On my list of things to do it to try Sew Art. For many years Sew What Pro has been my go to customizing program. Sands Computing the owners of SWP give superior customer service along with exceptional software that is affordable. Did I mention Free Upgrades! Although I have never tried Sew Art, know that it is a great program because my past experience with their customizing program SWP. They offer free trial periods on all of their software. Currently have some family illness, but as soon as that is resolved plan of trying their free trail.
PS Love their yahoo group…. No question goes unanswered.
Sewart sounds like what i need. I have a Brother HE 240 and converted a jpg into a dst file. It wouldn’t recognize the item and said it could not use the file. On the machine it said des or dst files are embroidery files. Any suggestions?
I thought that Brother machine liked PES files? Sometimes I will convert again to the format I need and all of the sudden that version will work. You might want to try the programs mentioned in this article.