Disclosure: Some of the links on this site are affiliate links. This means that if you click on them and make a purchase, I may earn a small commission at no extra cost to you. Please know that I only recommend products and services I trust and use myself.
Whether are not you do embroidery for a hobby or a business, its only a matter of time before someone asks you to stitch out their logo on some apparel. Once you know your embroidery machine, the stitching part is not the problem. The only challenge is figuring out how to convert a logo to an embroidery file.
Many people assume that a logo can be converted to an embroidery file in the click of a button, i.e. exporting it into a different file format. What they don’t realize is that embroidery files contain entirely different information than graphic files. Therefore, converting a logo to an embroidery file is not an automatic process. You must use digitizing software to do the conversion. Nevertheless, as far as images go, logos are one of the easiest types of graphics to convert to an embroidery file because they tend to be comprised of fairly basic shapes and have a limited color palette.
In this post, I will show you a very basic process of converting a logo to an embroidery file using the inexpensive digitizing program, SewArt. Keep in mind that there are many different digitizing software options, all of which will allow you to follow a similar method to what I will demonstrate.
Embroidery software needed for converting a logo to an embroidery file
There are many different options when it comes to choosing a digitizing program. And, the price for the software ranges from less than $100 to more than $1000. My advice is that – if you are new to embroidery and just want to dip your toe in the digitizing water, then I would stick to the programs on the lower end of the price spectrum. This is why I am a big fan of SewArt digitizing software. It allows you to do some basic digitizing without the huge monetary investment.
If you really don’t want to spend any money on digitizing software, I would recommend checking out Ink/Stitch. It is a free plugin to a free vector-based drawing program: Inkscape. These programs are especially well-suited for converting a logo to an embroidery file because logos are generally vector-based. You would simply need to import the logo into Inkscape and then use the Ink/Stitch feature to generate the embroidery file based on the logo. Inkscape and Ink/Stitch are not the easiest, most intuitive programs to learn, but hey – they are free – so definitely worth looking into.
So, if you’ve never done any digitizing before but want to give it a try, SewArt and Ink/Stitch are good places to start if you want to convert your logo into an embroidery design.
[do_widget id=custom_html-5]
Why you should convert a logo to an embroidery file with SewArt
SewArt is one of the least expensive digitizing programs you can buy. Of course Ink/Stitch is free but it’s capabilities are VERY limited. So, we’ll stick with SewArt here. Plus, you can actually download it for free and try it out for 30 days. During this trial period you can even create some real embroidery designs! If you want to try to convert a logo to an embroidery file, I would definitely start with the trial version of SewArt and see what you can do.
What makes logos different from other types of images
Logos are typically vector based images. They are different from pictures you see on the web or take on your smart phone (which are called pixel-based images). A pixel-based image, like a JPEG, is comprised of pixels, and there are a finite number of pixels in every image. If you scale one up really big, it’s going to start to look grainy and you can see the individual pixels.
Vector-based images are different from pixel-based images because the computer stores them as mathematical equations. So, you can scale one up and it’s always going to look nice and crisp and clear. Because logos are typically comprised of solid colored letters and shapes, it makes sense to create them in a vector-based drawing program (most commonly Adobe Illustrator).
The most common way to export a logo from Illustrator as a vector-based image is by exporting it as an .ai file. The AI file format is the native file type in Illustrator. You cannot open or edit an AI file with anything other than Adobe Illustrator (or another vector-based drawing/editing program). A more generic vector-based file format is EPS format. This is a common format that you might receive when requesting someone’s logo.
The advantage of importing vector-based logos into SewArt
Even though a typical, generic vector-based format for logos is EPS, an EPS file won’t import into SewArt. Of course, we could just convert that EPS file into a JPEG image and then import the JPEG into SewArt. But, it really doesn’t make sense to go that route because a vector-based images has special properties when it gets imported into SewArt. Therefore, what you need to do is, convert the EPS file into another vector-based file format that SewArt understands, which is SVG.
Converting a logo file to an embroidery design using SewArt
Importing a JPEG logo into SewArt
To make it abundantly clear why the vector-based version of the logo imports better into SewArt than a JPEG. Let’s just first import the JPEG version of the logo into SewArt and see what happens. You can see that even though you and I see the logo as black and white, SewArt sees hundreds of colors. SewArt doesn’t know the difference between this pixel and that pixel and so you would have to go through the process of merging similar pixels together and reducing the colors so that you can base stitch areas on the different areas of color. I demonstrate this process in my previous post about how to convert JPEG images into embroidery files using SewArt.
Preparing a vector logo for importing into SewArt
A vector-based version of the logo will behave a little bit differently than the JPEG (in a good way). SewArt will be able to see different areas of color so you will not have to clean it up as you would a JPEG. But the problem is that you cannot import an EPS file into SewArt. You need to first convert it to an SVG.
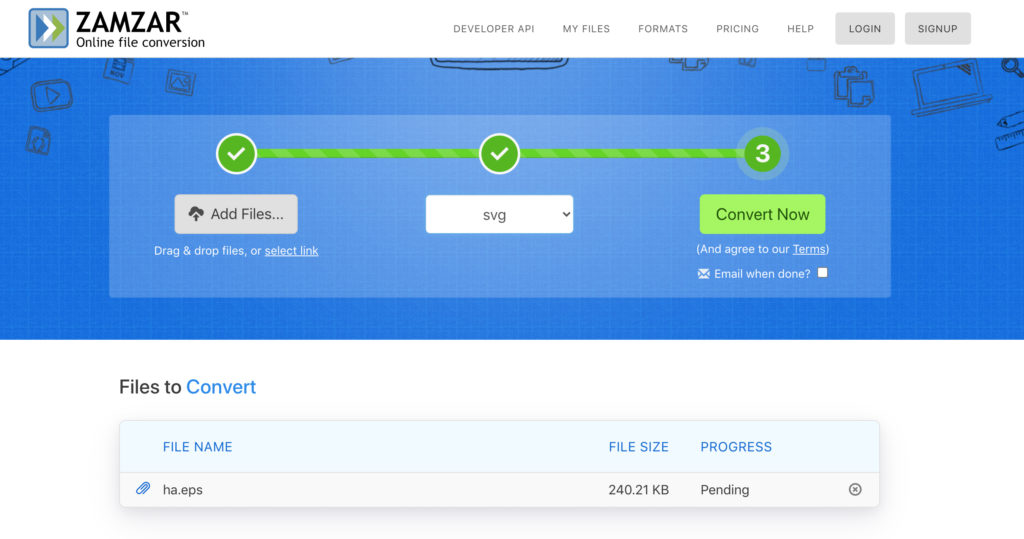
A good website to use for this type of file conversion is: http://www.zamzar.com. All you have to do is select the EPS file from your hard drive, then select the format you want to convert it to (SVG). Finally, you just select the convert button. The site will then generate a new SVG version of the file for you to download.
Importing a vector logo (in SVG format) into SewArt
Once you have successfully converted your file, you are now ready to open it in SewArt. You will notice that when I opened my SVG file in SewArt, I no longer had the option to Merge Colors. This is because SewArt is only seeing one color – which is great! We can move right into assigning different stitch areas which allows us to turn our graphic into an embroidery file.
Converting each shape to a stitch area in SewArt
In SewArt, I simply selected each of the shapes of my logo and assigned a fill stitch and an outline to each. I then exported the file as an EXP file (the embroidery file format my machine reads) and loaded it onto my machine.
Stitching out the digitized logo
I couldn’t end this post without showing you how this digitized logo turned out. You can see that in SewArt I filled the shape and I also created an outline around it to give it a bit more definition. Not bad for a trial version of an inexpensive software, huh?
Frequently asked questions about converting a logo to an embroidery file
Is there a maximum number of colors I can have for this?
Well, SewArt would let you create an embroidery file with at least 256 colors but logos typically don’t have this many colors anyway. .
How do you digitize a hand drawn logo?
You could bring the drawing (which would be a pixel-based image if you scanned it) into Adobe Illustrator and use the trace feature to convert it to a vector-based image and then follow the aforementioned process. Or – you can just keep it as a JPG and reduce the number of colors in SewArt, define your stitch areas and then save it as an embroidery file.
What if you want your stitches in your logo to be satin stitches instead of a fill stitch?
It’s not quite as easy in SewArt to define satin stitch paths in SewArt, but there is a tool to do it. You essentially have to click through the path to show where the satin stitching will go.
Can you convert embroidery files to vector-based images?
Yes – you actually can! Learn more about converting embroidery files into SVG files.
Ready to convert some logos to embroidery files?
While there are many different types of logos, most can be turned into a embroidery file by exporting them as a SVG file an importing them into SewArt. You’ll have greater control over defining areas of color when using a vector-based format versus JPEGs which require some cleaning up before importing in SewArt.
Good luck, embroidery friends and happy stitching!
xo
Julie
Need some extra clarity on how to convert a logo to an embroidery file in SewArt? Check out my video tutorial.
[do_widget id=custom_html-10]
[do_widget id=custom_html-9]
Want to learn more about SewArt, SewWhat-Pro and SewWrite?
Check out my course that teaches you how to use SewArt as well as SewWhat-Pro, and SewWrite: the SewArt, SewWhat-Pro and SewWrite Master Class. It’s designed for efficient and thorough learning – with over 50 instructional videos.
[do_widget id=custom_html-59]

There is also a free digitizing program and it works great and works with svg files and it is called inkstitch what is a free plugin for Inkscape what is a free program also you can download them at Inkscape.org and at inkstitch.org they work on Windows and Mac
Wow – I will definitely check it out.