Disclosure: Some of the links on this site are affiliate links. This means that if you click on them and make a purchase, I may earn a small commission at no extra cost to you. Please know that I only recommend products and services I trust and use myself.
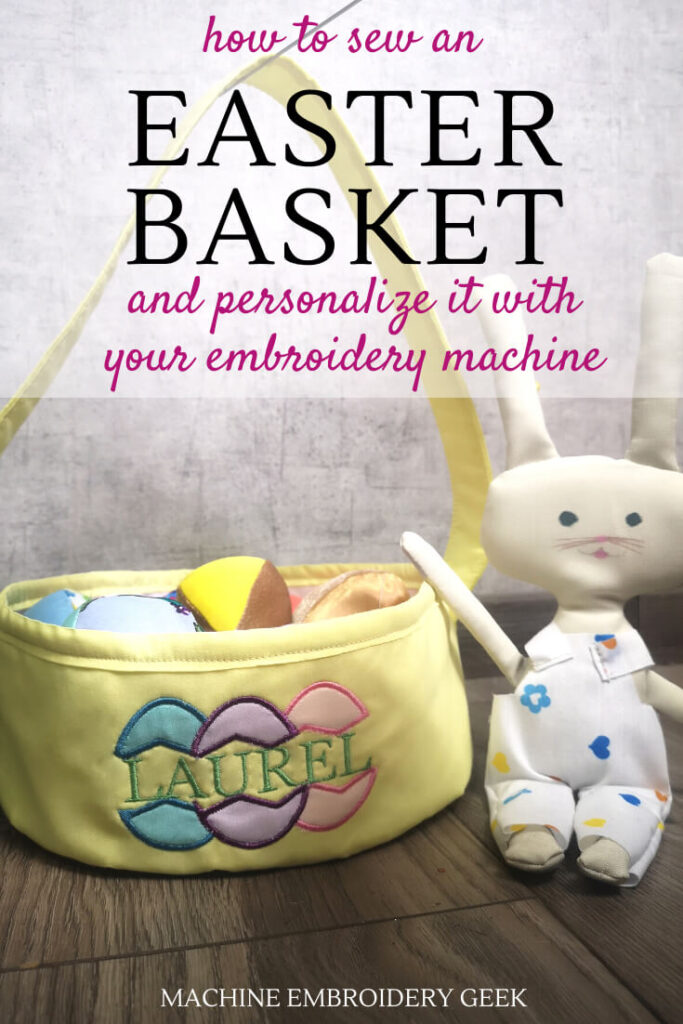
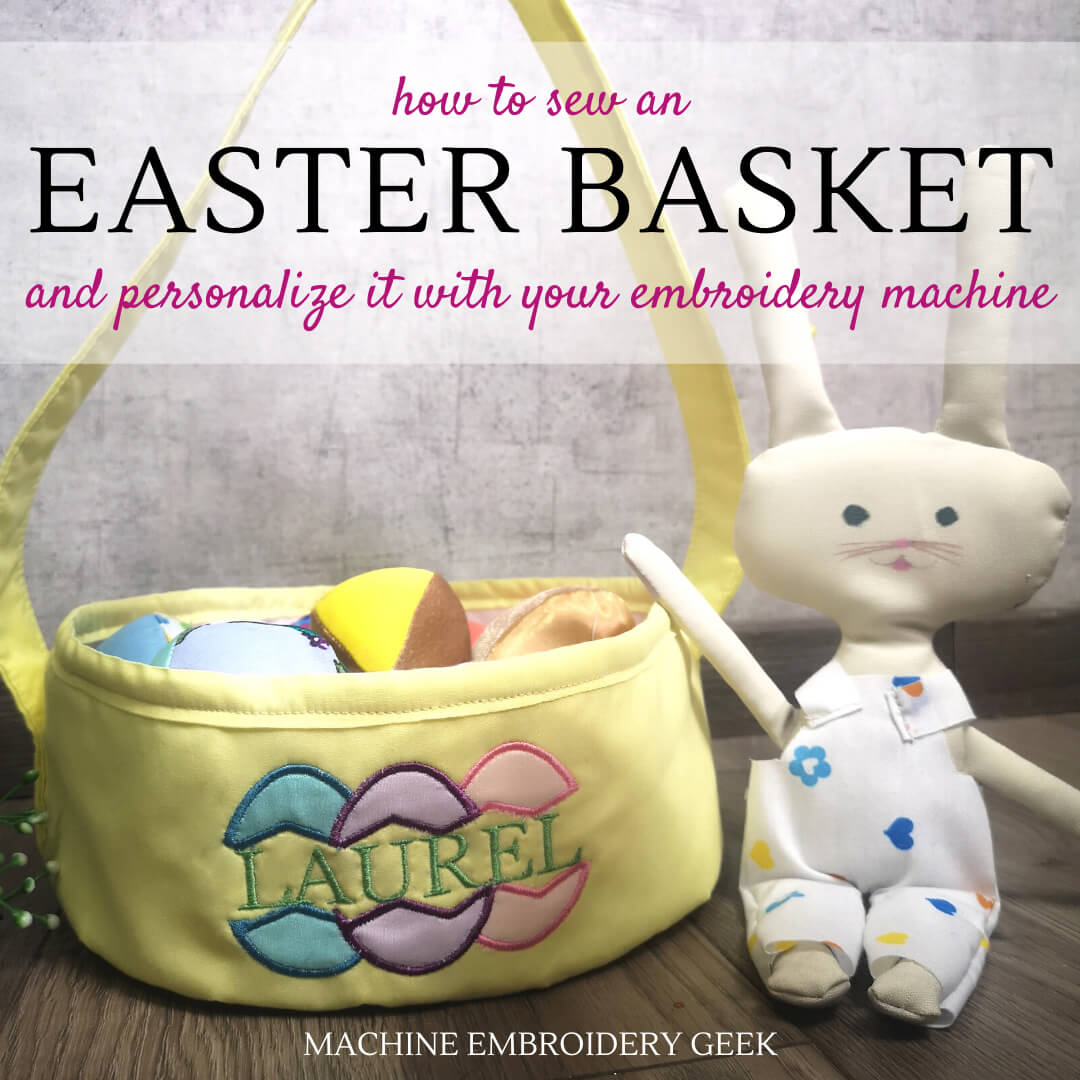
Are you searching for a more elegant alternative to the plastic, throwaway Easter basket? Well, look no further! In this blog post, we are going to teach you how to sew an Easter basket from scrap fabric and a bit of batting and then personalize it with a split egg appliqué design.
The genius behind the basket design is my collaborator, Dafhtne Paz. On her blog, My Golden Thimble, Dafhtne writes about all things sewing, offering advice, inspiration and a variety of PDF sewing patterns.
Dafhtne and I have collaborated on projects in the past, and have really enjoyed working together. (Check out the upcycled blouse I made which was featured on her site.) Since then, we have been meaning to do a fun holiday-themed project together. Fortunately, we were able to pull it together for Easter and deliver a simple, cute, functional and personalized Easter basket.
For this project, Dafhtne created the pattern for the Easter basket and I created the customizable appliqué design. I sent her the files and then she stitched the basket together. And, oh boy – did this turn out cute!
Inspiration for the appliqué design
The idea to sew an Easter basket with a personalized appliqué design on the front really came from Daphtne. She wanted to make a bit of Easter home decor that could be used for storage, but also double as a toy.
Plus, what kid wouldn’t love an Easter basket with his or her name on it? A child could use it in an Easter egg hunt and there would be no question as to whose eggs were in that basket!
So, do you want to sew an Easter basket like ours? Read on to learn how.
How to sew an Easter basket
To make this project, you will need to download the pattern from her site (My Golden Thimble) and the embroidery design from my resource library. You will also need the following supplies.
Supplies
- Easter egg basket pattern
- Split egg appliqué design (available for free in my resource library).
- Fabric for basket exterior (we used a light cotton)
- Fabric for basket lining (also a light cotton)
- Quilting batting
- Double folded bias tape that coordinates with the colors of your fabric
- Three scrap fabric pieces of fabric for appliqué (each about 2″ wide x 3″ tall)
- HeatnBond Lite – small pieces for appliqué
- Disappearing ink fabric marker
- Sticky back tearaway stabilizer
Preparing your basket fabric
Start by cutting out all of your fabric pieces according to the pattern. You will need to cut three pieces for the basket exterior: the basket bottom, the basket sides, and the basket handle.
For the basket exterior, we recommend using a cotton or canvas fabric. Dafhtne used some yellow quilting cotton that she had in her stash for the basket, and it worked great!
You will also need to cut out your two lining pieces – one for the basket bottom and another for the basket sides. She used a light pink quilting cotton for the basket inside.
Finally, cut out your three batting pieces for the basket bottom, sides and handle.
Preparing your appliqué fabric
The appliqué design is comprised of three eggs. We used a darker cotton fabric for each of the eggs so that they would really pop on the pale yellow background. For each egg, you will need a piece of appliqué fabric about 3″ high x 2″ wide. You will also need similarly sized pieces of HeatnBond Lite.
Once you have cut out the egg fabric as well as the similarly sized HeatnBond Lite, fuse the HeatnBond Lite onto the wrong side of the egg fabric. Then peel the backing paper away.
The HeatNBond Lite keeps the appliqué fabric in place while you are stitching it down. It also keeps the appliqué fabric from fraying.
Attaching the batting to the Easter basket fabric
The batting is an essential element for this project because it gives the basket structure and body.
To attach the batting to the basket fabric, with the right side up, simply lay one of the basket exterior pieces down on top of a piece of quilting batting. Pin in place and then sew around the edge with a 1/4″ seam allowance. Repeat this step for the basket bottom.
The basket handle is a little different because the strap is more than twice as wide as the batting. First, press over 1/2″ of fabric along all sides of the strap. Then, press the strap in half along the entire length of the strap. Next, place the batting inside the folded straps and tuck the 1/2″ seam allowance under the exposed batting on the non fold side. The batting should be completely encased and the raw edges of the fabric hiding the seam allowances on the inside and pin it together. You can leave the short ends of the strap unfinished.
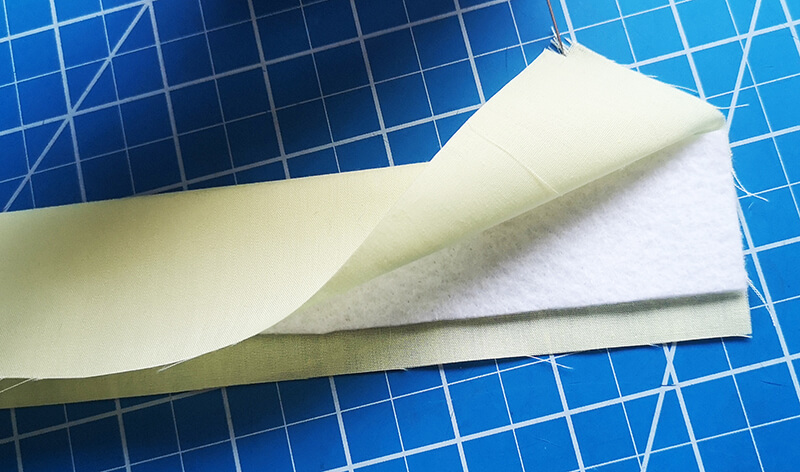
Finally – top stitch around the entire strap, giving it a finished look and securing the batting in place.

Preparing the appliqué file
The split Easter egg appliqué is sized to fit within a 4″ x 4″ embroidery hoop. It is also designed for adding a name between the split eggs. Each of the letters of the name you add should be no taller than 3/4″.
You can either combine the name with the egg appliqué design or create the name with the fonts on your embroidery machine. If you choose to combine the name into the design, you will need software like Embrilliance Essentials or SewWhat-Pro and then export the resulting the resulting design. (Learn more about working with machine embroidery fonts and/or combining embroidery designs.)
If this sounds too complicated, just add the name using the lettering on your embroidery machine.
Adding appliqué and a name on your basket
Since the appliqué is intended to go on the front center of the basket, you first need to identify the location of the design center. Fold the fabric + batting basket side piece in half along the short edge. This will be your horizontal center. Draw a line along the fold using a water soluble fabric marker. Next, locate the vertical center using a ruler. Draw a line through this point. Now you have the center of the design clearly located.
Hoop a piece of sticky back stabilizer with the shiny side up. Using a pin, score around the inside edge of the hoop, creating a small tear in the top paper layer. Then, peel the paper away to expose the sticky surface. Draw a horizontal and vertical line on the sticky stabilizer through the center of the hoop using a water soluble pen.
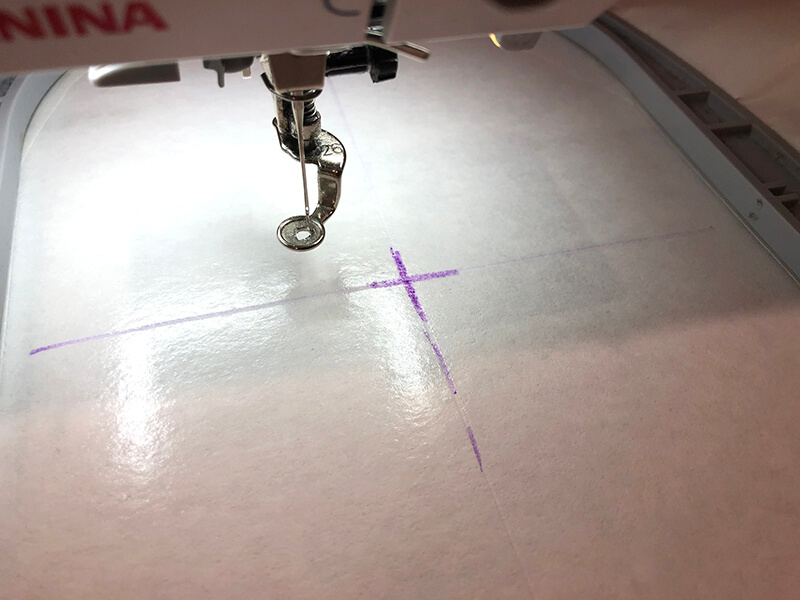
Align the center point you marked on the fabric + batting side piece on with the center of the stabilizer. Then stick it down.
Now you are ready to appliqué!
Creating the egg appliqué design
Start stitching out the design. The first thread color is the placement stitching for all eggs. When this is done, lay down the appliqué fabric over the left most egg. Start stitching the next thread color, it will tack down the appliqué fabric over the left most egg. Remove the embroidery hoop from the machine and trim the excess appliqué fabric using appliqué scissors.

Continue to stitch out the next thread color, which will be the tack down stitching for the right egg. Once again, remove the hoop from the machine and trim the excess fabric.
The third thread color will be the tack down stitching for the middle egg, so you will repeat the same process once again.
The next three thread colors will be the final satin stitching around the left egg, then the right egg and then the center egg.

Once the eggs are all done, go ahead and add the name (if you haven’t already integrated the name into the embroidery design before you loaded it onto you machine).
Sewing the exterior of the Easter basket
Now it is time to start assembling your Easter basket! Begin by sewing the two short ends of the basket together, with right sides together and leaving 1/2″ of seam allowance to create a cylinder shape. Press open the seam allowance.
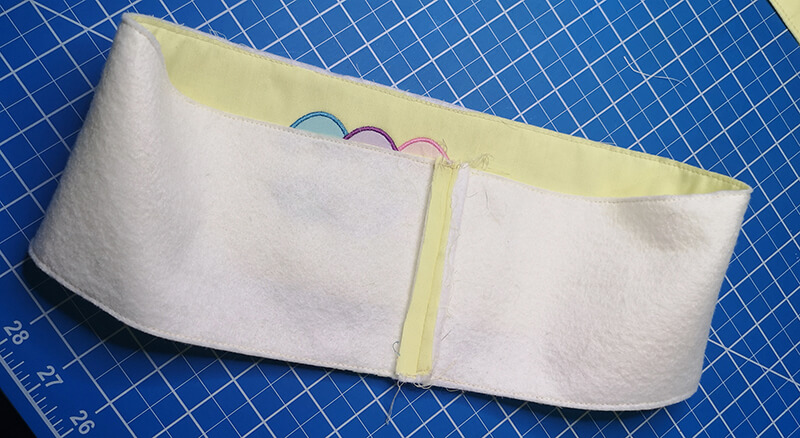
Your next step is to attach the handle to the basket. First, identify the two side points on the basket. These are the two spots on either side of the basket cylinder half way between the center of the appliqué design and the back seam. Pin one end of the handle onto the right side of the basket cylinder so that the end of the strap is at the bottom of the cylinder and spans the entire height. The other end should do the same on the other side with the strap ending on the bottom of the other side of the cylinder. Pin both sides in place.
Top stitch the handle in place on both sides. The top stitching you create should end 1″ below the top of the basket cylinder so that you can finish the top edge of the basket.
Divide your basket bottom into four quadrants. Then pin the right side of the the basket bottom to the right side of the basket cylinder in four spots lining up the four basket bottom quadrants points with the two cylinder sides, the front and the back seam. Pinning the four quadrants helps to ensure that the fabric is evenly distributed. Pin the rest of the basket bottom to the bottom of the cylinder. Stitch these two pieces together leaving 1/2″ seam allowance.
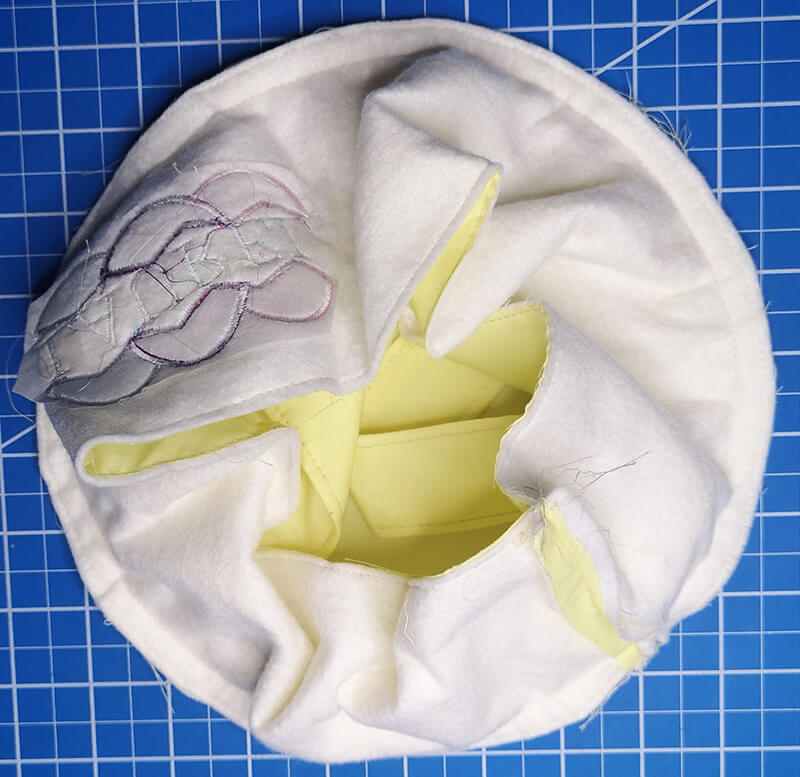
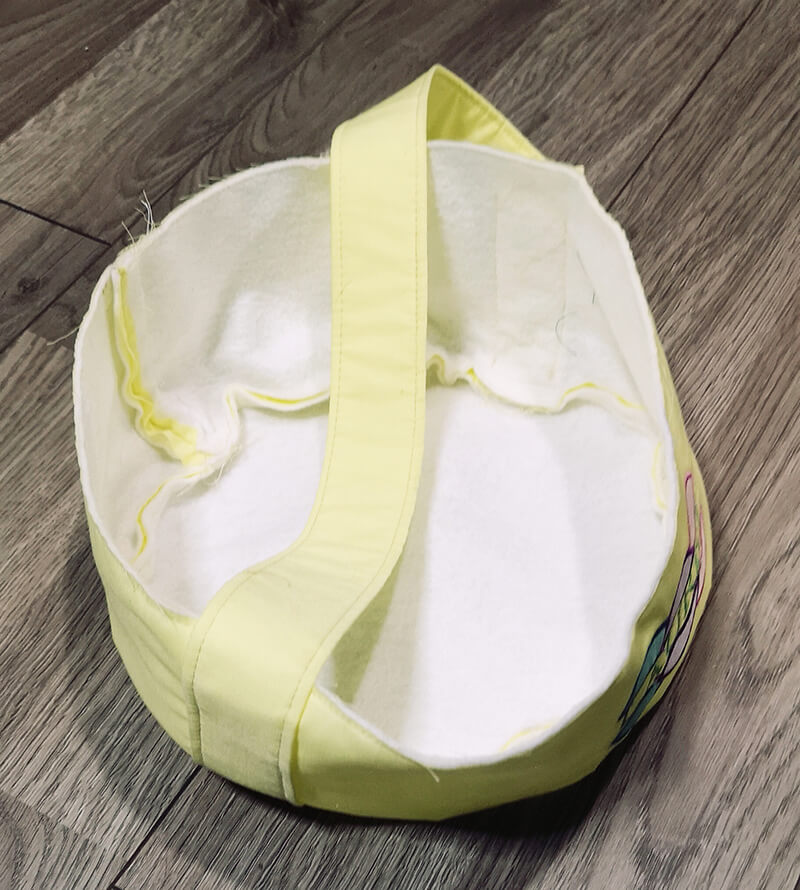
Turn the basket right side out.
Sewing the lining
With right sides together, sew the two short ends of the basket sides together to form a cylinder. Mark the four quadrants of the basket bottom and pin these four points to the two sides, front and back of the basket side lining cylinder. Add more pins to completely pin together the basket lining side piece and basket lining bottom. Stitch these two pieces together leaving 1/2′ seam allowance.
Finishing the basket
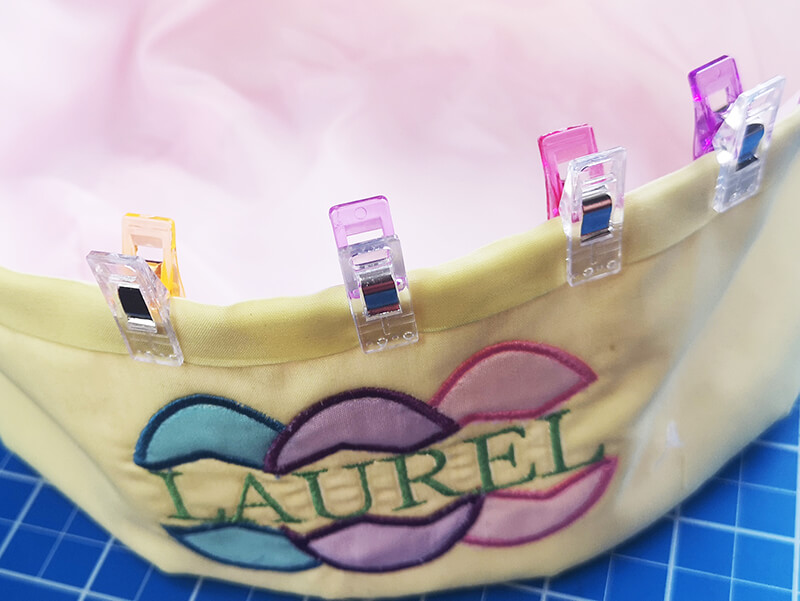
Turn the lining inside out and put it inside of the basket exterior. The two tops of the basket sides should line up. Pin them together and stitch them in place leaving 1/4″ seam allowance. Finally, pin double sided bias tape around the top edge of the basket. Hide the start and end of the bias tape at the back of the basket, folding over one end and overlapping the folded end over the unfinished end for a completely polished look. Top stitch down the bias tape all the way around the top of the basket. Check out the Dafhtne’ s tutorial on how to sew bias tape.
Your Easter basket is now complete!
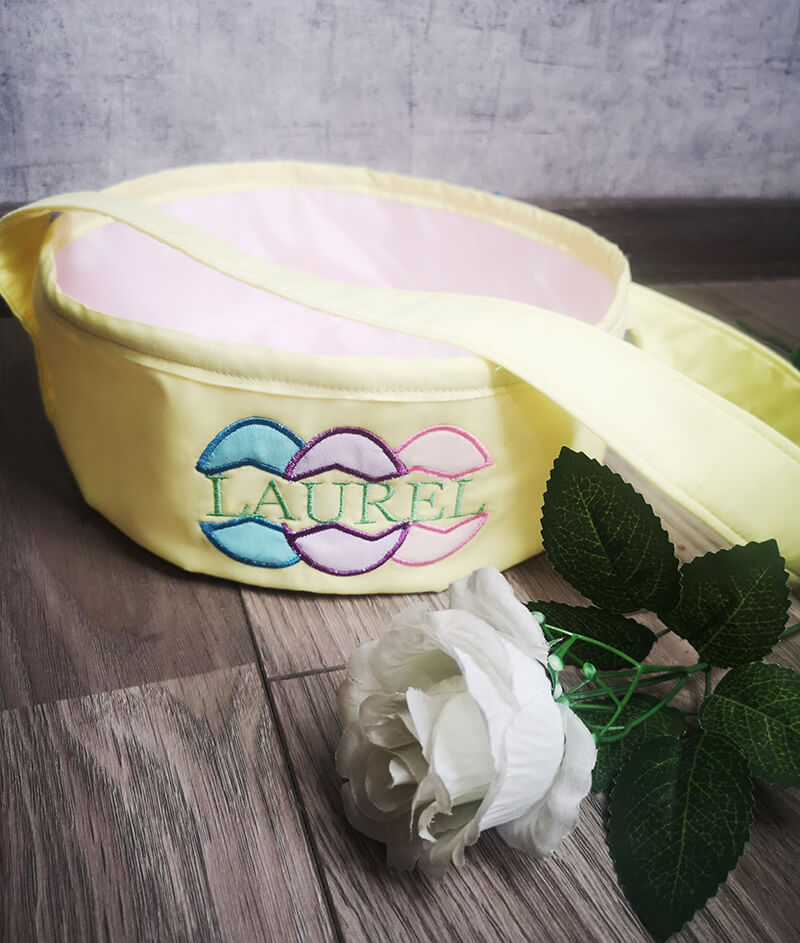
We hope you enjoyed this tutorial on how to sew an Easter basket from a bit of scrap fabric. The free PDF pattern and FREE appliqué design will help you create a one-of-a-kind Easter gift for someone special. If you have any questions, be sure to leave them in the comments section below and we’ll do our best to answer them. Happy Easter!
xo
Julie (and Dafhtne)
Want to remember this? Save “How to sew an Easter Basket and Personalize it with Your Embroidery Machine” on your favorite Pinterest board.