Disclosure: Some of the links on this site are affiliate links. This means that if you click on them and make a purchase, I may earn a small commission at no extra cost to you. Please know that I only recommend products and services I trust and use myself.
I’m very lucky to have a friend that REALLY supports my machine embroidery habit. She will wear literally ANYTHING I embroider for her. And – for that reason – I make her a lot of stuff. Knowing that she will rock whatever I stitch challenges me to do something that I’ve never done before. (Check out the bird dress I made a few years back…) And the projects keep getting weirder.
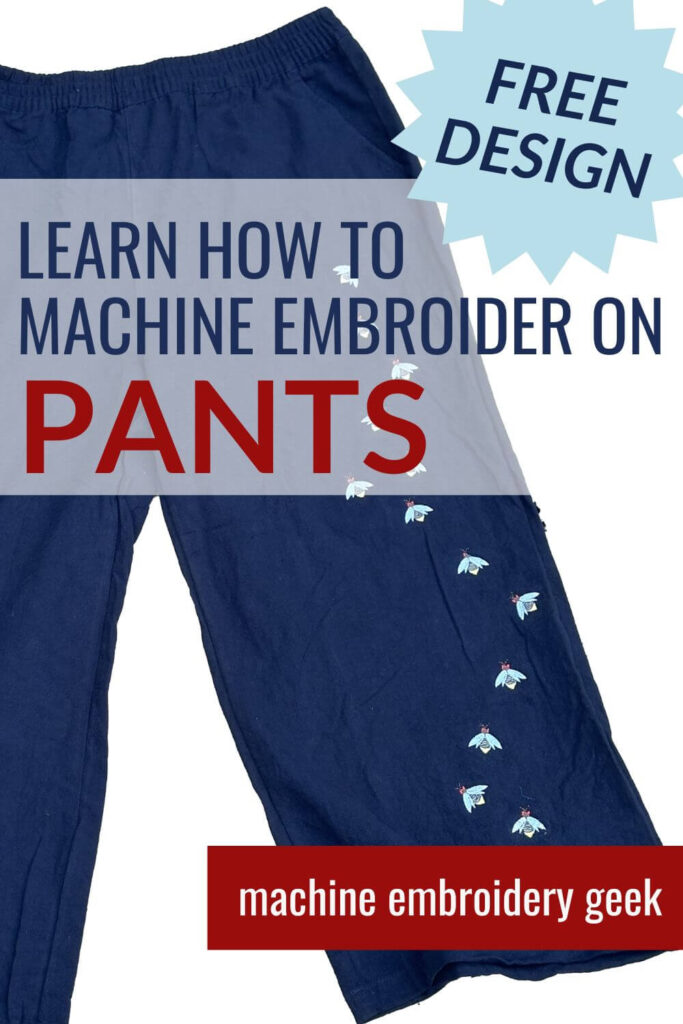
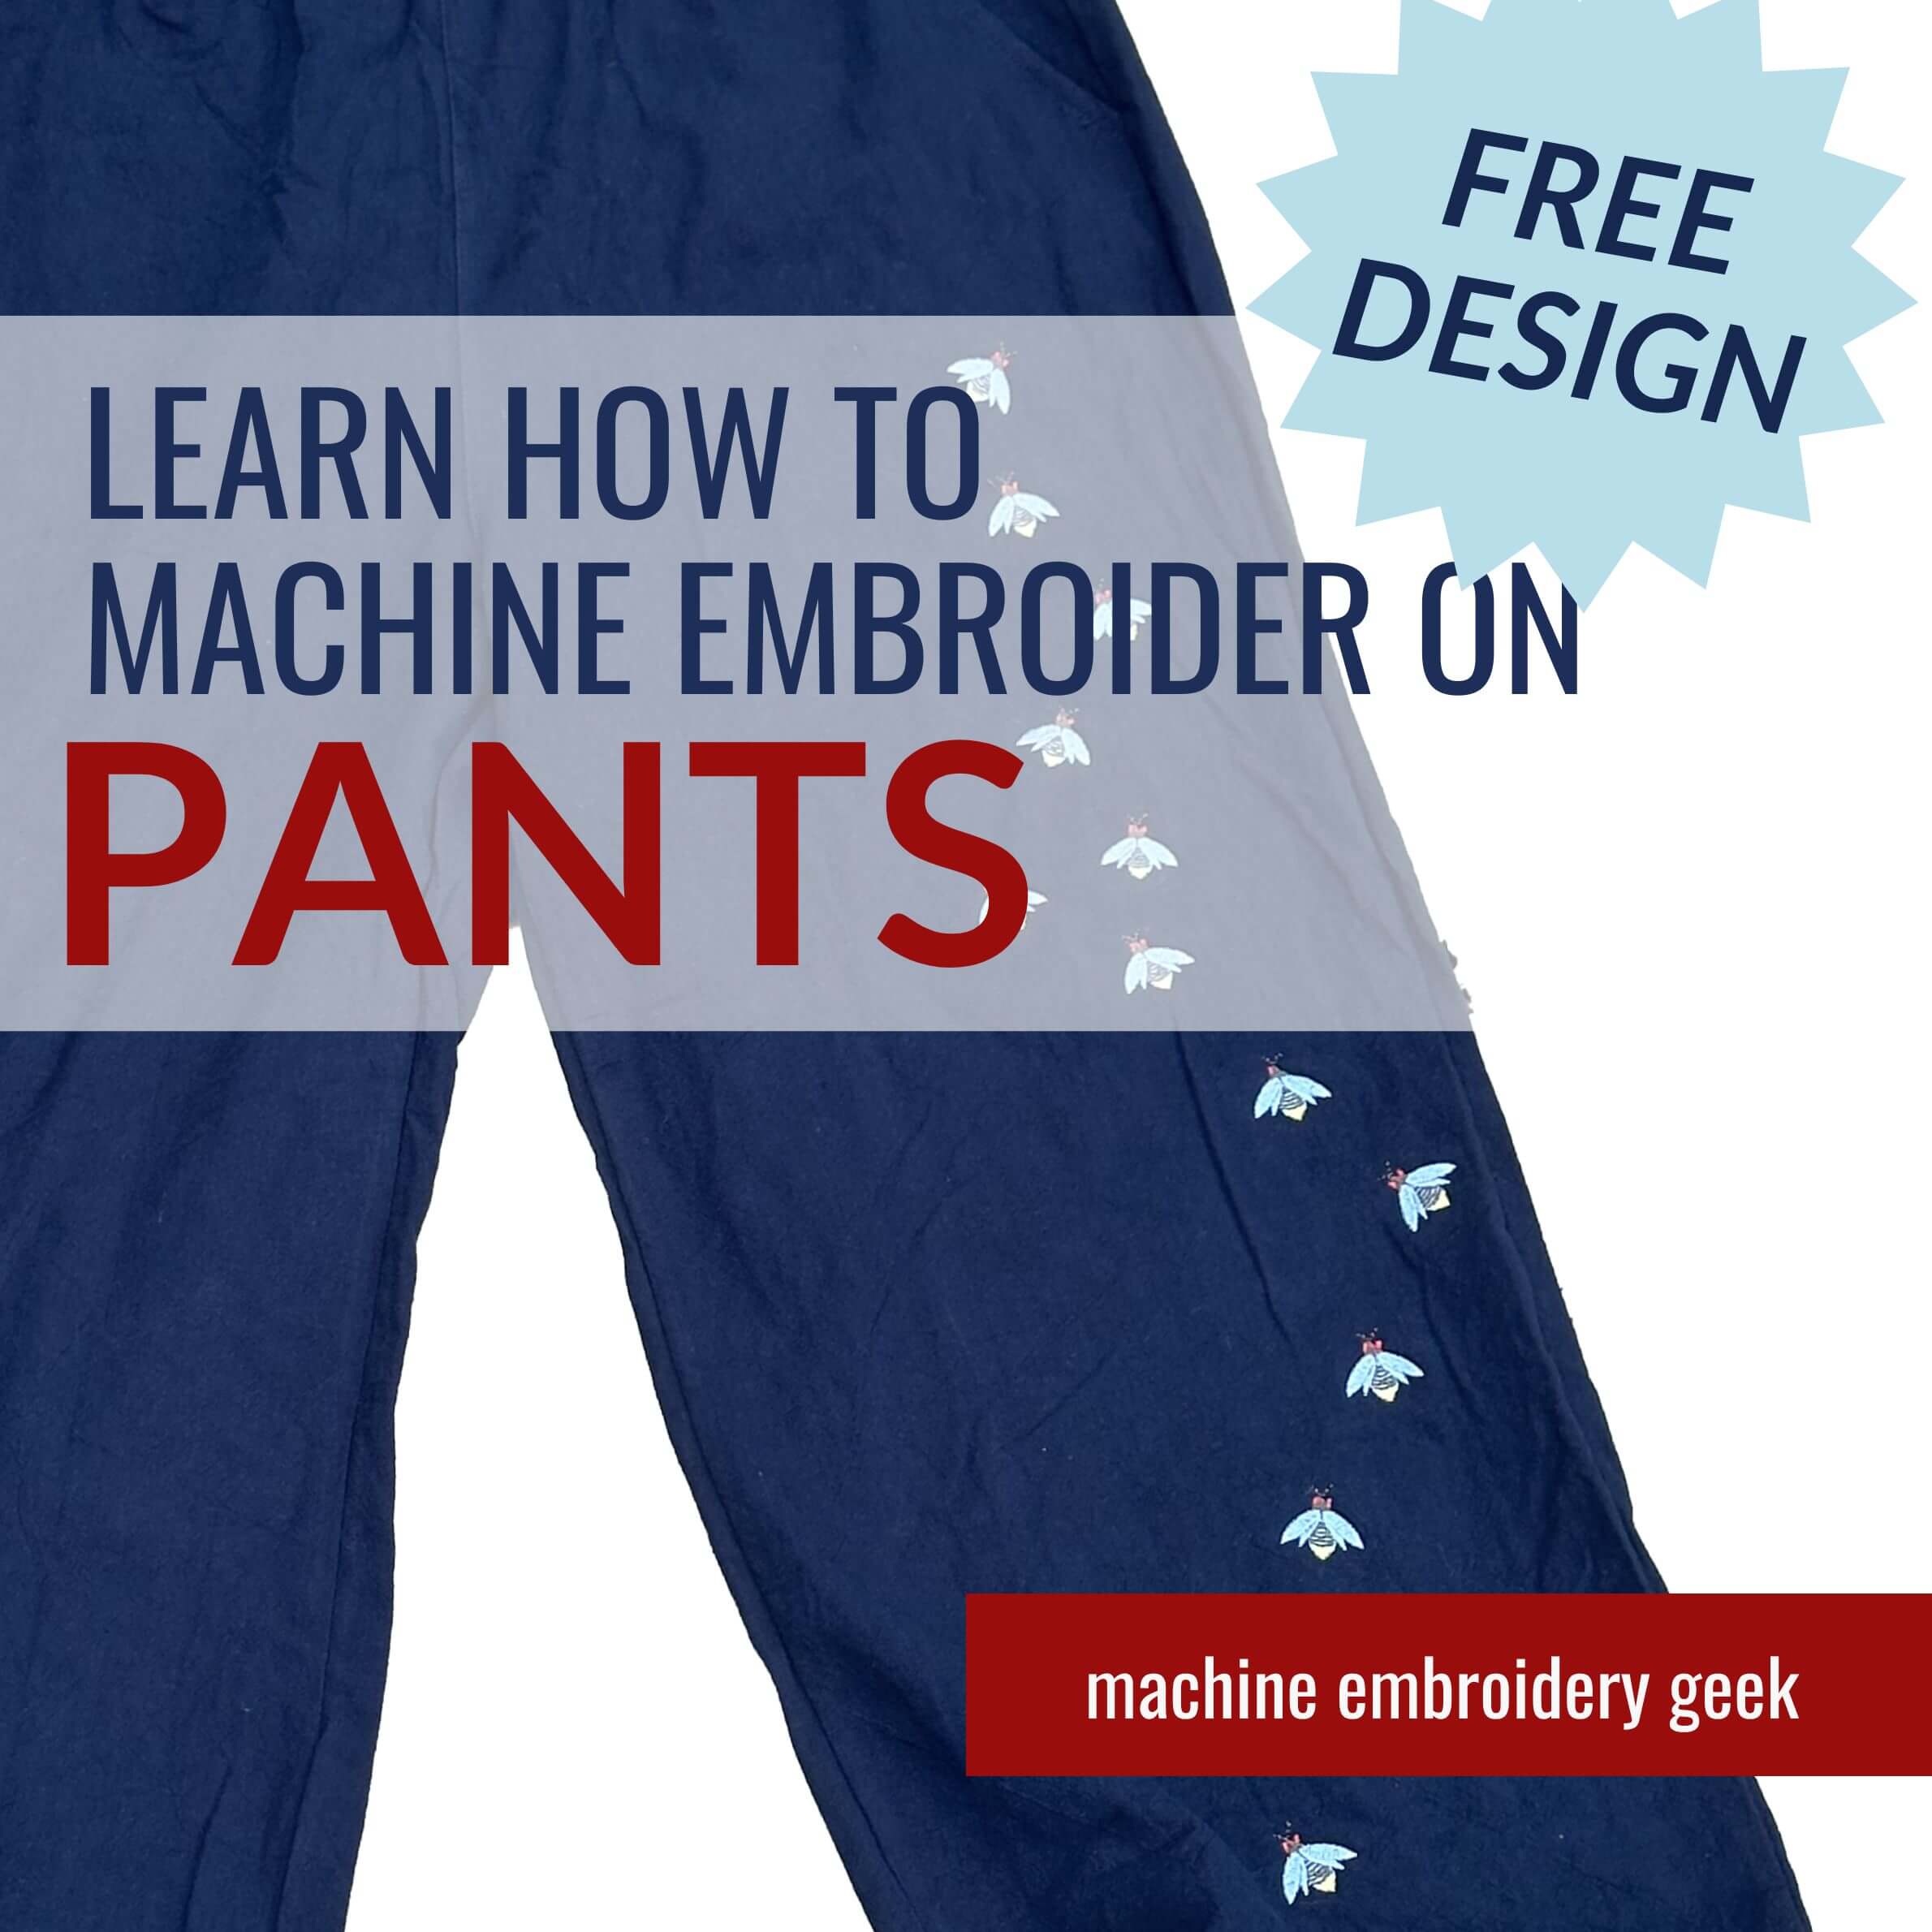
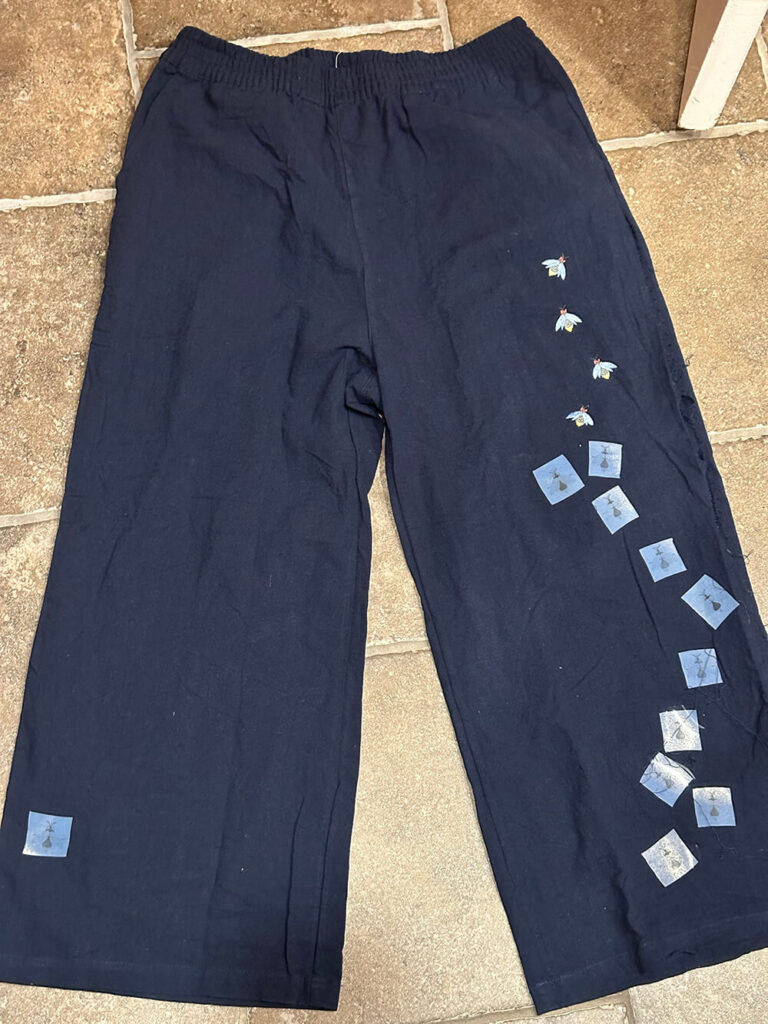
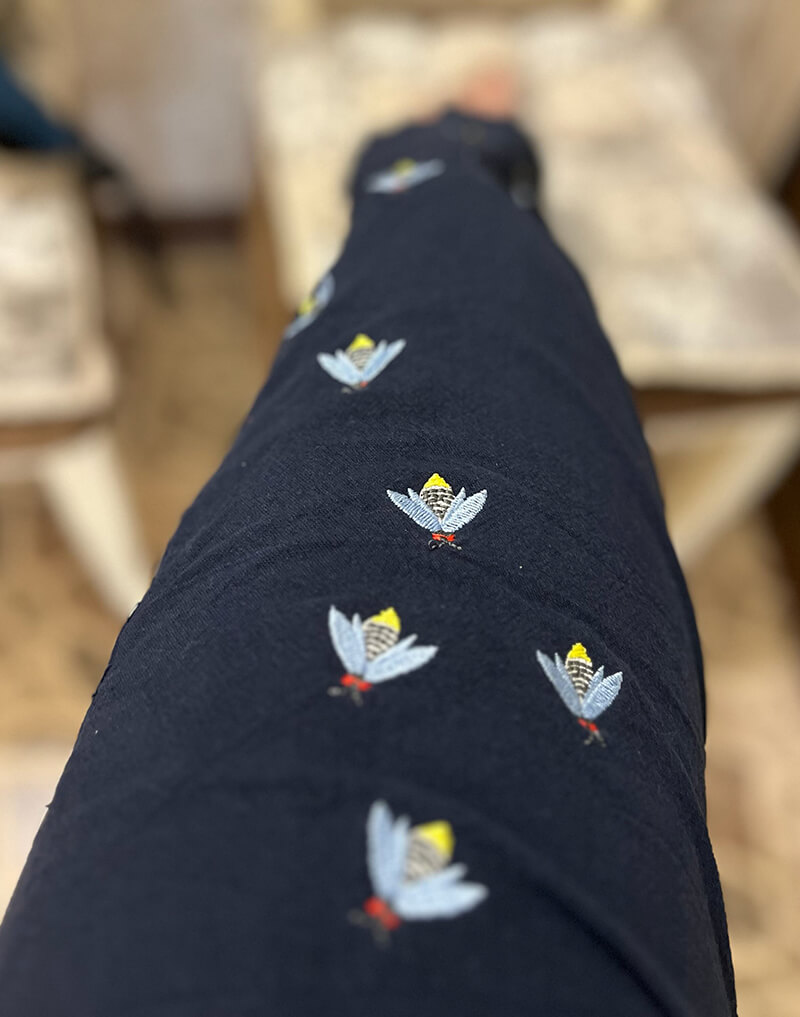
So… when her birthday came around this year – I decided to do something I have never done before…. machine embroidered pants! And – I’m not talking about a little embroidered detail here and there like the jeans I embroidered a while back – I’m talking about a leg full of embroidery. I wanted to stitch up an entire composition!
But what to embroider down the leg of the pants? Since these were lightweight, summer pants, I thought that stitching out a series of bugs down the leg might be kind of cute. But I couldn’t land on the right type of bug. Finally, one of my kids suggested – why not embroider a firefly?
I mean – how perfect? Fireflies are a quintessential symbol of summer. And – I just thought a swarm of these bright bugs flying up the leg of a pair of pants would be so fun and summery and totally unique.
Sound like fun? In this post – I’ll show you exactly how I did it. From creating the firefly embroidery design, arranging the designs and stitching them up – I’ll cover it all. Then – if you decide to make them yourself – you can head over to resource library, download the design and do it yourself.
Products mentioned in this post
- Lightweight cotton pants
- Embrilliance StitchArtist Level 3
- Firefly Design – available in the resource library
- DIME Print and Stick Target Paper
- Fusible poly mesh stabilizer
- Durkee EZ Frame (use the code JULIE for a discount)
So let’s get started. First I’ll show you how I created my firefly design.
Making the Firefly Design
Creating the firefly designs took a bit of thought. Since the final bug was going to be about 3/4″ – the design could not include too much detail. But it still needed to be simple and bold and instantly recognizable.
So I started with a simple, geometric sketch. I imported the image and recreated the shapes with the StitchArtist drawing tools. I kept the design fairly simple – including only five colors in the entire design.
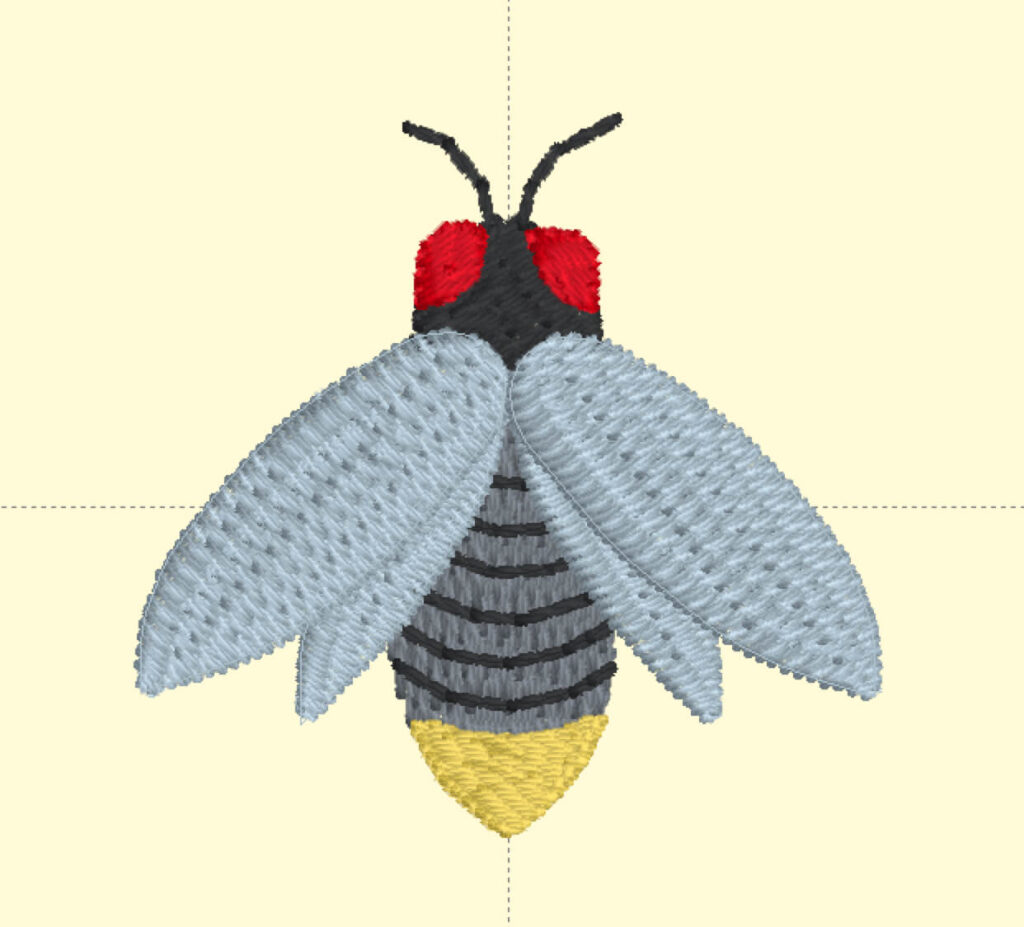
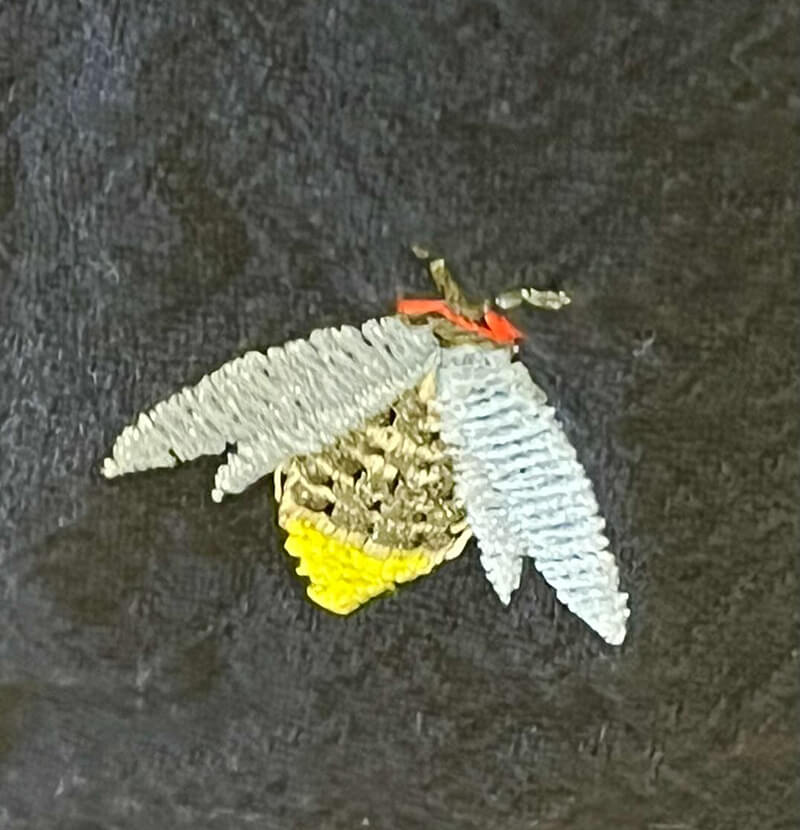
As always – before I stitched out my embroidery design on my final material, I did a test stitch. This also allowed me to assess the relationship between the thread colors and the background. Since I was stitching these on blue pants, I wanted to make sure the blacks and greys did not blend in too much with the background. So I made some adjustments to my thread colors before I settled on my final color palette.
Getting Ready to Machine Embroider Pants: Materials and Preparation
The pants I chose for this project were a light weight blue cotton fabric. Since they were summer pants so I didn’t want to work wtih heavy materials. However, you do need to pick a garment that is sturdy enough to hold up to a lot of embroidery like denim, canvas, or cotton twill.
To embroider on a pair of pants, it’s often easiest to open the seam so you can work on the fabric while it lies completely flat. Most pant legs are too narrow to fit comfortably in an embroidery hoop. So, I carefully unpicked the seam of one of the pants leg open with a seam ripper to create a broad, accessible surface that allowed me to place the designs exactly where I wanted them.
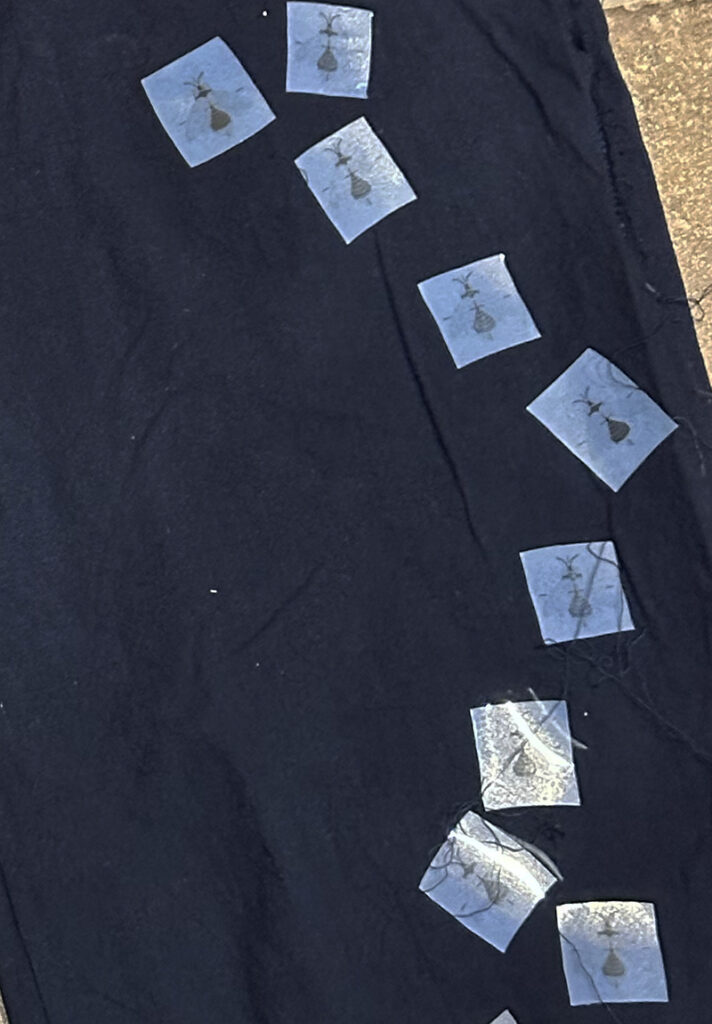
In order to visualize my composition, I decided to print out multiple instances of my firefly design on DIME’s Print and Stick Target Paper. If you want to create a layout like this – you export an image of your design from Embrilliance StitchArtist Level 3 and then copy and paste it multiple times on a 1-page PDF layout in Canva.
Once I printed out the designs on the sticky paper, I cut out individual fireflies. I then arranged them up the leg of one of the pants. The I added one stray firefly on the leg of the other pants.
Because pants are a wearable item, I followed the mantra “if you wear it, don’t tear it.” This means that you should use some type of permanent stabilization inside of your garments. These pants were pretty light so I didn’t want the permanent stabilizer to be too heavy and stiff. Instead, I cut out small pieces of fusible poly mesh and ironed them to the backside of the each location of the firefly which I was able to locate by sticking a pin through each centerpoint.
Then I set up my multi-needle embroidery machine with the five thread colors I needed to create the firefly design.
Choosing your method of embroidery
The method you use to stitch out your fireflies will depend on the type of embroidery machine you own. I am lucky to own a 6 needle machine so I could accommodate all the colors in the design on my machine at one time.
But if you don’t own a multi-needle – don’t fret – there is a way to do this project without hundreds of thread color changes. I’ll get to that in a minute. Here’s how I went about it.
Preparing to machine embroider pants
In addition to setting up all my threads on the machine, I also changed my hoop to one of my Durkee EZ Frame (use the code JULIE for a discount). I love these things and use them all the time. Instead of hooping the fabric – you simply adhere a piece of sticky back stabilizer onto the back of the frame. Then you peel away the paper on the top so that you can stick your project on top.
For this project – I just strategically stuck my pants onto the frame so that as many fireflies landed within the boundaries of the frame.

Embroidering on the pants
Before I started stitching each firefly, I moved my needle start position to the center of the bug and adjusted the rotation to match what I saw on the pants. Finally – I started stitching out the bugs one by one.
Lucky for me – the size of the Durkee frame would accommodate about 5 fireflies at a time. So, after I stitched out all the insects that fit into the frame, I simply tore the pants away from the stabilizer, patched the torn stabilizer and began the process again making sure that the poly mesh I had fused to the back of the each design did not bunch up.
Overall, the process went pretty quickly. I only had to rehoop the pants about 4-5 times.
Once I was done stitching, I simply trimmed back all the fusible poly mesh on the inside of the pants and stitched my pants leg back together.
How to machine embroider pants with several multi-colored design on a single needle embroidery machine
Now – here’s the moment you have been waiting for.
How would you do this project on a single needle machine without going totally insane changing thread colors a million times?
Here’s what I suggest. Cluster your fireflies. By that – I don’t mean move them around on the pants. Just look at the elements as a group. Take the transparent insert from your largest embroidery hoop and trace around it capturing as many instances of the fireflies as possible using a disapearrng ink pen. In addition, mark the center of the hoop. You will use these markings to determine exactly where to hoop your pants.
Then, translate that arrangement to your software. Duplicate the firefly and rotate each instance to match what you have laid out on the pants within the boundaries of the hoop you drew on the pants.
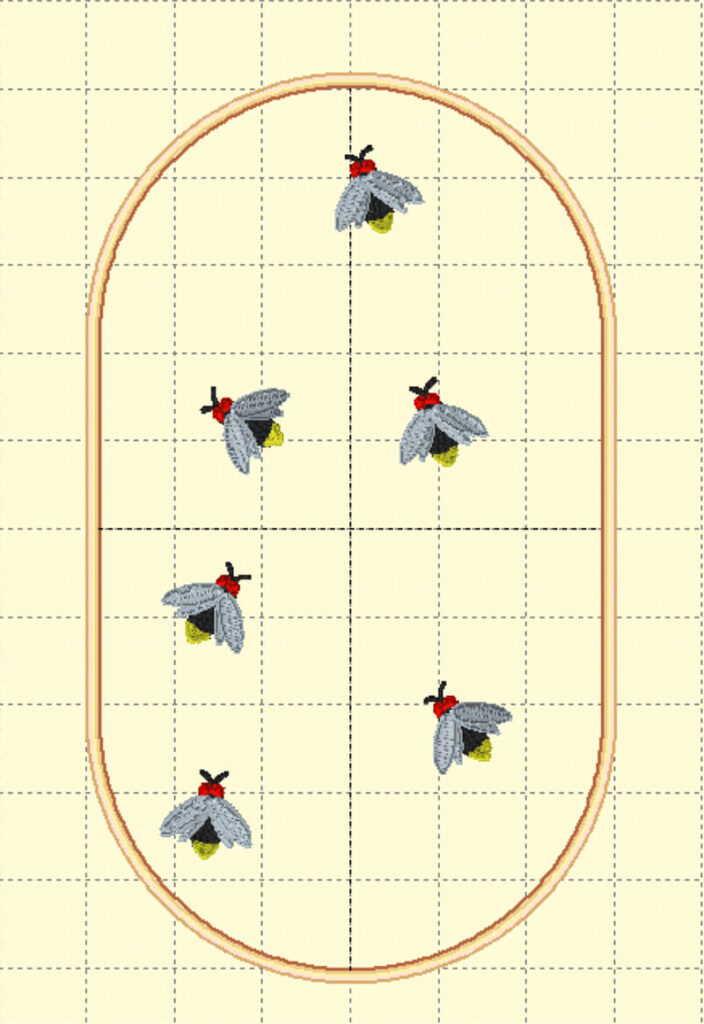
Before you export this composition and start stitching it out – you will definitely want to color sort your design. If you don’t color sort this design, your stitch order will look like this. For six fireflies, you would have 30 thread color changes!

After you color sort the design – you will only have 5 color changes.

I took these screen shots within Embrilliance Essentials as this program offers a color sorting feature. However, so does SewWhat-Pro.
If you cluster your fireflies in this manner, you should only have to hoop your pants about 5 times.
Ready to machine embroider pants?
So – what do you think? Are you feeling inspired to machine embroider pants? Head over to the resource library to download the free firefly design. Then be sure to share your finished work.
Happy stitching!
XO
Julie

Want to remember this? Save “How to embroider on pants” to your favorite Pinterest board