Disclosure: Some of the links on this site are affiliate links. This means that if you click on them and make a purchase, I may earn a small commission at no extra cost to you. Please know that I only recommend products and services I trust and use myself.
I often receive emails with machine embroidery questions, but this most recent one from Randi really got my attention. Wow! Newbies have a lot of questions!
“I received a Brother PE535 for Christmas last year and still haven’t figured out how to use it or get started. I was wondering if you know what I will need? What kind of thread do I buy? Is there a certain stabilizer I need is that what it’s called? Where’s the best place to get these items?”
Wow. I thought. Where do I even begin? Machine embroidery newbies sure have a lot of questions! But, it’s not surprising – there is just so much to know! I figured if my buddy, Randi, had these machine embroidery questions, so must others. So, I thought I would take a stab at answering Randi’s questions plus a few other ones that seem to come up quite frequently.
Products mentioned in this post
How do I set up my embroidery machine?
While every embroidery machine is slightly different, they all set up somewhat similarly. If you have a machine that is strictly for embroidery (and not sewing as well), then your setup is super simple.
If you have a sewing/embroidery combination machine, there are just a few parts you have to put together. There’s the main body of the machine (which looks a lot like a sewing machine), then there is the embroidery module, and finally you have the hoops. So, once you set up the main body of the machine, all you need to do is connect the embroidery module. There should be a fairly straightforward way that these two pieces attach. On my machine, they simply clip together and it’s pretty obvious when you have it in place due to the audible “click.”
If you have a purely embroidery machine like the Brother PE535 or the Brother 800. All you have to do is literally pull it out of the box.
To complete setup, all you have to do is to attach the hoop to the embroidery arm. On my embroidery machine, I have to pinch two buttons together on the hoop, then set it in place on the arm and then release the buttons to lock it. Again, it’s pretty easy to feel when you have it attached correctly as it clicks into place. Also, most machines will give you an error if you try to embroider anything with a hoop that’s not properly attached.
If you have a machine that is a sewing/embroidery combination machine, you will want to take a couple of additional measures. First of all, you need to make sure that the feed dogs are down. You also want to make sure you’re using an appropriate presser foot. An embroidery presser foot has a circle at the bottom of it whereas a regular presser foot is rectangular in shape. When you are embroidering, you will not need to use the pedal to make the machine start and stop.
Want to see how easy it is to set up and get started using an embroidery machine? Check out this previous post where I helped my buddy Rosselyn get her PE800 out of the box and start embroidering.
What stabilizer do I need? And do I need stabilizer at all?
Yes! You definitely need stabilizer. But the type that you need depends on what you’re embroidering.
A great rule of thumb is that “if you wear it – don’t tear it.” This means that when you embroider on most wearables, you should incorporate a permanent cutaway stabilizer. However, when embroidering on more durable materials, such as a canvas tote bag, you can probably get away with simply using a tearaway stabilizer. If you have never used stabilizer before, check out my previous post about the most essential stabilizers.
My personal preference is adhesive-backed tearaway stabilizer. I actually use it with almost everything I embroider, even when the project requires some type of cutaway. Learn more about why I’m such a fan of sticky-back stabilizer.
Where can I find embroidery files to stitch out on my embroidery machine?
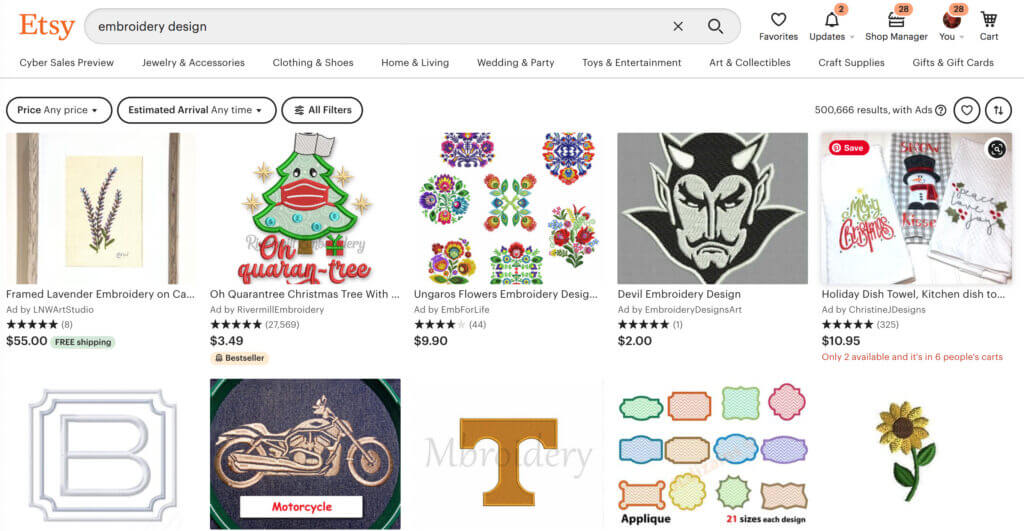
There are TONS of online shops that sell embroidery files. As digitizing software has become less expensive there are more and more digitizers now offering embroidery designs. And the designs have gotten more and more creative and unique.
Etsy is a great resource for finding embroidery designs. Even digitizers with big followings typically have a store on Etsy, so it’s a good way to sample a lot of different digitizer’s designs. Just read the instructions carefully to make sure that the design you are purchasing comes in the size that will work in your hoop. I, personally, always try to create a version that will work in a 4“ x 4“ embroidery hoop because I know many embroiderers are limited by the size of their hoop.
Also, check out the format the designer is offering the design in, and make sure it will work on your machine. If you don’t see the format you need listed, you can reach out to the digitizer to see if he/she can convert it for you. Or, you can convert the embroidery design yourself.
Hot tip! Before you go too crazy buying embroidery designs, you may want to check out try out some free machine embroidery designs while you on your skills.
What file embroidery file format does my machine take?
Yes, unfortunately there is not one standard embroidery file format. Different types of machines take different embroidery file types.
So, how do you know what format your machine will read? Check out this previous post about embroidery file formats to learn what file type you will need for your specific machine.
Another option is to download a set of embroidery designs that includes a variety of file types. Then load all of them on your flash drive and plug it into your machine and see which one comes up.
How do I get the embroidery design onto my embroidery machine?
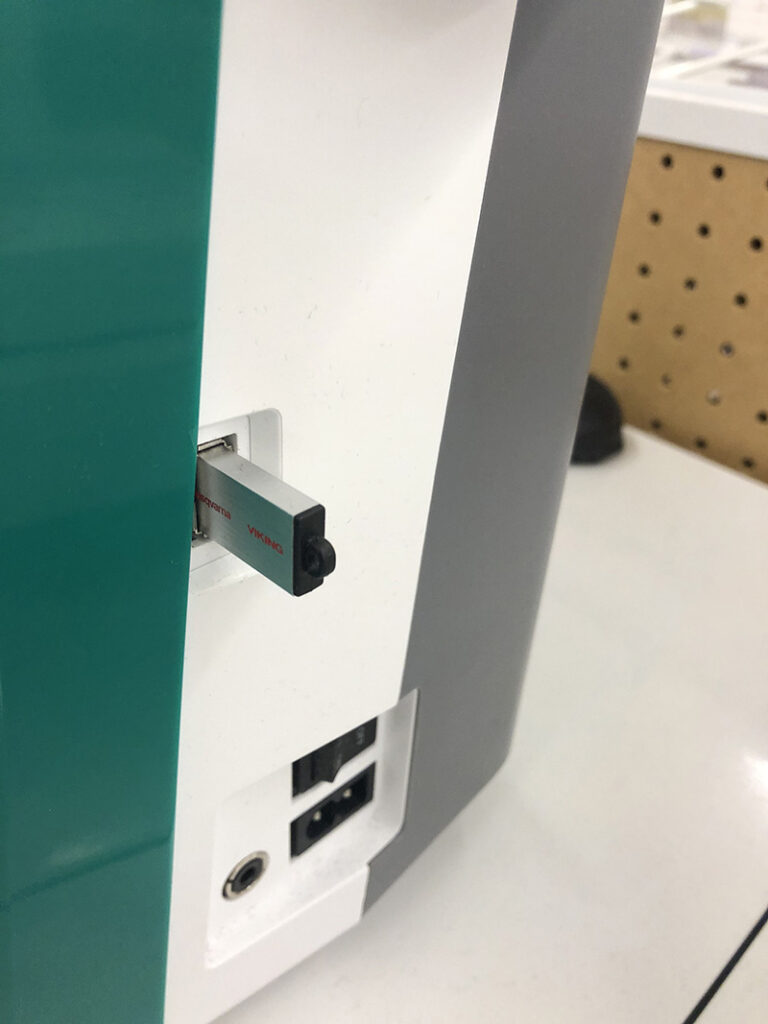
Most embroidery machines have USB ports where you can plug in a flash drive. After you purchase the embroidery design, you uncompress it to reveal all of the different file formats. Then, save the file format you want on your flash drive and then plug it into your machine. Learn more about how to get embroidery files onto your embroidery machine.
Generally, any flash drive will work on most embroidery machines. However, since embroidery files tend to be quite small, a lower capacity flash drive tends to work better on many embroidery machines.
Where what type of bobbin thread do I use with an embroidery machine?
For regular machine embroidery, (in most cases), you will want to use bobbin thread designed especially for machine embroidery. This is one of the nice things about machine embroidery; when you change thread on top, you don’t need to change the bobbin thread.
In fact, ideally, more of your top thread should be pulled onto the back of the item you were embroidering and you should never see the bobbin thread on the top of your embroidery.
How do you know what the colors should be in a design, and when do you switch colors?
A digitizer usually includes a text file with their design files explaining all of the different color stops and suggested colors for each stop. Of course you do not need to use the color suggested. However, if the embroidery design is photo-realistic, and you want to recreate that effect, you should use the color suggestions as dictated by the digitizer.
A single-needle embroidery machine will pause for each thread color change. When the machine pauses, you have the opportunity to change your thread color.
What tools and accessories do I need besides my embroidery machine?
Fortunately the extra tools that I think are most useful are not very expensive. Probably my two favorite tools are in most used are my appliqué scissors and my embroidery nippers. I also frequently use a metal ruler and disappearing ink pens. Oh – and I also highly recommend a thread stand so that you can embroider with big spools of embroidery thread.
How do I get my garment onto my hoop?
There are basically two ways to do this; you can either hoop it or float it. Hooping it means that you actually secure the garment with the stabilizer in the embroidery hoop. This has the advantage of being quite secure.
Unfortunately, it’s not always possible to hoop everything you want to embroider. When this is the case, you can float. Floating means that you hoop the stabilizer and then stick your garment to the stabilizer either using temporary adhesive spray or by using adhesive-backed tearaway stabilizer.
How do I position my garment on or in the hoop so that the design is not crooked?
My favorite trick is to use the folding method, to center and align embroidery designs on just about anything. But, other people prefer gadgets like the perfect placement kit to help position items before embroidering.
Can an embroidery machine be used for regular sewing?
Yes and no. You can’t use an embroidery machine to sew like you would use a regular sewing machine unless it is an embroidery / sewing combo machine like the Brother SE600 and you use it in sewing mode.
Another way that an embroidery machine “sews” is in the construction of in-the-hoop projects. These are items which can be made entirely in your embroidery hoop. The in-the-hoop file has layers of stitching set up that attach various pieces of fabric together to make a finished product.
Still confused?
Check out my new e-book and design set: “Machine Embroidery Quick Launch” where I take you step-by-step through some easy machine embroidery projects and provide you with the designs to do it! Once you master these three projects, you’ll be ready to take on anything.
Good luck and happy stitching!
xo
Julie
[do_widget id=custom_html-64]
Want to remember this? Save “10 Common Beginner Machine Embroidery Questions” on your favorite Pinterest board